The coronavirus pandemic of 2020 has forced many of us to sit down and re-evaluate how we do business. Do our companies meet the needs of the changing environment? Are we still relevant to our customer base? And can they still access our services when there is a lockdown or other barrier? Unfortunately, unexpected events can happen, and they can be detrimental to business. That’s why many companies seek to renew their commitment to technology solutions and invest in IT modernization.
What is IT modernization, and why does it matter?
Planning for the future is an essential part of every business, no matter whether you own a small café or an international firm, and technology is a massive part of that. In light of the COVID-19 pandemic, this trend only accelerated. 66% of businesses completing IT modernization initiatives that had previously faced resistance, while 55% made a commitment to implementing IT changes as part of a long-term strategy.
While COVID-19 might be a once-in-a-generation event, or perhaps not, it is a stark reminder of how swiftly things can change. In 2020, the IMF estimated a downturn of 4.4% in the world economy with many countries in recession, and this dramatically impacts businesses of all sizes.
Keeping your business relevant often means onboarding innovative solutions, such as IT infrastructure modernization. But what does that phrase mean exactly? Undoubtedly, every business doesn’t need a high-spec tech stack to back it up. Well, yes and no. Not every company requires ultra-modern solutions, such as blockchain, to help them function, but IT modernization can be utilized by almost all businesses.
Why are modern applications the backbone of IT modernization?
So, then, how can IT infrastructure modernization help your company, and why exactly are modern applications the backbone of IT modernization? Nowadays, it seems there’s an app for everything from checking your email to reviewing orders to making a purchase online. Chances are your business could benefit too. Modern applications can come in many shapes and sizes, from an app that lets your customers make purchases from you to back-end services that make your company more productive. There’s a solution to (almost) every issue. Whether you need help with business analysis, automation of paperwork processes, or something truly unique, IT modernization can help.
How does IT modernization look in your industry?
Let’s take a look at some of the modern IT infrastructure modernization solutions being implanted in a number of spheres.
Retail
From a handy app that lets your customers make purchases from the comfort of their homes to stock-taking in your warehouse to the latest try-on technology, retail has gone digital. Shopping is no longer just an in-store experience, and your employees are no longer just cashiers.
The entire experience has gone digital, and your customers expect more. Whether this is about creating a unique online experience or upgrading your brick and mortar in-store experience to ensure it is safe and comfortable, IT modernization is one way to go about it.
Real-life example. See our case study on an OKR application for a retailer and learn how we modernized their objectives and fundamental results framework.
Services
The services industry is growing across all business areas. One online video streaming platform reported growth of 2.2 million paid subscribers in Q3. A well-known online mega-store told of its $96.1 billion revenue for the same Q3 period. And these are not just digital unicorns. Growth of digital services rocketed during the pandemic, and that trend seems to be continuing. Even online education is benefiting, with a market value estimated at $350 billion by 2025. Many companies are stepping back to revaluate how their services can be adapted to the digital world or how IT modernization can improve their current operations.
Real-life example. Discover how we used IT modernization to boost online learning communication on Web, iOS, and Android platforms.
Logistics
In a post-COVID-19 world, logistics could not be more critical. Getting goods and services to where they need to be when they need to be is essential. Despite a downturn in air travel, the need to ship goods from one place to another hasn’t changed. The market remains global. So, how can a company stay relevant and plan for the future with logistics? Modern IT solutions help companies to safely, securely, and swiftly transport goods from one place to another. By monitoring the logistics process, businesses can optimize the supply chain and make improvements to overall efficiency.
Real-life example. Explore our innovative solution for an air service provider to deliver automatic flight information that meets the highest safety standards.
Other
Above we told of some of the industries that we’ve worked with in IT modernization, but that doesn’t mean if your sphere isn’t listed that improvements are not needed. Upgrades in technology can be beneficial to almost every area. The only limitation is the desire to improve.
Three top tips for successful IT modernization (no matter your business)
IT modernization might be a modern-day business essential, but that doesn’t mean diving in head-first is the best way to go about it. Here are the best tips for getting your IT modernization project off on the right track.
1. Have a plan
Like all areas of business, upgrading the IT stack requires planning. Failure to plan usually means planning to fail, so before you get going, it’s time to set out your IT modernization roadmap. This outlines the areas of your business you aim to improve and precisely how you want to improve them. Doing so allows you to reasonably plan out your IT improvement plan and its implementation. It also allows you to adjust your expectations – change won’t happen overnight – and think IT modernization long-term.
Areas to consider:
What processes can be optimized?
Which areas of my business can be automated?
What are my competitors doing right now?
Which areas of my business could stand to be upgraded?
What resources and tools do I currently have available?
Is my team ready for change?
2. Don’t forget about legacy software
Chances are that your company currently has some tools, software or solutions that they are currently working with. Whether this is a project management tool, time tracker, or old application, what this means is that you have legacy software. Before starting your IT application modernization journey, it’s time to take account of what you already have and evaluate how you can upgrade or rebuild.
For many companies, one of the key concerns is data and data protection. This means that when choosing to upgrade, you need to first consider how you can incorporate and take care of legacy software and data to ensure your new solution is up to the task and your IT remains secure.
Areas to consider:
What software or tools do I currently have on hand?
How do these meet my current needs/expectations?
Do I deal with data and data protection?
Do I want to start from scratch or rebuild what I currently have?
3. Make IT modernization integral to your business
In no circumstance should IT modernization happen for modernization’s sake alone. Conversely, it should be an integral part of your overall business and help you move forward in your aims. The most successful solutions out there are not always the most glamorous. However, they solve vital business issues.
For example, this can be optimizing data collection from form filling or tracking your products movement from A to B to improve the supply chain. Perhaps, you need a Big Data solution that tells you more about your customers to drive the business forward. However, no matter what it is, the solution you engage should be directly tailored to your company and its needs, no one else’s.
Areas to consider:
What direction is my business moving in?
What do I need to move forward?
Which solutions have industry competitors engaged, so far?
How can I get my team on board?
What does IT modernization mean for the overall scope of my business?
IT modernization round-up
Worldwide, more and more companies are choosing to upgrade their technology stack with modern solutions designed specifically to solve modern problems. Right now, the question is not if you should upgrade. It’s how and when. But, before taking the first steps into IT modernization, it’s vital to take a step back and evaluate the most effective way for your business to engage modern applications to get the maximum results.
Nowadays almost all businesses depend on applications in one form or another. Those who don’t will hardly survive the competition unfolding in the digital era.
However, simply running an application is not enough to actually succeed. The challenge that many companies are currently facing is that they use legacy applications, which were created for a different world and aren’t of much help for their users now. The flexibility of those apps is so negligible that they can’t integrate with systems of the digital age. And that’s, by the way, exactly what they are supposed to do.
So, ‘what’s the move?’, you may ask. Fortunately, an urgent need for smooth-running, high-performance internal processes can be covered with application modernization.
WHAT IS APPLICATION MODERNIZATION?
In a nutshell, application modernization is the transformation of a legacy app for its better alignment with an organization’s requirements.
There are various options for applications to be modernized – from relatively simple rehosting to complete rebuilding.
Making up your mind on which approach to go with, as well as looking for a reliable vendor takes some time, but it’s definitely worth it. So if you’re still lacking the application modernization initiative and don’t understand why fix something that isn’t broken, check out the reasons we’ve zeroed in on.
WHY INVEST IN APPLICATION MODERNIZATION?
Cutting operational costs
Operational costs optimization is perhaps one of the biggest drivers for modernizing business applications. Today more and more companies are adopting the Software as a Service (SaaS) model because it enables them to centrally host their apps for a subscription. Such an approach tends to be really tempting for many businesses since they get access to a plethora of new features as well as don’t have to carry the burden for keeping applications running 24/7.
Overcoming compatibility issues
Many applications still lean on archaic infrastructures, outdated programming code or operating systems – and sometimes on people who are no longer available to maintain them. Consequently, it requires a lot of resources to make these old-fashioned apps compatible with new technologies, modules, and tools. Another crucial detail that often slips our mind, is that time spares no one. Just like everything else, applications age on a permanent basis. Please, don’t deceive yourself into thinking that at some point your app can’t be “more legacy,” because it can and it surely will. And while applications are inexorably aging, the effort put into converting them to new and more efficient ones is – inevitably – going up along with the cost of that process.
Meeting integration and scalability challenges
Legacy apps are often difficult to change and expand to greater capabilities because of the outdated technology stack or/and overcomplicated inner architecture. A minor update can lead to multiple conflicts across the system. If even one component of an app has load and performance problems, it may become necessary to scale up the entire app only to serve this single component. As long as such a process requires a lot of time and effort from an IT team, needless to say, that adding even the teeny-tiny feature to your app will end up in a huge waste of money. Therefore, your application needs to be capable of handling integrations in a manner that does not break your processes.
Contributing to your employees’ satisfaction.
A good employee is the one who’s satisfied with their job. There’s a bunch of things that contribute to employees’ satisfaction. However, dealing with legacy applications is merely one of them. People don’t want to stay with a business that insists on maintaining the status quo. Instead of working with user-unfriendly technology that doesn’t cover the latest UX/UI standards or device specifics, some employees are more likely to look for better opportunities within other companies. The others, meanwhile, will struggle to use outdated and clumsy applications efficiently, which can significantly slow down the operations.
Making your applications future-ready
Application modernization can become the first step for your company to adopt cloud technology. If you think that to take full advantage of the cloud, it’s enough to simply lift-and-shift your applications there, think again. Legacy applications can only function in the cloud to a certain extent, which eventually results in ever-growing performance problems rather than solutions for your business – problems that your IT team will have to solve instead of focusing on more important errands. Not only will it deprive you of the possibility to access greater functionality at a minimal cost but also fail to meet your employees’ expectations and make them feel frustrated. So before spending tons of money over nothing, it’s better to make your applications cloud-ready in advance and let your business leverage all the possibilities that the cloud environment entails.
Improving decision-making through innovation
Meeting the needs of today’s business is barely possible without using real-time data. Application modernization addresses this issue by installing analytics into the application so that employees can operate with the information or KPIs whenever they need it.
Increasing agility
Business success depends on how fast you can respond to the market challenges and how long it takes you to adopt new technologies. Modernization opens up a number of opportunities for the team to be more efficient. For example, they’ll have access to the system from anywhere, anytime. Furthermore, with a modernized system, you will be able to develop and launch new products quicker than ever before. Scaling and sustaining agility is not just crucial but the only possible way to gain customers’ loyalty and competitive advantage.
Unlocking hidden value
After having been modernized, no-longer-obsolete applications are able to perform adequately within the modern digital ecosystem. You’ll get new opportunities for unlocking value in data analysis and workflow through interactions with Artificial Intelligence (AI) and other groundbreaking tools. Whether to leverage them or not is up to you, but isn’t it heartwarming to have an ace up your sleeve?
MAKING ALL THE DIFFERENCE
Since cutting-edge technologies firmly settled in literally every pocket, we’ve had neither a chance nor an option to ignore them, because the moment we do, we’ll be replaced by our more advanced competitors.
Running a business in a usual, ‘orthodox’, the way is far from a great choice. Business applications have to keep pace with the technology changes and easily embrace the latest and greatest features to help run the business in an effective manner.
So why are you waiting?
Get in touch with our experts now to find out more about how modernization can drive your company success.
The focus of the final part of this article is not dedicated to the methods of application performance improvement through multithreading. Instead, it examines its degradation using methods of thread synchronization. However, in this case, the application performance degradation is essential, since the processing of the same data in asynchronous threads may lead to unpredictable results and the application will perform poorly.
If you are interested in ways of creating multi-threaded applications in .NET, we invite you to read Part 1, Part 2, and Part 3 of the article.
Why is thread synchronization essential?
Thread synchronization is essential in the case when the same resource (a variable, an object, data source or a file) which is common for the whole application, is used by several threads synchronously as provided in the code below.
using System; using System.Threading; namespace NonSyncExample { classProgram { static int x = 0; // Function, that is sent to a thread public static void Count() { x = 1; for (int i = 1; i < 9; i++) { // In this cycle x is increasing by step = 1 Console.WriteLine("{0}: {1}", Thread.CurrentThread.Name, x); x++; // This operation is executed by 5 threads, so x will have an unpredictable value Thread.Sleep(100); } }
static void Main(string[] args) { for (int i = 0; i < 5; i++) { Thread th1 = newThread(Count); th1.Name = "Thread " + i.ToString(); th1.Start(); }
Console.ReadLine(); } } }
In this example, the variable “x” is common to all five threads ( five threads of Thread class, the Main thread does not perform the Count method()). The Count method searches “x” variables from 1 to 8. But the Count method itself is evoked in five threads. The threads will switch during the application performance. In this case, the “x” value will be unpredictable.
The Lock operator
The Lock operator limits the other threads access to the resource of the other threads, while it is used by the the current thread. The Lock operator identifies the code block which can be referred to by only one thread at any specific moment.
using System; using System.Threading; namespace LockExample { classProgram { // door is an object which can be locked then thread process it // and it will be released then thread is finished his work on it static object door = new object(); static int x = 0;
public static void Count() { lock (door) { // in this section code will be executed by only one thread at the moment x = 1; for (int i = 1; i < 9; i++) { Console.WriteLine("{0}: {1}", Thread.CurrentThread.Name, x); x++; Thread.Sleep(100); } } }
static void Main(string[] args) { for (int i = 0; i < 5; i++) { Thread myThread = newThread(Count); myThread.Name = "Thread " + i.ToString(); myThread.Start(); }
Console.ReadLine(); } } }
An object is issued to the lock operator as a parameter. It can be both a specific variable of the Object type and This – a reference to an object of the current class. The object is locked up, when the code performance reaches the Lock operator. Only one thread gets exclusive access to the object during the lock-up. Another thread can “capture” the object issued to the Lock and get exclusive access to it, when the object is released.
The performance of the monitor objects of the System.Threading.The Monitor class is similar to that of lock operator. Moreover, the lock uses the Monitor in its performance. An example of Monitor performance is provided below:
using System; using System.Threading; namespace MonitorExample
{ classProgram
{ static int x = 0; static object door = new object; public static void Count()
{ Monitor.Enter(door); try
{
x = 1; for (int i = 1; i < 9; i++)
{ Console.WriteLine(“{0}: {1}”, Thread.CurrentThread.Name, x);
x++; Thread.Sleep(100);
}
} finally
{ Monitor.Exit(door);
}
} static void Main(string[] args)
{ for (int i = 0; i < 5; i++)
{ Thread myThread = newThread(Count);
myThread.Name = “Thread “ + i.ToString();
myThread.Start();
} Console.ReadLine();
}
}
The Monitor.Enter() method takes an object as a parameter, just like the Lock operator. The object is blocked, giving access for one thread only. There is a code block in the block try, which is performed by only one thread at any specific moment. The block finally releases the object which was issued to the monitor by means of the Monitor.Exit method() in order to make it accessible to other threads.
The Monitor also provides several methods of lock management:
Wait() unlocks the object and transfers the thread to the wait queue, which allows the next thread from the queue to lock the object;
Pulse() allows the thread to release from the wait queue and lock the object;
PulseAll() allows all of the threads to release from the wait queue and transfer to the ready queue, where one of the treads will be allowed to get the object locking.
This class is a Wrap over WinAPI events. It allows the sending of signals from events to objects, which control the threads synchronization. At the same time, the object AutoResetEvent switches from the non-signal state to the signal state and functions as the sender and the receiver of these signals.
using System; using System.Windows; using System.Windows.Media; using System.Windows.Media.Imaging; using System.Threading; using System.Windows.Threading; namespace MyApp
{ public partial classMainWindow : Window
{ AutoResetEvent ewh; public void consrenew()
{ this.Dispatcher.BeginInvoke(DispatcherPriority.Normal,
(ThreadStart)delegate() { Cons.Text = “City at night”;});
ewh.Reset();
ewh.WaitOne();
}
After creation of the variable of AutoResetEvent type, we may specify that initially the object will be in non-signal or signal state by having transmitted to the constructor true or false.
The ewh.Set() method notifies all of the waiting threads that the object autoResetEvent is in the signal state and one of the threads can capture this object.
The ewh.WaitOne() method locks the object autoResetEvent and prevents other threads’ access to it, until the Set() signal arrives.
The methods WaitAny and WaitAll can be used, if the program uses several objects of the AutoResetEvent. These methods take as a parameter, the array of the AutoResetEvent objects.
The ewh.Reset() notifies all of the threads that the autoResetEvent object is captured by another thread.
In the example above, the access to the WPF application interface (API) and the WPF from another thread is used by means of Dispatcher and the button Cons which is assigned the name “City at night”. After the assignment operation, the reset of the signal state AutoResetEvent occurs by evoking the ewh.WaitOne () function; then the thread performance is suspended until the button Cons is pushed. After the Cons button the thread is signaled by means of the ewh.Set () method and the thread performance continues.
AutoResetEvent performs the method Reset() automatically as soon as the object autoResetEvent is captured by another thread. It is its main advantage over the ManualResetEvent, where the method Reset is to be evoked manually. Otherwise, the AutoResetEvent and ManualResetEvent perform the same methods of thread synchronization by means of events and signals.
Mutex
The System.Threading.Mutex type is a wrap over the object WinAPI Mutex.
using System; using System.Threading; namespace MutexExample
{ classProgram
{ static Mutex mutex = new Mutex(); static int x = 0;
public static void Count()
{
mutex.WaitOne();
x = 1; for (int i = 1; i < 9; i++)
{ Console.WriteLine(“{0}: {1}”, Thread.CurrentThread.Name, x);
x++; Thread.Sleep(100);
}
mutex.ReleaseMutex();
}
static void Main(string[] args)
{ for (int i = 0; i < 5; i++)
{ Thread myThread = newThread(Count);
myThread.Name = “Thread “ + i.ToString();
myThread.Start();
} Console.ReadLine();
}
}
There are only two Mutex methods for thread synchronization: the mutex WaitOne() method suspends the thread performance until the method mutex.ReleaseMutex() is evoked.
However, Mutex can be used not only as the thread synchronization object but also for synchronization between processes. For instance, an application for only one run can be created.
using System; using System.Reflection; using System.Runtime.InteropServices; using System.Threading; namespace SingleAppExample
{ classProgram
{ static void Main(string[] args)
{ bool exist; // we get GUID applications string guid = Marshal.GetTypeLibGuidForAssembly(Assembly.GetExecutingAssembly()).ToString();
Mutex mutex = newMutex(true, guid, out exist);
if (exist)
{ Console.WriteLine(“App is working”);
} else
{ Console.WriteLine(“App is already working. And this copy will be closed now.”); Thread.Sleep(5000); return;
} Console.ReadLine();
}
}
}
The overloaded constructor is used when the Mutex object is created.
The first parameter identifies whether the invoking thread must be the primary operator of the Mutex.
The second parameter receives the unique identificator guid obtained as a GUID application (application unit linking) of .NET.
The third parameter existed of the bool type returns true, if the mutex object has been requested and received successfully. In this case, the Mutex will be requested and received successfully only once. When the second copy of the application is run, it will be closed in 5 seconds.
Semaphore
The System.Threading. Semaphore type is a wrap over the WinAPI Semaphore object. The Semaphore limits the access to the common resource only for a certain number of threads. Only one semaphore can be created in the application, as its constructor is declared to be static.
using System; using System.Threading; namespace SemaphoreExample
{ classReader
{ staticSemaphore sem = newSemaphore(5, 5); Thread thr; int n = 5; // reader’s visit counter
Console.WriteLine(“{0} leave the library”, Thread.CurrentThread.Name);
sem.Release();
n–; Thread.Sleep(500);
}
}
} classProgram
{ static void Main(string[] args)
{ for (int i = 1; i < 10; i++)
{ Reader r = newReader(i);
} Console.ReadLine();
}
}
}
Two parameters are transferred to the semaphore constructor:
The first parameter identifies the number of threads which get access to the semaphore immediately after its creation.
The second parameter shows the maximum number of threads which the semaphore can use.
The example shows the behavior of the readers in the library. Each reader r may visit the library not more than five times within a certain period. In this case, no more than five readers can be in the “sem” library simultaneously. After a while, when one reader leaves the library (sem.Release()), another one replaces him. It does not matter how many threads have been created in the Main method, the Read() function wrapped by the semaphore ‘sem’ will be performed by five threads only.
How the synchronization affects the application performance
It is better to use the synchronization in the extreme case only, when it is truly essential. The use of thread synchronization methods in multi-threaded applications can very often lead to the degradation of application performance. This is due to the fact that only a certain number of threads can be performed at a certain moment, and very often only one thread can be performed.
The use of the Lock operator or Monitor is the most effective. However, this is not always true. The issue is that the Lock operator, Monitor and Mutex have similar parameters and solve the same problem. However, the mutexes are more convenient compared to the critical sections. The speed response of the Mutex is also much higher than the critical section.
The critical sections are simple and effective when there are few competitive threads. However, when their number increases, the number of input and output cycles also increases.
It is more appropriate to use the semaphore when the number of competitive threads is great. The semaphore decreases the number of competitive threads, without changing the program model.
The use of the Event model of synchronization (AutoResetEvent and ManualResetEvent) also decreases the application performance due to the lock-ups. The decrease is minor when the section of the code is chosen correctly.
In terms of performance, it is inappropriate to lock a big object by means of one global lock-up. Any lock-up consumes significant system resources. The reason is not only that very often one thread performs, but that the lock-up (or mutex) itself also takes a lot of time. Therefore, it is recommended to use several different mutexes for different resources which require locking-up and processing by a single thread (or by a limited number of threads). Frequent lock-up and unlocking of the resource also negatively affects the application performance.
Summary
The article, which consists of four parts, considers the principal ways of thread creation and management in .NET.
Thread pool (see Part 1) automates creation, destruction and re-use of the threads.
Low-level thread management with the use of Thread type objects (see Part 2) allows the manual creation of the number of threads needed, call the name of the thread and prioritize the threads.
Asynchronous delegates (see Part 2) use the pool thread when they perform. Therefore, they implement all the peculiarities of the pool use with its advantages and disadvantages.
BackgroundWorker (see Part 2) also uses the pool thread to perform the tasks in an asynchronous mode. BackgroundWorker is intended to perform the tasks in a background mode. It has full access to the visual application interface without the use of Invoke and Dispatcher and supports the inheritance of the user class from it.
Libraries TPL and PLINQ (see Part 3) are used to parallelize separate code snippets or database queries. The libraries fully automate the process of thread creation and destruction.
The methods of thread synchronization (Part 4) are essential when the application resources are used by several threads and it is necessary to get rid of the unpredictable operation results.
Due to their peculiarities, each of the above-mentioned methods can be used effectively, only in certain cases. Despite all of the disadvantages of these methods, the construction of modern computers enables parallel data processing by several processor cores simultaneously. This processing would be impossible without the creation of multi-threaded applications.
This is the third part of the article dedicated to the methods of creating multi-threaded apps in .NET. If you are interested in this topic, then we invite you to read Part 1 and Part 2 first.
This third part is devoted to Task Parallel Library (TPL) and Parallel Language Integrated Query (PLINQ). Though they appeared relatively recently in .NET, they are fully capable of solving complex problems on multi-core processors.
Task Parallel Library (TPL)
Task Parallel Library (TPL) is designed for execution on multi-core processors. It appeared in .NET Framework 4.0 when it became obvious that standard .NET tools for working with threads were not enough to efficiently execute multithreaded programs on multi-core processors. To use TPL’s basic functionality, you only need to add the System.Threading.Tasks namespace to the project.
using System.Threading.Tasks;
This library allows you to perform computationally complex tasks on several processor cores at the same time. Task Parallel Library simplifies the process of creating and destroying threads. The library itself uses a thread pool in its operation. Although apart from TPL, .NET contains many tools for working with threads. But starting with .NET 4.0, Microsoft recommends using TPL for creating multi-threaded applications.
Task class
The Task class is designed to speed up execution of a single, long operation. A task job is executed asynchronously in a separate thread, although TPL supports synchronous execution in the current thread.
Action delegate is passed as a parameter to the Task constructor. This delegate points to a method (function) that has no parameters and does not return a value.
To run a task for execution, the Task.Start() method is used.
When a Task object is executed asynchronously, the method that launched that task does not wait for its completion. Here, you can have such a situation where the method, for example Main, which launched a Task object, has already ended, while the Task object is still executing. To wait until the task is completed in the method that invoked it, the task.Wait() function is invoked.
An array of tasks can be run using the Task.Factory.StartNew() method. Here, we also pass an Action delegate as a parameter. Like the Task constructor, this constructor can take a lambda expression instead of a pointer as a function.
The task.WaitAll() method ensures that the method that launched an array of tasks for execution waits until all tasks are completed.
The Task class supports a number of properties to obtain information about the state of a task being executed:
AsyncState – returns the state object supplied when the Task was created;
CurrentID – returns the identifier of the currently executing Task;
Exception – returns an exception object that occurred during execution of Task;
Status – returns the status of the Task.
Tasks can return results. For this purpose, you need to typify the Task class when invoking the constructor of this class.
Taskint task1 = new Taskint(action);
To get result, you need to invoke the Result property of the Task class object.
int i = task1.Result;
The Task class allows you to create continuation tasks. These tasks will be launched after the tasks that invoked them are completed. To create and run a continuation task, the ContinueWith method needs to be invoked from the task that you want to continue.
Task task2 = task1.ContinueWith(action2);
Thus, by invoking subsequent tasks as continuations of the previous ones, you can build a certain order of execution of tasks.
Parallel class The Parallel class is a significant part of TPL. It allows you to strongly simplify code parallelization.
The Parallel class has three main methods:
Parallel.For
Parallel.ForEach
Parallel.Invoke
Parallel.Invoke method
The Parallel.Invoke method allows you to parallelize a block of consecutively executed operators.
using System; using System.Threading.Tasks; using Threading;
namespace TPLexample { classProgram {
static void Factorial(int x) { int result = 1; for (int i = 1; i <= x; i++) { result *= i; } Console.WriteLine(“Running task {0}”, Task.CurrentId); Thread.Sleep(5000); Console.WriteLine(“Result {0}”, result); }
These methods can be of any number. They will be automatically converted into Tasks and executed asynchronously and in parallel – based on the number of logical processor cores in the system.
Parallel.For method
The Parallel.For method allows you to execute parallel iterations of loops. The method takes three parameters.
The first parameter is int – the first value of loop.
The second parameter is int – the end value of the loop.
The third parameter is Action – a delegate pointing to a method (function) or lambda expressions, separated by a semicolon. The Action delegate will be executed once per iteration.
using System; using Threading; using System.Threading.Tasks;
namespace ForExample { classProgram {
static void Factorial(int x) { int result = 1; for (int i = 1; i <= x; i++) { result *= i; } Console.WriteLine(“Running task {0}”, Task.CurrentId); Console.WriteLine(“Factorial of number {0} = {1}”, x, result); Thread.Sleep(3000); }
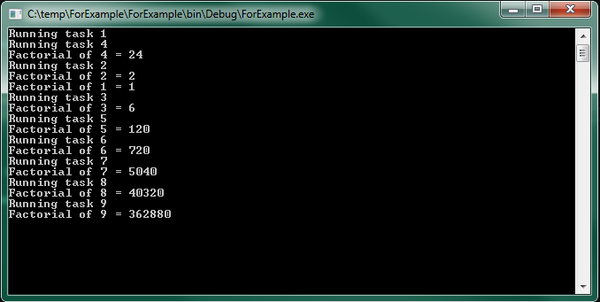
In the code given above, the factorials of numbers from 1 to 9 are calculated. In this case, factorial calculation operations are performed not sequentially, but in parallel. Therefore, the factorials of numbers are outputted chaotically as parallel factorial calculation operations are completed. The console output example illustrates this:
Figure 1 Calculating the factorials of different numbers in the Parallel.For loop.
Parallel.ForEach method
This method traverses the collection implementing the IEnumerable interface. Just like the foreach operator, but unlike the classical foreach, it performs parallel access to elements in this collection. This method is parameterized and has the following definition:
where the first parameter represents the collection in which enumeration will be made, the second parameter is an Action delegate (or lambda expression), executed once per iteration of the loop for each element of the IEnumerable collection. Parallel.ForEach returns a ParallelLoopResult structure that contains data about execution of a parallelized loop. The following example illustrates the use of Parallel.Foreach.
using System; using System.Collections.Generic; using System.Threading; using System.Threading.Tasks;
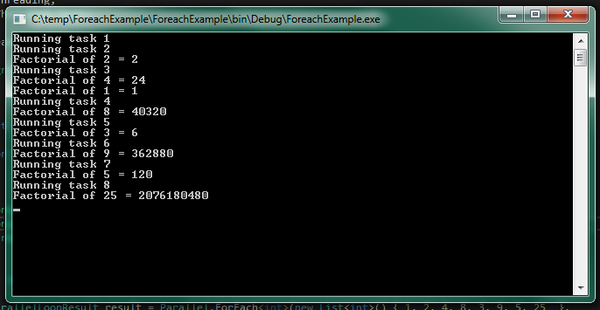
Iterations of the Parallel.Foreach loop are terminated in an order different from the order the numbers in the initial sequence were found. The order of output in the console depends on the execution time of the next iteration of the parallel loop, number of concurrent iterations in the loop, and complexity of calculating the factorial of a number. The more complex the factorial calculation operation is, the longer execution of iteration of the loop as it is found will take, as evidenced by the console output:
Figure 2 Calculating the factorials of numbers in the Parallel.Foreach loop.
Early termination of loop
Just like in classical loops for and foreach, which provide for early exit from the loop using the break operator, the Parallel.For and Parallel.ForEach methods provide for early exit from a loop.
using System; using System.Threading.Tasks;
namespace ParallelBreak { classProgram { static void Factorial(int x, ParallelLoopState pls) { int result = 1;
for (int i = 1; i <= x; i++) { result *= i; if (i == 6) pls.Break(); }
if (!result.IsCompleted) { Console.WriteLine("Loop ended on iteration number {0}", result.LowestBreakIteration); }
Console.ReadLine(); } } }
To exit a loop ahead of time, you need to pass the ParallelLoopState class object as a second parameter to the Parallel.ForEach (or Parallel.For) method used as a second parameter (Action delegate). Then, the Break() method of the parallelLoopState object can be invoked anywhere in the code of the function wrapped in this delegate. When running Parallel.ForEach, once the system encounters the Break method, it will exit this loop at the first opportunity in all threads and return the ParallelLoopResult object.
The ParallelLoopResult object returned by the Parallel.For and Parallel.ForEach loops contains two important loop state properties:
bool IsCompleted – determines whether the loop completed its work or whether its work was interrupted prematurely;
int LowestBreakIteration – returns the smallest index (from the number of indices of iterations being processed in parallel) at which the loop was interrupted.
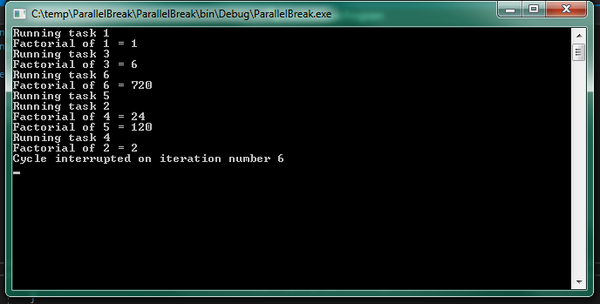
The result of this example is shown in the console output below.
Figure 3 Early termination of the Parallel loop by a command in the loop code.
There is also a way to abort a loop using CancellationToken. And this method works both with Parallel methods and with the tasks represented by Task objects. This is useful when you need to abort an operation that has taken too long or when the delegate passed to the parallel method (Task, TaskFactory, Parallel.For, Parallel.ForEach, Parallel.Invoke) is represented as a lambda function.
To cancel a parallel operation with CancellationToken, you need to:
Connect the System.Threading namespace (in addition to those already existing in the System and System.Threading.Tasks namespaces in the project);
Create an object of the CancellationTokenSource class; CancellationTokenSource CTS = newCancellationTokenSource();
Obtain a CancellationToken token from the CancellationTokenSource object; CancellationToken token = CTS.Token;
Catch token’s requestion using the following structure:
if (token.IsCancellationRequested)

{

Console.WriteLine("Operation interrupted");

return;

}
Cancel the operation by invoking the Cancel() method of the CancellationTokenSource class object; CTS.Cancel();
The example below illustrates the use of CancellatrionToken.
using System; using System.Threading; using System.Threading.Tasks;
Task task1 = newTask(() => { int result = 1; for (int i = 1; i <= number; i++) { if (token.IsCancellationRequested) { Console.WriteLine("Operation interrupted"); return; }
result *= i; Console.WriteLine("Factorial of {0} = {1}", i, result); Thread.Sleep(5000); } }); task1.Start();
Console.WriteLine("Enter N to cancel the operation or wait for it to finish"); string s = Console.ReadLine(); if (s == "N") { CTS.Cancel(); Console.WriteLine("Cancelled by user. Press any key to exit"); Console.ReadKey(); }
Console.Read(); } } }
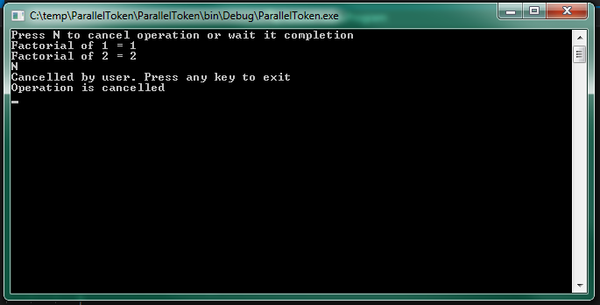
This example displays the following console output:
Figure 4 Early termination of the Parallel loop with CancellationToken.
CancellationToken can be passed to an external method as an argument:
In the method itself, you only need to check whether there is already a request to cancel the operation and complete the parallel operation.
if (token.IsCancellationRequested)
 {
 Console.WriteLine("Operation interrupted");
 return
 }
You can override the Parallel.For() and Parallel.Foreach() methods by adding one more parameter to them – the ParallelOptions class object – in which you can install CancellationToken:
But in this case, it will be necessary to catch the operationCancelledException exception, which occurred when the operation was canceled – with the following construction:
In this case, the parallel loop will be terminated, while the resulting exception will not stop the entire application.
Parallel LINQ (PLINQ)
LINQ was designed as a data query interface, which, based on the collection query results, processes them sequentially. Beginning with .NET 4.0, the ParallelEnumerable class appeared in the System.Linq namespace, allowing you to access the collection in parallel – using the capabilities of all the system’s processors.
However, by default, PLINQ processes data sequentially. Transition to parallel processing occurs if it really leads to faster query data processing.
But, as a rule, in parallel data query operations, there are additional costs. In this case, priority is given to sequential data processing. Therefore, PLINQ is usually applied in very large collections or in complex query operations, where it is really possible to achieve benefits when parallelizing operations.
It should also be taken into account that when sharing access to the same data from multiple threads, access blocking will be enabled, which will also have a big impact on PLINQ performance.
AsParallel() method
This method allows parallelizing a query to a data source. When this method is invoked, the data source is divided into parts (if possible) and then, operations are performed on each part as individual thread.
In fact, this is a normal LINQ query, but the AsParallel() method is also applied to the data source.
staticint Factorial(int x) { int result = 1; for (int i = 1; i <= x; i++) { result *= i; } Console.WriteLine("Factorial of {0} = {1}", x, result); return result; }
static void Main(string[] args) { int[] nums = new int[] { -6, -2, 0, 1, 2, 4, 3, 5, 6, 7, 8 }; var factorials = from n in nums.AsParallel() select Factorial(n); }
or
var factorials = nums.AsParallel().Select(x => Factorial(x));
ForAll() method
This method optimizes parallel queries even more. An algorithm like Parallel.Foreach is used to output results in this case. But at the same time, when the ForAll() method is used, delays increase during query execution due to assembly of data received from different threads into one set and enumeration of the data in a loop.
The ForAll() method takes an Action delegate or a lambda function as an argument.
int[] nums = new int[] { -6, -2, 0, 1, 2, 4, 3, 5, 6, 7, 8, };
 (from n in nums.AsParallel()
 where n > 0
 select Factorial(n)).ForAll(n => Console.WriteLine(n));
When executing a parallel query, the resulting selection can be constructed as you like and will be unordered. You can apply the LINQ OrderBy() method or the orderby operator, but this method will sort the sample data in an alphabetical order.
var factorials = from n in nums.AsParallel()
 where n > 0
 orderby n
 select Factorial(n);
However, this order will be different from the order in which they were located in the data source. If you want to organize the data according to the original sequence, then the AsOrdered() operator is used. In this case, this sorting will carry additional costs during query execution. If further manipulations on the set ordered by the AsOrdered() method are required, and the ordering itself is no longer required, the AsUnordered method is used.
var factorials = from n in nums.AsParallel().AsOrdered()
 where n > 0
 select Factorial(n);
 var query = from n in factorials.AsUnordered()
 where n > 100
 select n;
 query.ForAll(n => Console.WriteLine(n));
PLINQ error handling
When a parallel query is executed, the data source is divided into parts, and each part is processed in a separate thread. But if an error occurs in one of the threads, the system will interrupt execution of all threads. This will throw an AgregateException exception. The following code contains not only numbers but also a string in the data source (array). Therefore, an error occurs when you try to calculate the factorial from the row.
factorials = from  n in  nums2.AsParallel()
 let  x = (int )n
 select  Factorial(x);
 try
 {
 factorials.ForAll(n => Console.WriteLine(n));
 }
 catch  (AggregateException ex)
 {
 foreach  (var  e in  ex.InnerExceptions)
 {
 Console.WriteLine(e.Message);
 }
 }
Here, the resulting exception is an AggregateException exception, as in the Parallel class methods. This exception should be caught and its InnerExceptions property should be accessed to determine the type of exceptions that occurred.
Early termination of PLINQ queries
In the event that you need to abort an operation being executed by PLINQ before it finishes (for example, by timeout), you can use the WithCancellation() method in the query, which you can pass to CancellationToken as in the example below.
using System; using System.Linq; using System.Threading; using System.Threading.Tasks;
namespace PlinqCancel { classProgram { static int Factorial(int x) { int result = 1; for (int i = 1; i <= x; i++) { result *= i; } Console.WriteLine("Factorial of {0} = {1}", x, result); Thread.Sleep(1000); return result; }
try { int[] numbers = new int[] { 1, 2, 3, 4, 5, 6, 7, 8, 9, 10 }; var factorials = from n in numbers.AsParallel().WithCancellation(cts.Token) select Factorial(n); foreach (var n in factorials) Console.WriteLine(n); }
catch (AggregateException ex) { if (ex.InnerExceptions != null) { foreach (Exception e in ex.InnerExceptions) Console.WriteLine(e.Message); } }
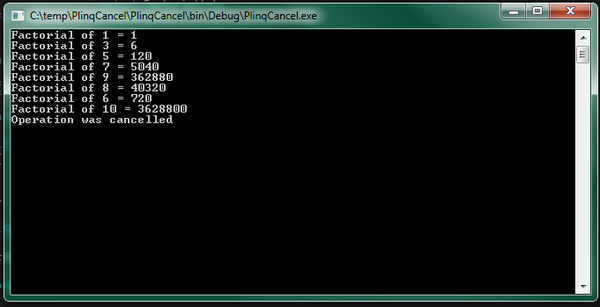
Figure 5 Early termination of parallel query using CancellationToken.
The cts.Cancel() method, as with the Parallel class, causes the OperationCancelledException exception to be thrown, which must be processed in the try { } catch block, otherwise it will crash the program. The AggregateException exception that will be thrown if any other exception occurs in one of the PLINQ threads should also be handled.
Conclusion
Despite the fact that TPL and PLINQ are relatively new in .NET, they are fully capable of solving complex problems on multi-core processors. TPL, for example, automatically parallelizes tasks between available processor cores, like ThreadPool.
The difference between TPL and ThreadPool is that TPL (like Thread objects) is designed to solve long computationally complex tasks. But if Thread objects need to be created and destroyed manually, then TPL creates threads automatically and exactly as much as is necessary for the most effective solution of the task.
The PLINQ library as a whole is similar to TPL. However, it is optimized for queries to data sources, which cannot always be effectively paralleled. In the next part of the article, we’ll look at the thread synchronization mechanisms. Stay tuned!
If you are interested in ways of creating multi-threaded applications in .NET, we invite you to read Part 1 and Part 2.
In Part 1 of this article, we talked about what threads are in .NET. Now, we want to dwell on the methods of background and asynchronous execution of threads in .NET apps.
These methods have advantages and disadvantages. They are not always convenient to use, but generally, background and asynchronous execution of threads offers wide opportunities in executing separate background threads for both small and long tasks.
Thread pool and its difference from the Thread class
Creation and destruction of threads are very resource-intensive processes. Performing them too often is not recommended. However, there are various small tasks that require asynchronous execution or with maximum utilization of all CPU cores. For such tasks, it is best to create a set of threads in advance and then distribute the tasks among these threads.
It would be quite good if the threads that had already completed their tasks could be re-used without wasting computational resources destroying them and creating new threads. It would also be nice if the program itself determines how many threads it would require to efficiently solve a problem.
Such a set of threads in .NET exists and is called a thread pool. It is implemented in the ThreadPool static class of the System. Threading namespace. You need not create a ThreadPool class object, and it will not work either. Such an object is created automatically when the application starts – provided the System. Threading namespace is connected in it.
ThreadPool can automatically increase or reduce the number of active threads to maximize task execution efficiency. The maximum allowed number of processing threads in a pool is 1023. The pool allocates a maximum of 1000 threads in an I/O operation.
To get maximum number of threads, you can use the GetMaxThreads method of the ThreadPool static class. The first parameter passed to this method returns the number of processing threads. The second parameter returns the number of I/O threads.
int nWorkers;  // number of processing threads
 int nCompletions; // number of I/O threads
  ThreadPool.GetMaxThreads(out nWorkers, out nCompletions);
You can also specify the maximum and minimum number of threads in a pool. To set the maximum number of threads, you need to invoke the SetMaxThreads method.
ThreadPool.SetMaxThreads(int nWorkers, int nCompletions);
where nWorkers is the number of processing threads, nCompletions is the number of I/O threads. To set the minimum number of threads in a pool, use the SetMinTherads method.
ThreadPool.SetMinThreads(int nWorkers, int nCompletions);
The parameters here are exactly the same as in the SetMaxThreads method.
If, for some reason, the threads are not enough to perform the user’s tasks, the tasks will be automatically placed in a queue. As soon as at least one of the pool threads finishes its work, it will be redirected to execute tasks in the queue. If any of the threads completes its work before the rest, it will be sent back to the pool but not destroyed. This thread can be re-enabled at the first opportunity.
You can add a task to a thread pool’s queue in one of the following four ways:
Calling the QueueUserWorkItem method.
Calling asynchronous delegates BeginInvoke() and EndInvoke();
Using the BackgroundWorker class methods;
Using the Task Parallel Library (TPL) methods.
QueueUserWorkItem method
This method adds a task to the thread pool’s queue for execution and requests the required number of threads from the pool to perform this task. The name of the executable function, wrapped in a WaitCallBack delegate, is passed to the method as a parameter. The object of storing the task state data can be passed as the second parameter.
ThreadPool.QueueUserWorkItem(Job);
If the ThreadPool object does not exist at the time the method is invoked, it will be created. If the pool is already created and there is at least one free thread in it, then the task is passed to this thread. If several pool threads are free, then the pool will allocate these threads such that the task is executed as quickly as possible.
The following example uses all the basic methods of working with a thread pool – accessing a pool to display the maximum number of threads and sending a task to a pool for execution.
using System; using System.Collections.Generic; using System.Linq; using System.Text; using System.Threading; namespace ThreadPoolTest
{ classProgram
{ static void Main()
{ int nWorkers; // number of processing threads int nIOs; // number of I/O threads ThreadPool.GetMaxThreads(out nWorkers, out nIOs); Console.WriteLine("Maximum threads: " + nWorkers
+ "nMaximum I/O Threads: " + nIOs); for(int i = 0; i < 10; i++) ThreadPool.QueueUserWorkItem(Job); Thread.Sleep(3000); Console.ReadLine();
} static void Job(object state)
{ for (int i = 0; i < 3; i++)
{ Console.WriteLine("cycle {0}, is processing by thread {1}",
i, Thread.CurrentThread.ManagedThreadId); Thread.Sleep(100);
}
}
}
}
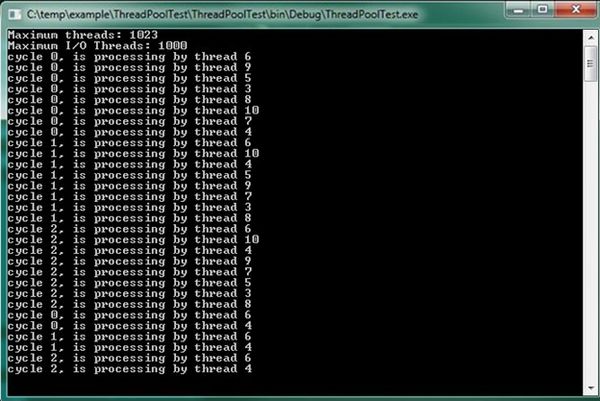
The result of the example is shown in Figure 1. The program was executed on an Intel Core i7 4770K processor, which contains 4 physical and 8 logical processor cores.
Fig. 1 Result of program execution in a thread pool.
As can be seen from Figure 1, eight threads were allocated from the pool to the program – exactly the same number of logical processor cores available.
Features of a thread pool
Using a thread pool allows you to enhance the performance of a multithreaded application. A thread pool significantly reduces the cost of starting and stopping threads, increases the number of threads that are started and stopped, and can reuse completed threads.
However, a thread pool has a number of features that in certain situations can be considered as shortcomings:
All threads from a pool are background thread.
At the end of all the foreground threads of an application, the work of all threads from the pool will also be aborted, regardless of whether they have completed their tasks or not.
It is impossible to make a thread from a pool a foreground thread.
Threads in a pool do not have a name. The only thing you can get for a thread from a pool is its ID (using the ManagedThreadID property):
Thread.CurrentThread.ManagedThreadId
Threads from a pool cannot be assigned a name.
The priority of a thread in a pool can be changed, but once it finishes executing its task and is returned to the pool, its priority will be reset to the default value (normal).
When processing COM objects in a thread pool, there will be problems due to the fact that such objects require the use of single-threaded apartment (STA) threads, but all the threads of a thread pool are multi-threaded apartment (MTA) threads.
Threads in a pool are suitable for executing small tasks, but not for permanent work (such threads need to be created using the Thread class).
Blocking a thread from a pool will lead to the starting of additional pool threads; the pool will continue to execute the task but this will affect performance.
A thread pool is implicitly used in the following .NET constructs:
Windows Communication Foundation (WCF);
Interprocess communication component – .NET Remoting;
ASP.NET;
ASMX Web Services;
Event-based Asynchronous Pattern (EAP);
Timers: System.Timer and System.Windows.Timer;
Parallel LiNQ (PLINQ).
It should be remembered that all the features of a thread pool apply to the above constructs.
Do you need experts for your software development project? Contact us now
Asynchronous delegates
The C# function can be invoked for both synchronous and asynchronous execution. When the function is invoked synchronously, it is executed in the same thread as the main program. The synchronous function invocation itself occurs in the usual way – by specifying the function name and its arguments in brackets immediately after the name.
When a function is invoked asynchronously, the runtime environment CLR allocates for the function a separate thread from the thread pool and executes the function in this thread, while the master program continues to execute in the main thread. To execute a function asynchronously, it must be wrapped in an AsyncCallBack delegate. Next, this delegate must be invoked by calling the BeginInvoke method. You can use the EndInvoke method to get the value returned by the method and terminate the method.
The following example illustrates how to work with asynchronous delegates.
using System; using System.Collections.Generic; using System.Linq; using System.Text; using System.Threading; using System.Runtime.Remoting.Messaging; classProgram
{ public delegate intMyDelegate(int x, int y); staticAutoResetEvent are = newAutoResetEvent(false); static int WriteSum(int x, int y)
{ Console.WriteLine("Thread {0}: Sum = {1}", Thread.CurrentThread.ManagedThreadId, x + y); return x + y;
} static void Summ(IAsyncResult async)
{ Thread.Sleep(3000); // AsyncResult type from the System.Runtime.Remoting.Messaging namespace MyDelegate func = ((AsyncResult)async).AsyncDelegate as MyDelegate; int sum = func.EndInvoke(async);
are.Set(); // The Set method is used in thread synchronization and gives a signal to a thread to continue working
} static void Main()
{ MyDelegate func = WriteSum; // The C# compiler displays an AsyncCallback delegate to refer to the SumDone() method IAsyncResult async = func.BeginInvoke(10, 10, Summ, null); Console.WriteLine("Thread {0}: called throw BeginInvoke() waiting to complete SumDone()", Thread.CurrentThread.ManagedThreadId);
are.WaitOne(); // The WaitOne method waits for a Set signal from at least one thread Console.WriteLine("Thread {0}: finished his work", Thread.CurrentThread.ManagedThreadId); Console.ReadKey();
}
}
To run a function for asynchronous execution, you need to declare the delegate class first.
public delegate intMyDelegate(int x, int y);
where int written after the keyword delegate is the type of the value returned by the function. The arguments of the function are listed in brackets.
The AutoResetEvent class notifies the thread generated by the asynchronous delegate that an event has occurred by calling the Set method. The value false is passed to the event constructor if AutoResetEvent is not scheduled to be triggered immediately after it is created.
staticAutoResetEvent are = newAutoResetEvent(false);
Next, you need to create an asynchronous MyDelegate delegate, which was declared earlier. The created delegate will be named func.
The EndInvoke method of the func delegate is used to return the result of asynchronous function execution.
The Set method of the AutoResetEvent class gives a signal to a waiting thread that it can resume its work. The Set method works only with waiting threads. In any other state other than waiting, the method ignores the threads. The WaitOne method is used to enter a thread in a waiting state. The WaitOne method blocks the current thread until it receives a signal generated by the Set method.
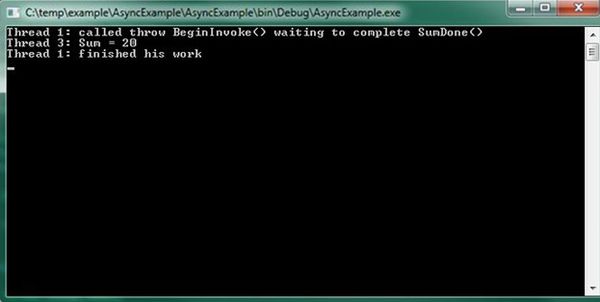
The result of the example is shown in Figure 2.
Fig. 2 – Result of execution of an asynchronous delegate.
As can be seen from Figure 2, the asynchronous delegate is actually executed in a separate thread.
BackgroundWorker Class
The BackgroundWorker class is designed to start long-running tasks in a separate thread. This class is essentially a wrapper for the ThreadPool class and uses a thread pool in its implementation. BackgroundWorker is needed if there is only one task that needs to be executed in a background mode in a separate thread.
BackgroundWorker provides the following capabilities:
Implementation of the protocol for sending and receiving messages on task progress, completion or early termination.
Flag for cancellation of an operation without using the Abort method of the Thread class.
Can be placed as a component on a form in a Visual Studio form designer (implements the IComponent interface).
Can handle exception in the main thread of a NET app (without mandatory writing of the try {} catch block in the body of the delegate of the passed thread).
Can change the statuses of window controls without using InvokeRequired and Dispatcher.
How to use BackgroundWorker
You can take use the features of the BackgroundWorker class in two ways:
To create an instance of the BackgroundWorker class.
To create a class inherited from BackgroundWorker.
When creating an instance of the BackgroundWorker class, the following needs to be performed:
Create this instance by invoking the constructor.
Add a DoWork event handler.
Invoke the RunWorkerAsync method and pass an instance of any class inherited from object to it as an argument.
Once the work is completed, BackgroundWorker will generate a RunWorkerCompleted event.
BackgroundWorker allows you to display the progress of an operation. To do this you need to:
Set the value true for the WorkerReportsProgress property.
In the DoWork event handler, periodically invoke ReportProgress, indicating the amount of work done and the remaining work.
Process the ProgressChanged event by requesting the ProgressPercentage property of its argument.
Event handlers ProgressChanged and RunWorkerCompleted freely access the user interface elements.
If there is a need to cancel an operation being performed by BackgroundWorker, you need to:
Set the WorkerSupportsCancellation property to true.
Set the Cancel property of the DoWorkArgs argument to true.
Request cancellation of the operation using the CancelAsync method of the BackgroundWorker class.
The example below illustrates all the common operations with BackgroundWorker:
using System; using System.Threading; using System.ComponentModel; classProgram
{ staticBackgroundWorker bw; static void Main()
{
bw = newBackgroundWorker(); // we create a new instance of the BackgroundWorker class
bw.WorkerReportsProgress = true; // we set support for progress of operations
bw.WorkerSupportsCancellation = true; // we set support for operation canceling
bw.DoWork += workfunc; // we add DoWork event handler
bw.ProgressChanged += Progress; // we add state change event handlers
bw.RunWorkerCompleted += Completed; // we add a shutdown event handler
bw.RunWorkerAsync(null); // We run BackgroundWorker Console.WriteLine( "Press Enter during five seconds to abort the process"); Console.ReadLine(); if (bw.IsBusy) // if the Enter button is pressed
{
bw.CancelAsync(); //cancel operation Console.ReadLine(); //read Enter key pressing
}
} static void workfunc(object sender, DoWorkEventArgs e)
{ // function executed by BackgroundWorker for (int i = 0; i <= 100; i += 20)
{ if (bw.CancellationPending)
{ // here we process operation cancellation request
e.Cancel = true; // here we cancel the operation return;
}
bw.ReportProgress(i); // here we declare the status of the operation Thread.Sleep(1000); //and put the thread to sleep for a second
}
e.Result = 1989; // will be passed to RunWorkerComрleted
} static void Completed(object sender, RunWorkerCompletedEventArgs e)
{ // BackgroundWorker completion event handler function if (e.Cancelled) // if user aborted work Console.WriteLine( "Task processing by BackgroundWorker was aborted by user!"); else if (e.Error != null) Console.WriteLine("Worker exception: " + e.Error); // if work was aborted due to exception else// if work was executed completely Console.WriteLine("Work is complete. Result is " + e.Result + ". "); Console.WriteLine("Press Enter to exit...");
} static void Progress(object sender, ProgressChangedEventArgs e)
{ // function that displays the status of work being performed Console.WriteLine("Proceed " + e.ProgressPercentage + "%");
} //ProgressPercentage - method of the ProgressChangedEventArgs argument of the BackgroundWorker class
}
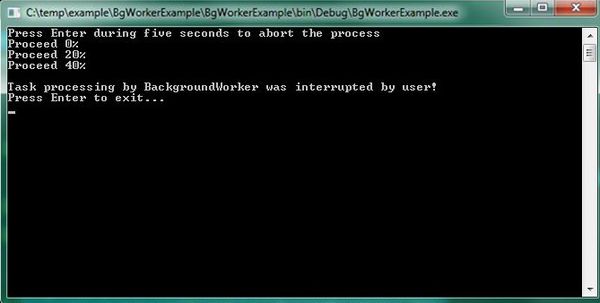
Display of the application when the Enter key is pressed (BackgroundWorker was aborted by the user) is shown in Figure 3.
Fig. 3 – Display of application when BackgroundWorker was interrupted.
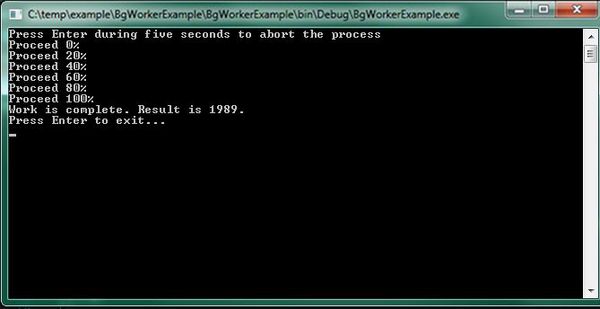
Figure 4 shows the display of the application if the task that BackgroundWorker was performing was not interrupted.
Fig. 4 – Display of the application in the case when BackgroundWorker operation was not aborted.
BackgroundWorker inheritance
The BackgroundWorker class allows you to inherit user classes from it. This class provides the OnDoWork virtual method, which the developer can override in his own way.
using System.Collections.Generic; using System.Threading; using System.ComponentModel; namespace BgWorkerInherit
{ public classClient
{ publicJamshut Tile (int foo, int bar)
{ return newJamshut(foo, bar);
}
} public classJamshut : BackgroundWorker
{ //You can add typed fields. publicDictionary<string, int> Result; public volatile int Foo; public volatile int Bar; public Jamshut()
{
WorkerReportsProgress = true; //Jamshut will show the progress of its work
WorkerSupportsCancellation = true; //Jamshut can interrupt work
} public Jamshut(int foo, int bar) : this()
{
Foo = foo;
Bar = bar;
} protected override void OnDoWork(DoWorkEventArgs e)
{
ReportProgress(0, "Bossy, Jamshut begins to put tiles"); bool finished = false; int percentage = 0; //Jamshut begins to work Thread.Sleep(1000); while (!finished)
{ if (CancellationPending)
{ //If a request is received to cancel the operation, Jamshut will stop its work
e.Cancel = true; return;
} Thread.Sleep(1000); if (percentage < 100) percentage += 10; // Jamshut reports on the progress of work
ReportProgress(percentage, "Proceed "+percentage+" %");
}
ReportProgress(100, "Bossy, come to see. Jamshut finished his work...");
e.Result = Result;
}
} classProgram
{ staticvoid Main(string[] args)
{
}
}
}
The code that created the Jamshut class object will have an already configured background operation handler that will report on the progress of its work and support its cancellation. In addition, the Jamshut class can update all the elements of the application’s graphical user interface without using Control.Invoke (in WinForms) and Dispatcher.Invoke (in WPF) methods.
Conclusion
In this part of the article, we have looked at the methods of background and asynchronous execution of threads in .NET apps. These methods have a number of advantages and disadvantages and that is why they are not always convenient to use. But in general, background and asynchronous execution of threads provides ample opportunities for execution in separate background threads of both short- and long-running tasks.
In part 3 of this article, we’ll look at .NET’s Task Parallel Library (TPL) and Parallel Language Integrated Query (PLINQ), which enables you to parallelize separate code snippets or database queries.
Developing Cross-Platform Apps Faster and on Any Platform
At the end of the last century, Microsoft, one of the most successful software development corporations, faced the problem of a huge number of incompatible languages, environments and programming technologies. At the same time, the development process was rigidly focused on a specific programming language. Also, across different languages, there was a different set of incompatible technologies. Above all, these technologies were gradually becoming obsolete.
There was a need to implement new programming tools that would fully support the object-oriented approach, exceptions handling and garbage collection. The growing popularity of the new Java software platform by Sun Microsystems surely added some fuel to the fire.
What was there before .NET Core?
In 1999, Microsoft began the development of a new unified platform, NWGS, later called the .NET Framework. This software platform, despite all the weaknesses and inoperability of the first versions, has become a unique product, combining many benefits. The main advantages of the platform:
Hardware-independent execution environment with the ability to compile just-in-time (JIT). This means that an application written in languages that support .NET can be run on processors of different architectures, in case there is a translator from the .NET MSIL language into the command codes of this processor.
Support for compatibility of program fragments written in different languages. For example, in C#, you can create your own class, inherited from a class written in Visual Basic, and call a method written in Managed C++. This all works without error.
As the .NET Framework evolved, it acquired new technologies and development capabilities. In version 2.0 there were WinForms and ASP.NET, in the 3.0 version there were WPF and WCF, the 3.5 version gave us LInQ, in version 4.0 TPL and PLInQ saw the light, and in version 4.5 API for Windows Store applications was added.
In 2002, the first version of the .NET Compact Framework was released. It was intended for mobile devices run by Windows Mobile. The .NET Compact Framework is formally a subset of the .NET Framework, but it actually contains its own application model, framework, and runtime environment, that is significantly different from the similar .NET Framework model.
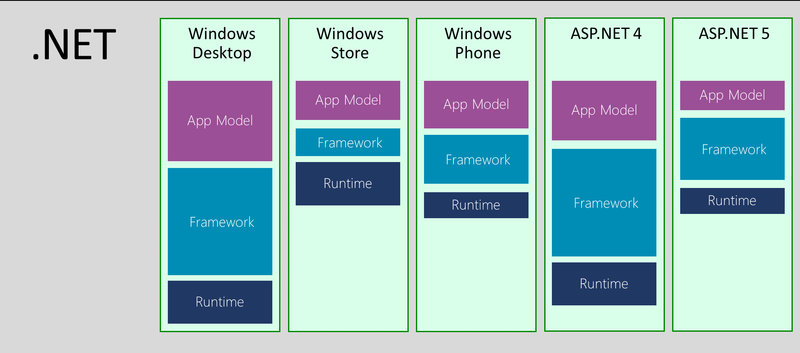
Subsequently, all new “subsets” of the .NET Framework were born. They were architecturally and functionally different from the desktop .NET version. These subsets are familiar to all .NET developers. They are: Silverlight, Windows Phone, Windows Store, .NET Micro Framework, and ASP.NET. The situation is even stranger for the last one: ASP.NET of version 4 and ASP.NET of version 5 are two different platforms, each with its own application model, framework, and execution environment (Figure 1).
Figure 1. Example of the different .NET verticals
Of course, all the platforms mentioned have a number of common APIs because they all once were separated from the desktop version of the .NET Framework. But their evolution caused the growth of differences between them, and Microsoft had to come up with increasingly sophisticated “crutches” to ensure compatibility and uniformity of their APIs. The compatibility problem arises when you need a software product that can work on several platforms. This raises the question of the availability and compatibility of the API in each of these platforms.
In addition to the mentioned “subsets” of .NET that run exclusively on Windows, there are also implementations of the .NET Framework for Linux systems, the most famous of which are Mono and DotGNU. These are created by communities of enthusiasts; Microsoft did not participate in their development in any way. Each of these implementations also represents a “subset” of .NET, with its own application model, framework, and runtime. Porting applications from the Windows version of the .NET Framework to Mono or DotGNU is as difficult as the development of an ASP.NET application version based on its desktop implementation.
It turned out that Microsoft eventually gave birth to a whole “zoo” of similar, but at the same time different, platforms with different APIs, application models, and execution environments in order to create a single software platform with full language and technology compatibilities. The .NET Framework, which Microsoft considered a salvation from the “zoo” of incompatible languages and technologies, eventually itself became the “zoo” of APIs and implementations. Microsoft again faced the challenge of creating a single software platform for all development methods that exist in the .NET Framework. This platform is .NET Core.
What is .NET Core?
.NET Core is a modular cross-platform version of .NET Framework with the ability to port applications to other platforms and operating systems. In this case, the already created code is used to the maximum during the porting process, while the use of APIs specified for a particular platform is minimized. However, .NET Core does not replace the .NET Framework, but is just a version of it (a subset). Also, .NET Core does not replace Mono on Linux-like operating systems – both projects are developing in parallel.
This is achieved by using portable class libraries (PCL) with the most common form of API for all target platforms. At the same time, implementations of the application, including the framework itself and the execution environment, remain different, although they are subsets of .NET. Appeals to the API are particular for a specific platform (in the case of designing a cross-platform project) and are separated by special preprocessor directives:
 #if WINDOWS_PHONE_APP

Windows.Phone.UI.Input.HardwareButtons.BackPressed

+= HardwareButtons_BackPressed;

#elif WINDOWS_APP

// Ignore. Windows Store doesn't have support for this.

#else

#error Unknown platform

#endif
where WINDOWS_PHONE_APP is the preprocessor symbol declared in the project. It can be found in the project properties (the Build section).
Beginning with 2013 Update 2 version in Visual Studio, it became possible to create universal applications for Windows that can be run on several platforms, due to PCL.
.NET Core is creating by the .NET Foundation community, which, in addition to Microsoft programmers, includes many independent developers, including the Mono Community developers.
Everyone can participate in the creation of .NET Core. The participation rules are published on GitHub. The project with open source is published on GitHub as well. .NET Core is a free software under the licenses of MIT, Apache 2.0 and Creative Attribution 4.0 (for some modules).
Portable Class Libraries (PCL)
In the .NET Framework, the core of the system is the extensive mscorlib library. It contains a lot of APIs and their implementations, some of which are not required in other target platforms (which differ from the desktop version) and others are not supported by these platforms. It turns out that on another target platform (for example, in Silverlight) there is a completely different mscorlib library. The situation is the same for other .NET libraries. Unlike the .NET Framework, the .NET Core has a flexible architecture of PCL, designed with significant code decomposition. At the same time, the dependencies between the libraries are clearly monitored by the .NET Core itself.
Each PCL is responsible for a specific .NET module and no more than that. Each PCL has its own independent assembly version, and new APIs are available only in new PCL versions.
This allows the target platform to choose the PCL modules independently. It is also important to note that the platform cannot support any PCL partially – it either supports it or it does not.
Also, the main principle of .NET Core is based on PCL, and there are uniform APIs for various .NET implementations. However the .NET implementations have not disappeared. They continue to exist and they are as different as before, but access to them can be done through APIs which are common to all of these implementations.
PCL allows you to implement the same code in several target .NET Core platforms.
Unified BCL is the Cross-platform Kernel for .NET Core
BCL contains an API that is uniform for the entire .NET Core and for all its implementations. For example, most of the .NET Native API used to create applications for mobile devices and ASP.NET 5, on which the server side of web applications is written, contains BCL, and it is the same for both technologies.
BCL is an intermediate layer of assemblies on MSIL, common for all .NET implementations. Above BCL, there are APIs specific for each particular platform (so-called “application models”), for example, WinRT interop for .NET Native and MVC for ASP.NET 5.
Below BCL there is a layer of adaptation to various .NET implementations to the performing environments, for example, CLR (CoreCLR) or .NET Native. The CLR compiles the MSIL code into the target platform command system during the execution of the application (JIT compilation).
Unlike the CLR, .NET Native compiles the MSIL code, together with the .NET libraries, into the target platform command system, even before it reaches this platform, and launches on it. As you can see from the description above, CoreCLR and .NET Native are two completely different .NET execution environments, but the BCL is the same for both and interacts with them only through the adaptation layer.
Currently, .NET Core BCL is being developed under the name of .NET Standard.
Compatibility Issues in the .NET Framework
The traditional .NET Framework is distributed as a single, indivisible software product. It is installed on the device entirely and it is removed from the device entirely. The new version replaces the previous one, with all the ensuing consequences. However, the new version of the .NET Framework can disrupt the normal operation of the application written in an older version. For example:
If a new interface is added in the new version to the existing type of the .NET Framework, there may be problems with the serializing of this type;
If an additional overload has been added to the existing method in the new version of the .NET Framework, then there may be a problem with the reflection of this method;
In the case of renaming an internal type to the .NET Framework, the application’s performance may also be compromised if the type name is determined by the toString() method.
Since the release of the new version of the .NET Framework, Microsoft has been trying to make it compatible with the previous version. But even if the probability of failure is extremely low (less than 0.1%), then there may be millions of such failures, because the .NET Framework is currently used on billions of devices.
NuGet – Distribution Mechanism and Modularization Basis of .NET Core
Unlike .NET Framework, .NET Core is presented as small NuGet packages, and each of them, as a rule, is responsible for any library or namespace. For example, if in .NET Framework the System.Colections.Generic namespace was a part of a large mscorlib library, then in .NET Core it is a certain NuGet package.
Every NuGet package has its own name and version.
Every NuGet package can be updated to a new version without updating other .NET Core components.
NuGet packages can be downloaded and installed individually from the website nuget.org without installation of a new .NET Core version.
Currently the nuget.org web page contains more than 800,000 .NET Core libraries. But this doesn’t mean that you would have to download .NET Core components from the website and install them separately every time a new application on .NET Core needs to be developed. All the NuGet packages included in .NET Core are installed alongside the installation of .NET Core and have the same version as the current version of .NET Core. Additional packages or packages of a newer version are downloaded and installed separately from the installation of .NET Core.
Additional NuGet packages that are not included in the current .NET Core version are circulated with the application after downloading. There is no need for NuGet to download its packages from the Internet. There is an autonomous installer for NuGet that is included in Visual Studio. Any plug-in in .NET Core can be replaced by a newer one without the installation of a new version of the framework. If a .NET Core plug-in works insecurely, NuGet can roll it back to an older version without disrupting the work of other .NET Core components.
Thus, .NET Core is a framework adjusted for every application. Every .NET application uses only these .NET Core libraries, which are required. The libraries that are common for all .NET applications are presented as NuGet packages within .NET Core. Additional .NET Core libraries are circulated together with applications.
Integration with Other .NET Platforms
.NET Core is a subset of .NET Framework and must be compatible with its other subsettings. The .NET platform is fully compatible with .NET Framework 4.6 and fully realizes its function. In time, .NET Core will develop faster than .NET Framework, but both projects will develop simultaneously. All the new technologies will be tested on .NET Core, and only then will they be adapted to .NET Framework.
Mono is a subset of .NET Framework released in Linux and MacOS. The Mono community is building up support for .Net Core release on these operating systems, at most, integrated with Mono.
Windows Store and Windows Phone are subsets of .NET Core as well, and contain their own models of applications over BCL and their own runtime (.NET Native).
Other .NET platforms can be compatible with .NET Core as well. It is achieved either by the usage of PCL or by the creation of a common project and the adaptation of code with the help of #if directives.
.NET Compiler Roslyn as a .NET Core Part
Particularly in .NET Core, a new compiler, Roslyn, is used, written for usage in .NET Core. Roslyn allows the connecting of each stage of code compilation and .NET application building through API.
Among the most interesting Roslyn possibilities we can point out are the building and reprogramming of a syntactic tree, the generation of source code by this tree and the possibility of using C# and Visual Basic as script languages (with the use of REPL).
.NET Core gave Roslyn its own namespace of Microsoft.Net.Compilers and its own NuGet package, which corresponds to this namespace. On the basis of Roslyn, a freely distributable cross-platform IDE with Visual Studio Code open source code was developed.
ASP.NET Core – a New Framework for Web Applications
Despite its crudity, the ASP.NET becomes a prospective platform for web service development. This is facilitated by more compact code, better scalability and the very high efficiency of a new platform. Along with that, Microsoft has refused many technologies in ASP.NET Core which were used in ASP.NET. These are System.Web namespace, Web Forms, Transaction Scope, WPF, and WinForms. Instead, .NET Framework provides a flexible web application model, with the use of MVC and WebAPI subsystems.
If the earlier ASP.NET, based on System.Web.dll, ran only on Windows and IIS, then at present, relying on benchmarks, it ranks among the top Linux web frameworks in terms of efficiency.
Microsoft’s aspiration to make ASP.NET Core cross-platform led to ASP.NET Core depending on neither the operating system nor the web server which it will run on. ASP .Net Core will run equally well on either Windows, Mac, or Linux, and its projects will be able to run both in Windows Azure Web App or in Docker on Linux, and everything will work correctly in both cases.
Further .NET Core (Roadmap) Development
Nowadays .NET Core is developing actively. .NET Core is adopting more and more common APIs from .NET Framework and Xamarin to make an application portable to all .NET platforms. Microsoft and .NET Foundation are pursuing the following aims in developing upgrades for the framework:
To make .NET appropriate for most of the current development tasks;
To develop high-quality .NET Core versions for Windows, Linux, and MacOS operating systems;
To create high-quality .NET Core versions for processor architectures: x86, x64 arm32, and arm64;
To perform releases of new .NET Core versions at least several times per year;
To allow developers to develop applications as quickly as possible, using intuitive .NET Core tools;
To improve application building productivity in .NET Core to make the development cycle (making changes in code and subsequent code execution on a compiler) as quick as possible;
To improve the work of .NET applications in the cloud – to improve logging algorithms, tracings, and error diagnosis;
To allow the user to assemble .NET Core from source code files independently, including those modified by the user.
The release of the 2.0 version of .NET Core is expected in 3Q 2017. The next version of cross-platform framework by Microsoft is expected to have many improvements. The utility of the second .NET Core version has been proclaimed for the following operating systems:
Windows (starting from 7 SP1);
Windows Server (starting from 2008 R2 SP1);
Red Hat Enterprise Linux (from version 7.3);
Fedora (from version 25);
Debian (from version 8.7);
Ubuntu (from version 14.04);
OpenSuse (starting from version 42.2);
Tizen (from version 4);
MacOs X (from version 10.12).
Microsoft continues to develop other .NET tools, together with .NET Core. These are: ASP.NET, .NET Framework, programming languages for .NET, and others. The project .NET Standard, developed from Unified BCL, is developing actively. .NET Standard is a set of common specifications for all .NET platforms: .NET Core, .NET Framework, Mono, Xamarin, and others. .NET Standard guarantees the usage of its libraries in all .NET runtime environments.
Summary
The contribution of Microsoft to the progress of development tools is, of course, wonderful, but at the same time, the progress of these tools was ambiguous. The tendency to use a huge number of different technologies and approaches to software development resulted in many incompatible languages and development tools. This led to the problem of unification and compatibility of all languages, development tools and technologies ever developed by Microsoft.
Microsoft, having resolved this issue once and having created .NET Framework, faced the problem again. Now this issue presents as different verticals of .NET subsettings, which have originated from one framework but are different, and have become more and more distant from each other as they developed. The colossal effort of developers was needed to create a single software platform. The result of such work was .NET Core – one framework for all .NET verticals.
.NET Core is not just another .NET Framework. As opposed to .NET Framework, it is an absolutely new .NET platform with technologies and work principles entirely different from .NET. Absolutely everything has changed in .NET Core: the framework and its core building principles, the distribution and upgrade scheme (NuGet), development frameworks (Visual Studio 2015/2017 and Visual Studio Code), web development platforms (Asp.NET Core), and even the compiler *(Roslyn). However, Microsoft and .NET Foundation have not hurried to switch fully to .NET Core; they are developing it along with other .NET platforms.
One could encounter different situations where it becomes necessary to write one’s own code compiler, interpreter or analyzer for a programming language. Creation of compilers and interpreters is believed to be an “aerobatics” in programming, whilst the creation process itself is seen as very complicated and time consuming. However, the .NET platform has had tools existing quite for a long time, which greatly simplify this task.
What we had before Roslyn came
The .NET Framework can compile a source code without Visual Studio installed on the machine. The .NET Framework (starting with version 2.0) includes command line compilers csc.exe and vbc.exe. These compilers can be used to build .NET applications from any text file containing C# or Visual Basic source code. The compilers are run from the command line. The command line compiler parameters enable you to:
Set the name of the compiled file (/out);
Collect console applications (/target:exe);
Collect applications with graphical interface without using a console (/target:winexe);
Write command-line arguments for the *.rsp file and specify the name of the rsp file as the command-line argument (@file.rsp).
The csc and vbc parameters perfectly handle the task of compiling a source code contained in one file. But MSBuild is used for the more complex tasks of compiling and assembling projects. Moreover, Visual Studio files *.csproj, *.vbproj and *.vcxproj serve as XML codes for MSBuild. Visual Studio uses MSBuild to build projects. In addition, MSBuild can be called from the command line or from a .NET application code via APIs.
It is also possible to generate a low-level MSIL code using System.Reflection.Emit. You can also go for dynamic code generation for .NET programming languages using CodeDOM, and then compile the generated code with the help of code providers (for example, CSharpCodeProvider, which is an add-in over the csc compiler).
All the approaches listed above were being used for code generation before the emergence of the .NET Compiler Platform, better known as Roslyn.
Roslyn is a collection of open-source compilers, code analysis and refactoring tools which work with C# and Visual Basic source codes. This set of compilers and tools can be used to create full-fledged compilers, including, first and foremost, source code analysis tools.
The History of Roslyn
The name “Roslyn”, the new platform for compiling a source code, was first written by Eric Lippert, a former Microsoft employee, when he started to recruit developers for a new project. Lippert named the compiler in honor of Roslyn, a suburb in Washington.
The first version of Roslyn was released in October 2011 as a part of Community Technology Preview (CTP) – an extension for Visual Studio 2010 SP1. The update of CTP in September 2012, despite the large scale, was not very successful. It had the so-called “breaking changes” – changes in Roslyn components, which could potentially crash other components. Besides, not all the features of the CTP APIs were implemented for C# and Visual Basic languages.
At its Build conference in April 2014, Microsoft announced Roslyn as an open source project, and also implemented a way to integrate Roslyn in Visual Studio 2013. Since then, Roslyn has been distributed under the Apache 2.0 license. However, even by then, not all Roslyn features were implemented – there were plans for deployment in C# 6.0 and Visual Basic 14.0.
Starting with 2015 version, Visual Studio uses Roslyn to compile and build its own projects. However, to date, Roslyn only supports two languages – C# and Visual Basic.
In January 2015, Microsoft moved Roslyn source code to GitHub.
Installing Roslyn
To date, Roslyn has remained a part of Visual Studio 2015 and is installed together with it. Roslyn is a part of Visual Studio 2017 as well. It has been released in March 2017.
However, Roslyn is not included in the .NET Framework. Even in the .NET Framework 4.6 version, the traditional csc.exe and vbc.exe compilers are included. This is done for it to be compatible with previous .NET Framework versions.
To install Roslyn compilers without installing Visual Studio, you need to download and install Microsoft Build Tools. Roslyn can also be downloaded from Github, then you can compile and get binary files csc.exe and vbc.exe, which can be accessed from the command line.
APIs for Roslyn compilers
Most of the existing traditional compilers come as “black boxes”, which “magically” convert the source code into an executable file or library. Unlike them, Roslyn allows you to access each stage of the code compilation and application creation process via its own APIs.
Together with compilers, other “black boxes” are often supplied – integrated development environments (IDEs) that can enable you to increase the development speed with convenient tools, such as code highlighting, Intellisense, refactoring tools, performance analysis tools (profilers) and other complex tools. Roslyn takes over these features and also provides an API to them. Moreover, with Roslyn, the developer can work with the compiler from his own application, using the compiler as a service to:
Generate code in C# and Visual Basic (like CodeDOM);
Analyze code;
Refactor code;
Use C# and Visual Basic as script languages, interpreting instead of compiling the code. Roslyn APIs are represented by three sets (Figure 1).
Fig. 1 – Roslyn APIs
The compiler APIs allow you to get an object model of processes that occur at each stage of the compilation process, regardless of the Visual Studio components installed (Figure 2).
Fig. 2. Compiler APIs
The Roslyn compiler pipeline is represented by four phases, each of which has its own object representation:
The parser displays information in the form of a syntax tree;
The symbol declaration phase displays a hierarchical symbol table;
The binding phase returns information in the form of semantic analysis results;
The emitting phase provides APIs for generating low-level code in MSIL language (similar to what System.Reflection.Emit does).
Language services use these APIs to perform their own functions. For example, code highlighting uses a syntax tree, while an object browser uses a hierarchical symbol table.
Roslyn diagnostic APIs allow you to handle errors and warnings that occur at all the compilation stages. Roslyn also allows you to process errors through analysis tools written by the user.
Scripting APIs allow executing C# or Visual Basic code without compilation – something similar to the REPL interactive environment in Perl, Python, Haskell, Erlang, and others.
Workspace APIs gives direct access to the application’s object model in the compiler without parsing the source code files for the second time. The APIs also allow for projects tuning, management of project dependencies, source code generation without using Visual Studio components.
Syntax trees
The syntax tree is the basic structure used by Roslyn for compilation, code analysis, binding, refactoring, code generation and other operations. Roslyn syntax trees have three key properties:
They contain all the source information, such as grammatical constructs, tokens, directives, comments and even whitespaces – all this information is contained in the syntax tree;
The syntax tree or its part can be converted back to the source code – you can build syntax trees and generate code from them, you can edit the syntax tree and it will generate a corrected code;
They are thread-safe and protected from changes. This means that you will not be able to directly change the data in the syntax tree. The tree completely reflects the state of the source code at the time of construction.
These three important attributes of the trees allow you to work with the syntactic structure of the source code, including in custom projects, accessing it through APIs. These properties have also greatly simplified complex refactoring operations, and this happens naturally without direct code editing but only by editing the syntax tree. Each syntax tree consists of the following elements:
Syntax Nodes – they represent complex syntactic constructs, such as declarations or expressions;
Syntax Tokens – they represent the simplest constructs for constructing syntax nodes. Syntax tokens consist of, for example, an identifier or operator;
Syntax Trivia – it represents parts of the source text that are mainly insignificant for the compiler, such as comments, directives or whitespace;
Spans display positions within the source text of each node, token or trivia, and its length;
Kinds identify the syntax unit in the tree;
Errors are processed in the syntax tree in two ways: either by inserting the expected token, or by adding a token that is unknown to the compiler as a trivia.
Semantic model and Workspace APIs
Unlike syntax trees that represent the structure of source code, semantics is the logic in the source code and all its constructs. It includes declarations of variables, classes, objects, fields, methods, function calls and passing parameters to them, types of operands and operation results, and operator priorities. Semantic analysis of source code checks the code (or syntax tree in Roslyn) for compliance with the rules of the language. Semantic model provides the following information about the source code:
Semantic symbols: source elements or elements imported from libraries (types, methods, properties, fields, events, etc.);
Resulting type of expression;
Diagnostic data: errors, warnings, exceptions, etc.
Workspace APIs represent the object model of solutions, projects in solutions and documents in projects. All the objects and methods listed above can be called from any .NET application working with Roslyn as a service and using Roslyn APIs.
Working with Roslyn: samples
There are so many examples of working with Roslyn. Here are some of them:
Roslyn will be developed further in two important areas: creation of new features and improving existing algorithms. The following are expected among the qualitative improvements of algorithms:
Increasing the performance and speed of algorithms in the compiler platform;
Creating a new implementation of PDB Writer with big parallelism when writing text to a PDB file;
Increasing the test coverage with the help of new testing tools;
Eliminating Roslyn’s dependence on the full version of .NET Framework so that Roslyn could be deployed, for example, on WinRT.
Some of the features of Roslyn compilers are still considered experimental and are being tested publicly. Others that have already been implemented can be improved – performance, speed and quality of work can be enhanced. Still others associated with the new functionality require a decision by Microsoft and the .NET Foundation community to be taken first before intensive development and implementation could start. Here are some of the ways to improve the following versions of Roslyn compilers:
New features for programming languages C# 6.0 and Visual Basic 14.0 (more);
APIs for creating XML documentation from code comments;
Improvement of diagnostic APIs for synchronous code analysis in the process of writing it. For example – identifying and indicating errors and warnings while writing code without running it for compilation;
Increasing the performance of code analyzers via Roslyn APIs;
Increasing the number of rules for static code analysis tool FxCop;
Creating APIs for writing custom static code analyzers;
Modifying the semantics of some expressions for scripting languages (C# Script and VB Script);
Improving REPL interface – interactive environment windows for programming within command line interface tools;
Improving APIs for working with scripting languages (C# Script and VB Script);
Increasing the performance of FindAllReferences operation;
Improving the algorithms for finding conflicts when renaming.
Some more piece about Roslyn
Despite the large number of flaws, the Microsoft’s new compiler platform Roslyn is gaining popularity, and it’s no accident. Roslyn is one of the few compilers that give you the opportunity to observe all the compilation and assembly stages, access any intermediate results and internal compiler constructs, as well as use various language services of the compiler, refactoring and diagnostics tools. Due to the wide interpretation options inherent in Roslyn, the C# and Visual Basic have become scripting languages. Despite its relatively small history, Roslyn is already being used in large projects, such as IDE Visual Studio 2015, static code analyzer PVS-Studio, and cross-platform framework .NET Core. It is also used as an alternative to script system Windows PowerShell. In the future, the number of such projects will only increase.
Some life hacks on the use of Roslyn
Roslyn provides a huge set of tools for building your own compilers, code analyzers, interpreters and scripting languages. A significant shortcoming of Roslyn is that it only works with two programming languages: C# and Visual Basic. However, Roslyn makes it easier to create your own language on the .NET platform. In this case, you only need to translate the code into C# or Visual Basic, or create a syntax tree, and then use Roslyn compiler APIs to build a full-fledged application on the .NET platform. Another option is to run the generated code for execution (interpretation) as a script. If you need to generate and compile a source code using C# as a scripting language, then the best solution is to use Roslyn compiler APIs. If you do not like the source code analyzers built into Visual Studio, then Roslyn APIs could enable you to create your own. You can even create your own IDE, using the features of this compiler platform and connecting it as a service to your project.
Roslyn is not just another Microsoft compiler – it is an off-the-shelf framework, which you can use to create your own source code tools. Roslyn gives .NET developers many new features. It is a great tool that helps you to write your own compiler, interpreter or analyzer for a programming language. We advise you to study how the compiler works for it would simplify your tasks. We are interested in Roslyn because it can be used to create your own programming language on the .NET platform.
Team Foundation Server 2015 has a variety of options that very few know about. This article will tell you about operation nuances and settings of the product. You will see for yourself that TFS is not only for .NET developers.
Team Foundation Server 2015 is the newest version of platform for managing Microsoft’s applications life cycle.
It facilitates web development by:
team chat;
task planner;
test schedule;
code review process;
cloud-based load testing;
high-efficient merging;
kanban board reorganization.
Above all, no more need to build and deliver a new website version to the server manually. Just click one button and your new build is on the server!
Who uses TFS 2015?
The platform is integrated into the Visual Studio environment and has an intuitive interface. It is friendly to .NET teams, yet could it come in handy to others?
Many projects require using several languages and clearly separating responsibilities. You may have a back-end code in C# and a front-end code in Angular. The solution will be Visual Studio for Angular developers.
What about developing mobile applications, with one IDE for iOS and another for Android? Without VS you can only go for additional software to work with TFS. Yes, this means an extra cost, but it is worth it: look how easily you can use the platform now.
How can mobile app developers work with the build?
Let us use Android Application as an example.
To operate successfully you don’t need any additional software: Java, Gradle and Android SDK are already installed on an Android developer’s computer.
1. Creating a build
Click the icon Plus in the left menu. Templates appear in a new window. Choose Empty.
Press the OK button and you have a new build.
The build consists of consecutive steps.
2. Creating a new step
Choose Android Build, press the Add button and close the window. You will see a build step configuration window with self-explanatory fields.
SOLUTION. As you know, there is no direct tool for publishing applications after the Play Market build in TFS. You need to use your imagination and add a Command Line after the Android build. It executes the bit of code written in advance for Google Play publishing: the application will be built and published on a button click!
3. Build configuration
It pays to delve into the build configuration to make your life easier once and for all. The most interesting things are variables and triggers. You need triggers to configure a scheduled build, while variables can be used for tweaking. For instance, a variable responsible for choosing either Demo or Release build mode can be pushed to a build step.
TFS brings developers together and opens up more opportunities. Use your imagination: the platform will give you a tool to realize your idea. Automatize repetitive processes to make coding easier.
Have you used TFS in your projects, or your customers’ ideas in life? What did you think about this solution and workflow for your cases?
As always, your comments are very welcome. We will answer all your questions and suggestions about this topic.
In our First and Second parts we examined the topic of real-time video streaming, how it’s done on iOS and took to pieces the process itself. And now:
Let’s Compare The Results Of Video Encoding On Various iOS Devices!
Disclaimer
In order to convey an informative experiment in comparing various video encoding methods, we created a test environment, an application that allows us to measure the results properly.
The app uses three encoders:
Hardware – accessible via VideoToolbox library.
Hardware – accessible via AVAssetWriter. For this purpose the realization from kickFlip Library was used – OS broadcasting solution for your iOS applications.
Software – compiled ffmpeg 3.0 library with compiled as dependency x264 library.
We wanted to find out the limits of each method and conducted research for multiple resolutions used by AVCaptureSession: 352×288, 640×480, 1280×720, 1920×1080, 3480×2160. The handheld devices chosen for the tests: iPhone 4S – the weakest iOS8 device, iPhone 6 plus, and iPad Air 2 – one of the most powerful devices in the market. During the tests we determined and measured the CPU usage and delays when encoding the video in H.264 format.
There is a certain margin of error and the results might differ from the results acquired during such tests in a different environment here. However, our results show the difference in encoding efficiency on various devices and show it quite well.
ffmpeg with x264 (sw)
AVAssetWriter (kickflip realization)
VideoToolbox
352×288
delay: ~ 0.60 s. CPU Used: ~ 55%-60%
delay: ~ 0.39 – 0.46 s. CPU Used: ~ 8% – 12%
delay: ~ 0.07 – 0.087s. CPU Used: ~ 7% – 9%
640×480
delay: ~ 0.75 – 0.85 s. CPU Used: ~ 130% – 160%
delay: ~ 0.46 – 0.5 s. CPU Used: ~ 8% – 12%
delay: ~ 0.067 – 0.087s. CPU Used: ~ 7% – 9%
1280×720
delay: ~ 1.55 – 1.63 s. CPU Used: > 160%
delay: ~ 0.688 – 0.77 s. CPU Used: ~ 8% – 12%
delay: ~ 0.114 – 0.118s. CPU Used: ~ 7% – 9%
1920×1080
delay: ~ 3.8s. CPU Used: > 160%
delay: ~ 0.84 – 0.88s. CPU Used: ~ 8% – 12%
delay: ~ 0.177 – 0.181s. CPU Used: ~ 7% – 9%
It is clear that the software encoder overloads the CPU and it fails to deliver reasonable results even working with 640×480 resolution. You can also notice that there is more than 100% load of CPU meaning that some frames will be left out as the CPU won’t be able to process them in time. Obviously, the device battery will die faster.
Hardware encoders work wonderfully and showed great results regardless of resolutions. The average CPU usage was kept within 7-12% limits. We found that AVAssetWriter has a longer delay and the difference is quite noticeable.
iPhone 6 Plus and iPad Air 2
Here are the results after testing the devices.
iPhone 6 Plus:
ffmpeg with x264 (sw)
AVAssetWriter (kickflip realization)
VideoToolbox
352×288
delay: ~ 0.49 – 0.57 s. CPU Used: ~ 26%-37%
delay: ~ 0.21 – 0.276 s. CPU Used: ~ 9% – 10%
delay: ~ 0.03 – 0.04s. CPU Used: ~ 7% – 8%
640×480
delay: ~ 0.49 – 0.57 s. CPU Used: ~ 40% – 70%
delay: ~ 0.22 – 0.24 s. CPU Used: ~ 9% – 10%
delay: ~ 0.035s. CPU Used: ~ 7% – 8%
1280×720
delay: ~ 0.64 – 0.70 s. CPU Used: ~120% – 170%
delay: ~ 0.23 – 0.3 s. CPU Used: ~ 9% – 10%
delay: ~ 0.044 – 0.045s. CPU Used: ~ 8% – 9%
1920×1080
delay: ~ 1.08 – 1.26s. CPU Used: > 160%
delay: ~ 0.26s. CPU Used: ~ 9% – 10%
delay: ~ 0.0615 – 0.069s. CPU Used: ~ 9% – 10%
iPad Air 2:
ffmpeg with x264 (sw)
AVAssetWriter (kickflip realization)
VideoToolbox
352×288
delay: ~ 0.53 – 0.62 s. CPU Used: ~ 40%-50%
delay: ~ 0.29s. CPU Used: ~ 9% – 10%
delay: ~ 0.026s. CPU Used: ~ 6% – 8%
640×480
delay: ~ 0.53 – 0.58 s. CPU Used: ~ 45% – 60%
delay: ~ 0.29 s. CPU Used: ~ 9% – 10%
delay: ~ 0.029s. CPU Used: ~ 7% – 10%
1280×720
delay: ~ 0.57 – 0.61 s. CPU Used: ~90% – 170%
delay: ~ 0.3 s. CPU Used: ~ 9% – 10%
delay: ~ 0.03s. CPU Used: ~ 9% – 11%
1920×1080
delay: ~ 1.76s. CPU Used: 180% – 270%
delay: ~ 0.32s. CPU Used: ~ 9% – 12%
delay: ~ 0.038s. CPU Used: ~ 10% – 12%
In order to make the data more comprehensible and easy-to-read, we decided to put them on a bar chart. On the charts below you can see how three encoding methods fare against each other.
Apparently, powerful CPUs handle software encoding much better than previous iterations, but such a high CPU load is unacceptable even for modern handheld devices with improved batteries. To top it all off, the software encoding efficiency is much lower than that of hardware encoders.
This small test shows the true advantage that hardware encoders have over the software solutions. VideoToolbox functionality is much more diverse and efficient when it comes to compressing and broadcasting videos.
It is important to note that the delay of AVAssetWriter solution may increase depending on the encoding method used by a developer. If the minimal delay is a goal then VideoToolbox is much more preferable.
Long Live The Battery!
In order to show just how much impact encoding has on an end-user, we conduct a test on the batteries of the devices. We measured how long they can supply power to the device broadcasting a stream. The test was conducted using iPhone 5s with 100% battery and for 1080p resolution. Here’s the data.
The results show clearly that with software encoding the battery lasted less than 2 hours while hardware solutions extended this period to more than 3 hours.
Conclusion
The tests allowed us to determine whether the hardware encoders do their job better than software ones. Moreover, we successfully measure the effectiveness of popular encoding methods for iOS devices and now know exactly which methods to use when making a video broadcasting feature on a iOS device!
Previously, in our Part 1, we talked about devs struggling to get the broadcasting available from an iOS device. Now we have direct access to compressed files and this accessibility gave us the freedom we dreamt about. We came up with a qualitatively better method of preparing frames for subsequent broadcasting. In general, we can split this process into three steps.
Step 1. Video capturing. Сam catches the video and the device creates CMSamplebuffer packages with all the media samples and data.
Step 2. Video compressing. Received data is being compressed with the help of VideoToolbox. This process compresses the data within the CMSamplebuffer packages.
Step 3. Converting into NALUs to optimize online streaming.
Let’s Talk The Process Step By Step
We can refer to numerous documents and examples to explain how the first step is being done, but we want to focus your attention on the fact that during this first step process we receive CMSamplebuffer streamline containing uncompressed CMPixelBuffer data.
During the second stage we need to create and tune VTCompressionSessionRef. To compress an input frame we use VTCompressionSessionEncodeFrame function while using CMSampleBuffer as a parameter for the process. Upon finishing the operation the encoder uses a call-back function, which we set up during the initialization of the VTCompressionSessionRef. As a result of this complicated process we receive a new CMSampleBuffer package, that now contains compressed data. It is the very same CMSampleBuffer stream, but it contains CMBlockBuffer structures with a compressed video.
The following step requires us to convert the CMSampleBuffers’ stream into NALUs (Network Abstraction Layer Unit) stream. That is how it’s usually done when working with H.264 encoder. H.264 stream can be made in two different formats – Annex B and AVCC. Apple calls the format most commonly used for streaming Elementary Stream, we call it Annex B. iOS media libraries can work with H.264 stream in the AVCC format (MPEG-4 stream). Regardless of the format, there are 19 various types of NALUs and each NALU can store two types of data: VCL (Video Coding Layer) or meta. Each package can be easily parsed and processed as it has an appropriate descriptive header. The core difference between Annex B and AVCC formats lies in NALUs being splitted into the videostream.
Two Formats – One Way
Annex B doesn’t carry its own size, but starts with a start code. This code is usually 0x000001 or 0X0000001 (3 or 4 bytes). This allows splitting the whole stream into multiple NALUs.
AVCC defines the size of each NALU with a header that precedes the NALU itself. The header is about 4 bytes long, but might be lesser.
Each CMSampleBuffer package with compressed data contains the following:
Pts (CMTime) – presentation time stamp
Format description (CMVideoFormatDescription) that apparently carries the description of the format
Block Buffer (CMBlockBuffer) that contains parts of or a whole compressed frame
A CMSampleBuffer stream is a stream of I-, B-, and P-frames. Each stream may contain one or multiple AVCC format NALUs. Annex B, which is used for transmitting, is a sequence of PPS (Picture Parameter Set), SPS (Sequence Parameter Set), I-frames, B-frames, and P-frames NALUs. The amount of P- and B-frames may vary.
PPS and SPS contain parameters needed for encoding and must precede each I-frame.
For each NALU the length parameter is switched for the start code and then added to the stream. In order to correctly measure the length and amount of NALUs in a stream of CMBlockBuffer data, we use the length header coming forward each NALU.
The correct length is being coded in big-endian format and thus we need to swap its value in order to get correct NALU’s length. When a CMSampleBuffer contains an I-frame, we make PPS and SPS NALUs out of I-frame format description and put them before other NALUs from the CMBlockBuffer within the corresponding CMSampleBuffer.
All about results in a H.264 Annex B format stream that is ready to be broadcast and displayed on other devices!