Ways of creating multi-threaded applications in .NET Part 3. TPL and PLINQ

This is the third part of the article dedicated to the methods of creating multi-threaded apps in .NET. If you are interested in this topic, then we invite you to read Part 1 and Part 2 first.

This third part is devoted to Task Parallel Library (TPL) and Parallel Language Integrated Query (PLINQ). Though they appeared relatively recently in .NET, they are fully capable of solving complex problems on multi-core processors.

Task Parallel Library (TPL)
Task Parallel Library (TPL) is designed for execution on multi-core processors. It appeared in .NET Framework 4.0 when it became obvious that standard .NET tools for working with threads were not enough to efficiently execute multithreaded programs on multi-core processors. To use TPL’s basic functionality, you only need to add the System.Threading.Tasks namespace to the project.

using System.Threading.Tasks;

This library allows you to perform computationally complex tasks on several processor cores at the same time. Task Parallel Library simplifies the process of creating and destroying threads. The library itself uses a thread pool in its operation. Although apart from TPL, .NET contains many tools for working with threads. But starting with .NET 4.0, Microsoft recommends using TPL for creating multi-threaded applications.

Task class

The Task class is designed to speed up execution of a single, long operation. A task job is executed asynchronously in a separate thread, although TPL supports synchronous execution in the current thread.

Action delegate is passed as a parameter to the Task constructor. This delegate points to a method (function) that has no parameters and does not return a value.

If you’re interested in more, read Microsoft Roslyn – using the compiler as a service

To run a task for execution, the Task.Start() method is used.

When a Task object is executed asynchronously, the method that launched that task does not wait for its completion. Here, you can have such a situation where the method, for example Main, which launched a Task object, has already ended, while the Task object is still executing. To wait until the task is completed in the method that invoked it, the task.Wait() function is invoked.

An array of tasks can be run using the Task.Factory.StartNew() method. Here, we also pass an Action delegate as a parameter. Like the Task constructor, this constructor can take a lambda expression instead of a pointer as a function.

The task.WaitAll() method ensures that the method that launched an array of tasks for execution waits until all tasks are completed.

The Task class supports a number of properties to obtain information about the state of a task being executed:

  • AsyncState – returns the state object supplied when the Task was created;
  • CurrentID – returns the identifier of the currently executing Task;
  • Exception – returns an exception object that occurred during execution of Task;
  • Status – returns the status of the Task.

Tasks can return results. For this purpose, you need to typify the Task class when invoking the constructor of this class.

Task int task1 = new Task int(action);

To get result, you need to invoke the Result property of the Task class object.

int i = task1.Result;

The Task class allows you to create continuation tasks. These tasks will be launched after the tasks that invoked them are completed. To create and run a continuation task, the ContinueWith method needs to be invoked from the task that you want to continue.

Task task2 = task1.ContinueWith(action2);

Thus, by invoking subsequent tasks as continuations of the previous ones, you can build a certain order of execution of tasks.

Parallel class
The Parallel class is a significant part of TPL. It allows you to strongly simplify code parallelization.

The Parallel class has three main methods:

  • Parallel.For
  • Parallel.ForEach
  • Parallel.Invoke

Parallel.Invoke method

The Parallel.Invoke method allows you to parallelize a block of consecutively executed operators.

using System;
using System.Threading.Tasks;
using Threading;

namespace TPLexample
{
class Program
{

static void Factorial(int x)
{
int result = 1;
for (int i = 1; i <= x; i++)
{
result *= i;
}
Console.WriteLine(“Running task {0}”, Task.CurrentId);
Thread.Sleep(5000);
Console.WriteLine(“Result {0}”, result);
}

static void Display()
{
Console.WriteLine(“Running task {0}”, Task.CurrentId);
Thread.Sleep(5000);
}

static void Main(string[] args)
{
Parallel.Invoke(Display,
() => {
Console.WriteLine(“Running task {0}”, Task.CurrentId);
Thread.Sleep(5000);
},
() => Factorial(10));

Console.ReadLine();
}
}
}

This method takes an array of Action delegates or lambda functions, separated by a semicolon (see example).

Parallel.Invoke(Display,
() => {
Console.WriteLine("Running task {0}", Task.CurrentId);
Thread.Sleep(5000);
},
() => Factorial(10));

These methods can be of any number. They will be automatically converted into Tasks and executed asynchronously and in parallel – based on the number of logical processor cores in the system.

Parallel.For method

The Parallel.For method allows you to execute parallel iterations of loops. The method takes three parameters.

The first parameter is int – the first value of loop.

The second parameter is int – the end value of the loop.

The third parameter is Action – a delegate pointing to a method (function) or lambda expressions, separated by a semicolon. The Action delegate will be executed once per iteration.

using System;
using Threading;
using System.Threading.Tasks;

namespace ForExample
{
class Program
{

static void Factorial(int x)
{
int result = 1;
for (int i = 1; i <= x; i++)
{
result *= i;
}
Console.WriteLine(“Running task {0}”, Task.CurrentId);
Console.WriteLine(“Factorial of number {0} = {1}”, x, result);
Thread.Sleep(3000);
}

static void Main(string[] args)
{
Parallel.For(1, 10, Factorial);

Console.ReadLine();
}
}
}

In the code given above, the factorials of numbers from 1 to 9 are calculated. In this case, factorial calculation operations are performed not sequentially, but in parallel. Therefore, the factorials of numbers are outputted chaotically as parallel factorial calculation operations are completed. The console output example illustrates this:
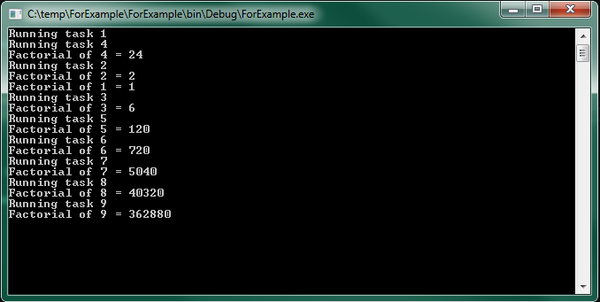
Figure 1 Calculating the factorials of different numbers in the Parallel.For loop.

Parallel.ForEach method

This method traverses the collection implementing the IEnumerable interface. Just like the foreach operator, but unlike the classical foreach, it performs parallel access to elements in this collection. This method is parameterized and has the following definition:

ParallelLoopResult ForEach<TSource>(IEnumerable<TSource> source, Action<TSource> body);

where the first parameter represents the collection in which enumeration will be made, the second parameter is an Action delegate (or lambda expression), executed once per iteration of the loop for each element of the IEnumerable collection. Parallel.ForEach returns a ParallelLoopResult structure that contains data about execution of a parallelized loop. The following example illustrates the use of Parallel.Foreach.

using System;
using System.Collections.Generic;
using System.Threading;
using System.Threading.Tasks;

namespace ForeachExample
{
class Program
{

static void Factorial(int x)
{
int result = 1;

for (int i = 1; i <= x; i++)
{
result *= i;
}

Console.WriteLine(“Running task {0}”, Task.CurrentId);
Console.WriteLine(“Factorial of {0} = {1}”, x, result);
Thread.Sleep(5000);
}

static void Main(string[] args)
{
ParallelLoopResult result = Parallel.ForEach<int>(
new List<int>() { 1, 2, 4, 8, 3, 9, 5, 25 },
Factorial);

Console.ReadLine();
}
}
}

Iterations of the Parallel.Foreach loop are terminated in an order different from the order the numbers in the initial sequence were found. The order of output in the console depends on the execution time of the next iteration of the parallel loop, number of concurrent iterations in the loop, and complexity of calculating the factorial of a number. The more complex the factorial calculation operation is, the longer execution of iteration of the loop as it is found will take, as evidenced by the console output:
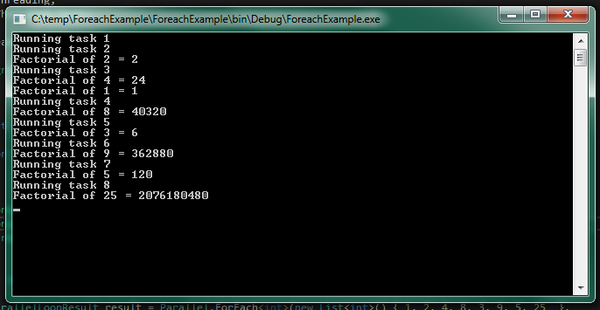
Figure 2 Calculating the factorials of numbers in the Parallel.Foreach loop.

Early termination of loop

Just like in classical loops for and foreach, which provide for early exit from the loop using the break operator, the Parallel.For and Parallel.ForEach methods provide for early exit from a loop.

using System;
using System.Threading.Tasks;

namespace ParallelBreak
{
class Program
{
static void Factorial(int x, ParallelLoopState pls)
{
int result = 1;

for (int i = 1; i <= x; i++)
{
result *= i;
if (i == 6)
pls.Break();
}

Console.WriteLine(“Running task {0}”, Task.CurrentId);
Console.WriteLine(“Factorial of {0} = {1}”, x, result);
}

static void Main(string[] args)
{
ParallelLoopResult result = Parallel.For(1, 8, Factorial);

if (!result.IsCompleted)
{
Console.WriteLine("Loop ended on iteration number {0}", result.LowestBreakIteration);
}

Console.ReadLine();
}
}
}

To exit a loop ahead of time, you need to pass the ParallelLoopState class object as a second parameter to the Parallel.ForEach (or Parallel.For) method used as a second parameter (Action delegate). Then, the Break() method of the parallelLoopState object can be invoked anywhere in the code of the function wrapped in this delegate. When running Parallel.ForEach, once the system encounters the Break method, it will exit this loop at the first opportunity in all threads and return the ParallelLoopResult object.

If you’re interested in more, read .NET Core Framework Complete Review

The ParallelLoopResult object returned by the Parallel.For and Parallel.ForEach loops contains two important loop state properties:

  • bool IsCompleted – determines whether the loop completed its work or whether its work was interrupted prematurely;
  • int LowestBreakIteration – returns the smallest index (from the number of indices of iterations being processed in parallel) at which the loop was interrupted.
  • The result of this example is shown in the console output below.
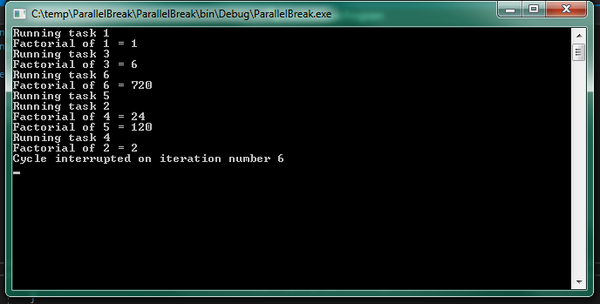
Figure 3 Early termination of the Parallel loop by a command in the loop code.

There is also a way to abort a loop using CancellationToken. And this method works both with Parallel methods and with the tasks represented by Task objects. This is useful when you need to abort an operation that has taken too long or when the delegate passed to the parallel method (Task, TaskFactory, Parallel.For, Parallel.ForEach, Parallel.Invoke) is represented as a lambda function.

To cancel a parallel operation with CancellationToken, you need to:

  1. Connect the System.Threading namespace (in addition to those already existing in the System and System.Threading.Tasks namespaces in the project);
  2. Create an object of the CancellationTokenSource class;
    CancellationTokenSource CTS = new CancellationTokenSource();
  3. Obtain a CancellationToken token from the CancellationTokenSource object;
    CancellationToken token = CTS.Token;
  4. Catch token’s requestion using the following structure:

if (token.IsCancellationRequested)
{
Console.WriteLine("Operation interrupted");
return;
}

  1. Cancel the operation by invoking the Cancel() method of the CancellationTokenSource class object;
    CTS.Cancel();

The example below illustrates the use of CancellatrionToken.

using System;
using System.Threading;
using System.Threading.Tasks;

namespace ParallelToken
{
class Program
{
static void Main(string[] args)
{
CancellationTokenSource CTS = new CancellationTokenSource();
CancellationToken token = CTS.Token;
int number = 6;

Task task1 = new Task(() =>
{
int result = 1;
for (int i = 1; i <= number; i++)
{
if (token.IsCancellationRequested)
{
Console.WriteLine("Operation interrupted");
return;
}

result *= i;
Console.WriteLine("Factorial of {0} = {1}", i, result);
Thread.Sleep(5000);
}
});
task1.Start();

Console.WriteLine("Enter N to cancel the operation or wait for it to finish");
string s = Console.ReadLine();
if (s == "N")
{
CTS.Cancel();
Console.WriteLine("Cancelled by user. Press any key to exit");
Console.ReadKey();
}

Console.Read();
}
}
}

This example displays the following console output:
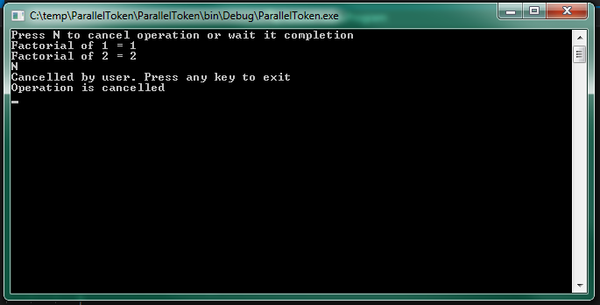
Figure 4 Early termination of the Parallel loop with CancellationToken.

CancellationToken can be passed to an external method as an argument:

static void Factorial(int x, CancellationToken token);

In the method itself, you only need to check whether there is already a request to cancel the operation and complete the parallel operation.

if (token.IsCancellationRequested)
{
Console.WriteLine("Operation interrupted");
return
}

You can override the Parallel.For() and Parallel.Foreach() methods by adding one more parameter to them – the ParallelOptions class object – in which you can install CancellationToken:

Parallel.ForEach<int>(new List<int>() { 1, 2, 3, 4, 5 }, new ParallelOptions { CancellationToken = token }, Factorial);

But in this case, it will be necessary to catch the operationCancelledException exception, which occurred when the operation was canceled – with the following construction:

try
{
Parallel.For(1, 5, new ParallelOptions { CancellationToken = token }, Factorial);
}
catch (OperationCanceledException ex)
{
Console.WriteLine("Operation interrupted");
}
finally
{
CTS.Dispose();
}

In this case, the parallel loop will be terminated, while the resulting exception will not stop the entire application.

Parallel LINQ (PLINQ)
LINQ was designed as a data query interface, which, based on the collection query results, processes them sequentially. Beginning with .NET 4.0, the ParallelEnumerable class appeared in the System.Linq namespace, allowing you to access the collection in parallel – using the capabilities of all the system’s processors.

However, by default, PLINQ processes data sequentially. Transition to parallel processing occurs if it really leads to faster query data processing.

But, as a rule, in parallel data query operations, there are additional costs. In this case, priority is given to sequential data processing. Therefore, PLINQ is usually applied in very large collections or in complex query operations, where it is really possible to achieve benefits when parallelizing operations.

It should also be taken into account that when sharing access to the same data from multiple threads, access blocking will be enabled, which will also have a big impact on PLINQ performance.

AsParallel() method

This method allows parallelizing a query to a data source. When this method is invoked, the data source is divided into parts (if possible) and then, operations are performed on each part as individual thread.

In fact, this is a normal LINQ query, but the AsParallel() method is also applied to the data source.

static int Factorial(int x)
{
int result = 1;
for (int i = 1; i <= x; i++)
{
result *= i;
}
Console.WriteLine("Factorial of {0} = {1}", x, result);
return result;
}

static void Main(string[] args)
{
int[] nums = new int[] { -6, -2, 0, 1, 2, 4, 3, 5, 6, 7, 8 };
var factorials = from n in nums.AsParallel()
select Factorial(n);
}

or

var factorials = nums.AsParallel().Select(x => Factorial(x));

ForAll() method

This method optimizes parallel queries even more. An algorithm like Parallel.Foreach is used to output results in this case. But at the same time, when the ForAll() method is used, delays increase during query execution due to assembly of data received from different threads into one set and enumeration of the data in a loop.

The ForAll() method takes an Action delegate or a lambda function as an argument.

int[] nums = new int[] { -6, -2, 0, 1, 2, 4, 3, 5, 6, 7, 8, };
(from n in nums.AsParallel()
where n > 0
select Factorial(n)).ForAll(n => Console.WriteLine(n));

When executing a parallel query, the resulting selection can be constructed as you like and will be unordered. You can apply the LINQ OrderBy() method or the orderby operator, but this method will sort the sample data in an alphabetical order.

var factorials = from n in nums.AsParallel()
where n > 0
orderby n
select Factorial(n);

However, this order will be different from the order in which they were located in the data source. If you want to organize the data according to the original sequence, then the AsOrdered() operator is used. In this case, this sorting will carry additional costs during query execution. If further manipulations on the set ordered by the AsOrdered() method are required, and the ordering itself is no longer required, the AsUnordered method is used.

var factorials = from n in nums.AsParallel().AsOrdered()
where n > 0
select Factorial(n);
var query = from n in factorials.AsUnordered()
where n > 100
select n;
query.ForAll(n => Console.WriteLine(n));

PLINQ error handling

When a parallel query is executed, the data source is divided into parts, and each part is processed in a separate thread. But if an error occurs in one of the threads, the system will interrupt execution of all threads. This will throw an AgregateException exception. The following code contains not only numbers but also a string in the data source (array). Therefore, an error occurs when you try to calculate the factorial from the row.

object[] nums2 = new object[] { 1, 2, 3, 4, 5, "oops" };


factorials = from n in nums2.AsParallel()
let x = (int )n
select Factorial(x);
try
{
factorials.ForAll(n => Console.WriteLine(n));
}
catch (AggregateException ex)
{
foreach (var e in ex.InnerExceptions)
{
Console.WriteLine(e.Message);
}
}

Here, the resulting exception is an AggregateException exception, as in the Parallel class methods. This exception should be caught and its InnerExceptions property should be accessed to determine the type of exceptions that occurred.

Early termination of PLINQ queries

In the event that you need to abort an operation being executed by PLINQ before it finishes (for example, by timeout), you can use the WithCancellation() method in the query, which you can pass to CancellationToken as in the example below.

using System;
using System.Linq;
using System.Threading;
using System.Threading.Tasks;

namespace PlinqCancel
{
class Program
{
static int Factorial(int x)
{
int result = 1;
for (int i = 1; i <= x; i++)
{
result *= i;
}
Console.WriteLine("Factorial of {0} = {1}", x, result);
Thread.Sleep(1000);
return result;
}

static void Main(string[] args)
{
CancellationTokenSource cts = new CancellationTokenSource();
new Task(() =>
{
Thread.Sleep(500);
cts.Cancel();
}).Start();

try
{
int[] numbers = new int[] { 1, 2, 3, 4, 5, 6, 7, 8, 9, 10 };
var factorials = from n in numbers.AsParallel().WithCancellation(cts.Token)
select Factorial(n);
foreach (var n in factorials)
Console.WriteLine(n);
}

catch (AggregateException ex)
{
if (ex.InnerExceptions != null)
{
foreach (Exception e in ex.InnerExceptions)
Console.WriteLine(e.Message);
}
}

finally
{
cts.Dispose();
}
Console.ReadLine();
}
}
}

In this example, two threads are started. In the main thread, there is a parallel query with possible early termination.

var factorials = from n in numbers.AsParallel().WithCancellation(cts.Token)
select Factorial(n);

A parallel query is interrupted (after a certain time has elapsed) as an additional thread created using the Task object.

new Task(() =>
{
Thread.Sleep(500);
cts.Cancel();
}).Start();

A console output of the example is shown below.
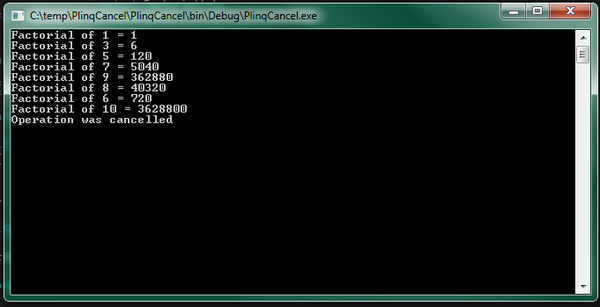
Figure 5 Early termination of parallel query using CancellationToken.

The cts.Cancel() method, as with the Parallel class, causes the OperationCancelledException exception to be thrown, which must be processed in the try { } catch block, otherwise it will crash the program. The AggregateException exception that will be thrown if any other exception occurs in one of the PLINQ threads should also be handled.

Conclusion

Despite the fact that TPL and PLINQ are relatively new in .NET, they are fully capable of solving complex problems on multi-core processors. TPL, for example, automatically parallelizes tasks between available processor cores, like ThreadPool.

The difference between TPL and ThreadPool is that TPL (like Thread objects) is designed to solve long computationally complex tasks. But if Thread objects need to be created and destroyed manually, then TPL creates threads automatically and exactly as much as is necessary for the most effective solution of the task.

The PLINQ library as a whole is similar to TPL. However, it is optimized for queries to data sources, which cannot always be effectively paralleled.
In the next part of the article, we’ll look at the thread synchronization mechanisms. Stay tuned!

If you are interested in ways of creating multi-threaded applications in .NET, we invite you to read Part 1 and Part 2.
Ways of creating multi-threaded applications in .NET (Part 2). ThreadPool Class

In Part 1 of this article, we talked about what threads are in .NET. Now, we want to dwell on the methods of background and asynchronous execution of threads in .NET apps.

These methods have advantages and disadvantages. They are not always convenient to use, but generally, background and asynchronous execution of threads offers wide opportunities in executing separate background threads for both small and long tasks.

Thread pool and its difference from the Thread class

Creation and destruction of threads are very resource-intensive processes. Performing them too often is not recommended. However, there are various small tasks that require asynchronous execution or with maximum utilization of all CPU cores. For such tasks, it is best to create a set of threads in advance and then distribute the tasks among these threads.

It would be quite good if the threads that had already completed their tasks could be re-used without wasting computational resources destroying them and creating new threads. It would also be nice if the program itself determines how many threads it would require to efficiently solve a problem.

Such a set of threads in .NET exists and is called a thread pool. It is implemented in the ThreadPool static class of the System. Threading namespace. You need not create a ThreadPool class object, and it will not work either. Such an object is created automatically when the application starts – provided the System. Threading namespace is connected in it.

If you’re interested in more, read Microsoft Roslyn – using the compiler as a service

ThreadPool can automatically increase or reduce the number of active threads to maximize task execution efficiency. The maximum allowed number of processing threads in a pool is 1023. The pool allocates a maximum of 1000 threads in an I/O operation.

To get maximum number of threads, you can use the GetMaxThreads method of the ThreadPool static class. The first parameter passed to this method returns the number of processing threads. The second parameter returns the number of I/O threads.

int nWorkers; // number of processing threads
int nCompletions; // number of I/O threads
ThreadPool.GetMaxThreads(out nWorkers, out nCompletions);

You can also specify the maximum and minimum number of threads in a pool. To set the maximum number of threads, you need to invoke the SetMaxThreads method.

ThreadPool.SetMaxThreads(int nWorkers, int nCompletions);

where nWorkers is the number of processing threads, nCompletions is the number of I/O threads. To set the minimum number of threads in a pool, use the SetMinTherads method.

ThreadPool.SetMinThreads(int nWorkers, int nCompletions);

The parameters here are exactly the same as in the SetMaxThreads method.

If, for some reason, the threads are not enough to perform the user’s tasks, the tasks will be automatically placed in a queue. As soon as at least one of the pool threads finishes its work, it will be redirected to execute tasks in the queue. If any of the threads completes its work before the rest, it will be sent back to the pool but not destroyed. This thread can be re-enabled at the first opportunity.

You can add a task to a thread pool’s queue in one of the following four ways:

  • Calling the QueueUserWorkItem method.
  • Calling asynchronous delegates BeginInvoke() and EndInvoke();
  • Using the BackgroundWorker class methods;
  • Using the Task Parallel Library (TPL) methods.

QueueUserWorkItem method

This method adds a task to the thread pool’s queue for execution and requests the required number of threads from the pool to perform this task. The name of the executable function, wrapped in a WaitCallBack delegate, is passed to the method as a parameter. The object of storing the task state data can be passed as the second parameter.

ThreadPool.QueueUserWorkItem(Job);

If the ThreadPool object does not exist at the time the method is invoked, it will be created. If the pool is already created and there is at least one free thread in it, then the task is passed to this thread. If several pool threads are free, then the pool will allocate these threads such that the task is executed as quickly as possible.

The following example uses all the basic methods of working with a thread pool – accessing a pool to display the maximum number of threads and sending a task to a pool for execution.

using System;
using System.Collections.Generic;
using System.Linq;
using System.Text;
using System.Threading;
namespace ThreadPoolTest
{
class Program
{
static void Main()
{
int nWorkers; // number of processing threads
int nIOs; // number of I/O threads
ThreadPool.GetMaxThreads(out nWorkers, out nIOs);
Console.WriteLine("Maximum threads: " + nWorkers
+ "nMaximum I/O Threads: " + nIOs);
for(int i = 0; i < 10; i++)
ThreadPool.QueueUserWorkItem(Job);
Thread.Sleep(3000);
Console.ReadLine();
}
static void Job(object state)
{
for (int i = 0; i < 3; i++)
{
Console.WriteLine("cycle {0}, is processing by thread {1}",
i, Thread.CurrentThread.ManagedThreadId);
Thread.Sleep(100);
}
}
}
}

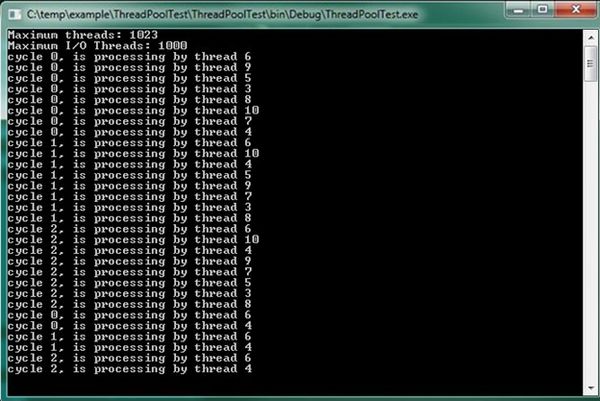
The result of the example is shown in Figure 1. The program was executed on an Intel Core i7 4770K processor, which contains 4 physical and 8 logical processor cores.

Fig. 1 Result of program execution in a thread pool.

As can be seen from Figure 1, eight threads were allocated from the pool to the program – exactly the same number of logical processor cores available.

Features of a thread pool

Using a thread pool allows you to enhance the performance of a multithreaded application. A thread pool significantly reduces the cost of starting and stopping threads, increases the number of threads that are started and stopped, and can reuse completed threads.

However, a thread pool has a number of features that in certain situations can be considered as shortcomings:

  • All threads from a pool are background thread.
  • At the end of all the foreground threads of an application, the work of all threads from the pool will also be aborted, regardless of whether they have completed their tasks or not.
  • It is impossible to make a thread from a pool a foreground thread.
  • Threads in a pool do not have a name. The only thing you can get for a thread from a pool is its ID (using the ManagedThreadID property):

Thread.CurrentThread.ManagedThreadId

  • Threads from a pool cannot be assigned a name.
  • The priority of a thread in a pool can be changed, but once it finishes executing its task and is returned to the pool, its priority will be reset to the default value (normal).
  • When processing COM objects in a thread pool, there will be problems due to the fact that such objects require the use of single-threaded apartment (STA) threads, but all the threads of a thread pool are multi-threaded apartment (MTA) threads.
  • Threads in a pool are suitable for executing small tasks, but not for permanent work (such threads need to be created using the Thread class).
  • Blocking a thread from a pool will lead to the starting of additional pool threads; the pool will continue to execute the task but this will affect performance.

A thread pool is implicitly used in the following .NET constructs:

  • Windows Communication Foundation (WCF);
  • Interprocess communication component – .NET Remoting;
  • ASP.NET;
  • ASMX Web Services;
  • Event-based Asynchronous Pattern (EAP);
  • Timers: System.Timer and System.Windows.Timer;
  • Parallel LiNQ (PLINQ).

It should be remembered that all the features of a thread pool apply to the above constructs.

Do you need experts for your software development project? Contact us now

Asynchronous delegates

The C# function can be invoked for both synchronous and asynchronous execution. When the function is invoked synchronously, it is executed in the same thread as the main program. The synchronous function invocation itself occurs in the usual way – by specifying the function name and its arguments in brackets immediately after the name.

When a function is invoked asynchronously, the runtime environment CLR allocates for the function a separate thread from the thread pool and executes the function in this thread, while the master program continues to execute in the main thread. To execute a function asynchronously, it must be wrapped in an AsyncCallBack delegate. Next, this delegate must be invoked by calling the BeginInvoke method. You can use the EndInvoke method to get the value returned by the method and terminate the method.

The following example illustrates how to work with asynchronous delegates.

using System;
using System.Collections.Generic;
using System.Linq;
using System.Text;
using System.Threading;
using System.Runtime.Remoting.Messaging;
class Program
{
public delegate int MyDelegate(int x, int y);
static AutoResetEvent are = new AutoResetEvent(false);
static int WriteSum(int x, int y)
{
Console.WriteLine("Thread {0}: Sum = {1}",
Thread.CurrentThread.ManagedThreadId, x + y);
return x + y;
}
static void Summ(IAsyncResult async)
{
Thread.Sleep(3000);
// AsyncResult type from the System.Runtime.Remoting.Messaging namespace
MyDelegate func = ((AsyncResult)async).AsyncDelegate as MyDelegate;
int sum = func.EndInvoke(async);
are.Set(); // The Set method is used in thread synchronization and gives a signal to a thread to continue working
}
static void Main()
{
MyDelegate func = WriteSum;
// The C# compiler displays an AsyncCallback delegate to refer to the SumDone() method
IAsyncResult async = func.BeginInvoke(10, 10, Summ, null);
Console.WriteLine("Thread {0}: called throw BeginInvoke() waiting to complete SumDone()",
Thread.CurrentThread.ManagedThreadId);
are.WaitOne(); // The WaitOne method waits for a Set signal from at least one thread
Console.WriteLine("Thread {0}: finished his work",
Thread.CurrentThread.ManagedThreadId);
Console.ReadKey();
}
}

To run a function for asynchronous execution, you need to declare the delegate class first.

public delegate int MyDelegate(int x, int y);

where int written after the keyword delegate is the type of the value returned by the function. The arguments of the function are listed in brackets.

The AutoResetEvent class notifies the thread generated by the asynchronous delegate that an event has occurred by calling the Set method. The value false is passed to the event constructor if AutoResetEvent is not scheduled to be triggered immediately after it is created.

staticAutoResetEvent are = new AutoResetEvent(false);

Next, you need to create an asynchronous MyDelegate delegate, which was declared earlier. The created delegate will be named func.

MyDelegate func = ((AsyncResult)async).AsyncDelegate as MyDelegate;

The EndInvoke method of the func delegate is used to return the result of asynchronous function execution.

The Set method of the AutoResetEvent class gives a signal to a waiting thread that it can resume its work. The Set method works only with waiting threads. In any other state other than waiting, the method ignores the threads. The WaitOne method is used to enter a thread in a waiting state. The WaitOne method blocks the current thread until it receives a signal generated by the Set method.

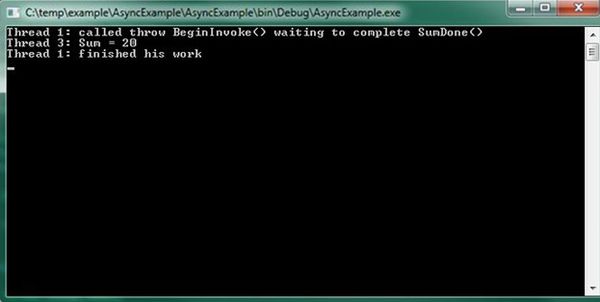
The result of the example is shown in Figure 2.

Fig. 2 – Result of execution of an asynchronous delegate.

As can be seen from Figure 2, the asynchronous delegate is actually executed in a separate thread.

BackgroundWorker Class

The BackgroundWorker class is designed to start long-running tasks in a separate thread. This class is essentially a wrapper for the ThreadPool class and uses a thread pool in its implementation. BackgroundWorker is needed if there is only one task that needs to be executed in a background mode in a separate thread.

BackgroundWorker provides the following capabilities:

  • Implementation of the protocol for sending and receiving messages on task progress, completion or early termination.
  • Flag for cancellation of an operation without using the Abort method of the Thread class.
  • Can be placed as a component on a form in a Visual Studio form designer (implements the IComponent interface).
  • Can handle exception in the main thread of a NET app (without mandatory writing of the try {} catch block in the body of the delegate of the passed thread).
  • Can change the statuses of window controls without using InvokeRequired and Dispatcher.

How to use BackgroundWorker

You can take use the features of the BackgroundWorker class in two ways:

  1. To create an instance of the BackgroundWorker class.
  2. To create a class inherited from BackgroundWorker.

When creating an instance of the BackgroundWorker class, the following needs to be performed:

  1. Create this instance by invoking the constructor.
  2. Add a DoWork event handler.
  3. Invoke the RunWorkerAsync method and pass an instance of any class inherited from object to it as an argument.

Once the work is completed, BackgroundWorker will generate a RunWorkerCompleted event.

BackgroundWorker allows you to display the progress of an operation. To do this you need to:

  1. Set the value true for the WorkerReportsProgress property.
  2. In the DoWork event handler, periodically invoke ReportProgress, indicating the amount of work done and the remaining work.
  3. Process the ProgressChanged event by requesting the ProgressPercentage property of its argument.

Event handlers ProgressChanged and RunWorkerCompleted freely access the user interface elements.

If there is a need to cancel an operation being performed by BackgroundWorker, you need to:

  1. Set the WorkerSupportsCancellation property to true.
  2. Set the Cancel property of the DoWorkArgs argument to true.
  3. Request cancellation of the operation using the CancelAsync method of the BackgroundWorker class.

The example below illustrates all the common operations with BackgroundWorker:

using System;
using System.Threading;
using System.ComponentModel;
class Program
{
static BackgroundWorker bw;
static void Main()
{
bw = new BackgroundWorker(); // we create a new instance of the BackgroundWorker class
bw.WorkerReportsProgress = true; // we set support for progress of operations
bw.WorkerSupportsCancellation = true; // we set support for operation canceling
bw.DoWork += workfunc; // we add DoWork event handler
bw.ProgressChanged += Progress; // we add state change event handlers
bw.RunWorkerCompleted += Completed; // we add a shutdown event handler
bw.RunWorkerAsync(null); // We run BackgroundWorker
Console.WriteLine(
"Press Enter during five seconds to abort the process");
Console.ReadLine();
if (bw.IsBusy) // if the Enter button is pressed
{
bw.CancelAsync(); //cancel operation
Console.ReadLine(); //read Enter key pressing
}
}
static void workfunc(object sender, DoWorkEventArgs e)
{ // function executed by BackgroundWorker
for (int i = 0; i <= 100; i += 20)
{
if (bw.CancellationPending)
{ // here we process operation cancellation request
e.Cancel = true; // here we cancel the operation
return;
}
bw.ReportProgress(i); // here we declare the status of the operation
Thread.Sleep(1000); //and put the thread to sleep for a second
}
e.Result = 1989; // will be passed to RunWorkerComрleted
}
static void Completed(object sender, RunWorkerCompletedEventArgs e)
{ // BackgroundWorker completion event handler function
if (e.Cancelled) // if user aborted work
Console.WriteLine(
"Task processing by BackgroundWorker was aborted by user!");
else if (e.Error != null)
Console.WriteLine("Worker exception: " + e.Error); // if work was aborted due to exception
else // if work was executed completely
Console.WriteLine("Work is complete. Result is " + e.Result + ". ");
Console.WriteLine("Press Enter to exit...");
}
static void Progress(object sender, ProgressChangedEventArgs e)
{ // function that displays the status of work being performed
Console.WriteLine("Proceed " + e.ProgressPercentage + "%");
} //ProgressPercentage - method of the ProgressChangedEventArgs argument of the BackgroundWorker class
}

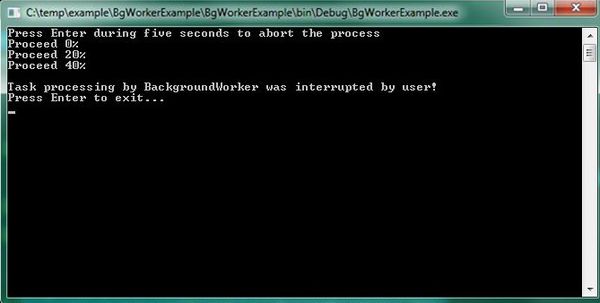
Display of the application when the Enter key is pressed (BackgroundWorker was aborted by the user) is shown in Figure 3.

Fig. 3 – Display of application when BackgroundWorker was interrupted.

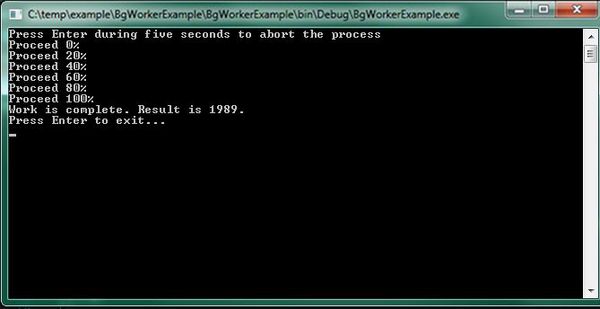
Figure 4 shows the display of the application if the task that BackgroundWorker was performing was not interrupted.

Fig. 4 – Display of the application in the case when BackgroundWorker operation was not aborted.

BackgroundWorker inheritance

The BackgroundWorker class allows you to inherit user classes from it. This class provides the OnDoWork virtual method, which the developer can override in his own way.

using System.Collections.Generic;
using System.Threading;
using System.ComponentModel;
namespace BgWorkerInherit
{
public class Client
{
public Jamshut Tile (int foo, int bar)
{
return new Jamshut(foo, bar);
}
}
public class Jamshut : BackgroundWorker
{
//You can add typed fields.
public Dictionary<string, int> Result;
public volatile int Foo;
public volatile int Bar;
public Jamshut()
{
WorkerReportsProgress = true; //Jamshut will show the progress of its work
WorkerSupportsCancellation = true; //Jamshut can interrupt work
}
public Jamshut(int foo, int bar) : this()
{
Foo = foo;
Bar = bar;
}
protected override void OnDoWork(DoWorkEventArgs e)
{
ReportProgress(0, "Bossy, Jamshut begins to put tiles");
bool finished = false;
int percentage = 0;
//Jamshut begins to work
Thread.Sleep(1000);
while (!finished)
{
if (CancellationPending)
{ //If a request is received to cancel the operation, Jamshut will stop its work
e.Cancel = true;
return;
}
Thread.Sleep(1000);
if (percentage < 100) percentage += 10;
// Jamshut reports on the progress of work
ReportProgress(percentage, "Proceed "+percentage+" %");
}
ReportProgress(100, "Bossy, come to see. Jamshut finished his work...");
e.Result = Result;
}
}
class Program
{
static void Main(string[] args)
{
}
}
}

The code that created the Jamshut class object will have an already configured background operation handler that will report on the progress of its work and support its cancellation. In addition, the Jamshut class can update all the elements of the application’s graphical user interface without using Control.Invoke (in WinForms) and Dispatcher.Invoke (in WPF) methods.

Conclusion

In this part of the article, we have looked at the methods of background and asynchronous execution of threads in .NET apps. These methods have a number of advantages and disadvantages and that is why they are not always convenient to use. But in general, background and asynchronous execution of threads provides ample opportunities for execution in separate background threads of both short- and long-running tasks.

In part 3 of this article, we’ll look at .NET’s Task Parallel Library (TPL) and Parallel Language Integrated Query (PLINQ), which enables you to parallelize separate code snippets or database queries.

What .NET Threads Are. Part 1

Ways Of Creating Multithreaded Applications In .NET (Part 1). What .NET Threads Are

With the advent of multi-core processors, multithreading has become almost indispensable in the development of applications. It is multi-threading that gives significant performance gain when using multiple processor cores.

However, multithreading comes with a lot of hidden pitfalls that are very unpleasant for inexperienced developers. Therefore, we have decided to make a series of articles devoted to multithreading methods in .NET applications using the C# language as an example.

In the first part, we’ll talk about multitasking and multithreading, we’ll consider the architecture of multi-core processors and how processor cores are arranged in an operating system. We’ll also review operating system tools for creating multithreaded applications, and we’ll take a closer look at the Thread class.

What is multitasking and multithreading?

Multitasking has become quite a natural phenomenon in modern operating systems. When several applications are running at the same time, the operating system can quickly switch between them, giving them CPU processing resources in turns. This creates the illusion that several programs are running simultaneously. This separation seems inconspicuous since neither the person nor the fastest Internet connection can work at the speeds with which modern processors process information.

Multithreading is the same thing as multitasking but within one application. The operating system switches between different parts of the same application quickly, thus creating the illusion that it is executing them simultaneously.

If you’re interested in more, read Microsoft Roslyn – using the compiler as a service

Architecture of modern computers

In the 2000s, when the CPU clock speeds grew rapidly, it seemed that nothing could stop this growth. Some experts predicted that the 10 GHz mark will be exceeded by 2010. This growth was proportional to reduction in the size of processor transistors, while an increase in processor power in those times was significantly ahead of Gordon Moore’s predictions (see Moore’s law).

However, before long, engineers encountered problems – substantial increase in heat release and fundamental limitations on transistor size. As a result, further increase in performance by improving CPU clock speed became practically impossible, and the clock speed remained at the 3-5 GHz mark today.

Engineers had to look for other ways of improving CPU performance. They found such an effective solution in multiprocessor information processing. If you cannot make the processor faster, why not add one more processor? In this case, you don’t need to create such a processor in the form of a separate device. The easiest way is to create such processors within one module so that they all have equal access to shared memory. Such processors were called physical processor cores.

Logical processor cores and hyper-threading

Operating systems operate on logical processor cores, sharing the time resources of each of the processor cores between processes and threads. A logical processor core may not always match with a physical processor.

In 2002, the Intel Pentium 4 processor introduced the Hyper-Threading technology for execution of commands. Hyper-Threading involves execution of multiple command threads by one physical processor core. In this case, the operating system sees each thread as a separate logical core. Dual-threaded hyper-threading works by adding another set of registers, an instruction pointer, and an interrupt controller into the physical core of the processor. Here, the number and set of execution units in the core remains unchanged.

Hyper-threading appeared as a solution to the problem of frequent downtime of the computational pipeline of Intel Pentium 4 processor, associated with excessive increase in the number of information processing stages in this pipeline.

The reasons for such downtime were:

  • The branching instruction was incorrectly predicted when executing conditional and unconditional branches.
  • There was a miss when accessing the processor’s cache and data needed to be loaded into the cache from the RAM.
  • The result of the previous instruction, which is still executing, is needed to execute the next instruction.

It should be understood that hyper-threading threads are not full-fledged physical processor cores, so they do not give multiple increase in performance. On average, the performance gain from hyper-threading is 1-30%, depending on the task being solved. In some tasks, there can be no performance increase at all. Nevertheless, hyper-threading is used in processors to this day, for example, in Intel Core i3, Core i7, Atom, Pentium, AMD Ryzen, and others.

If you’re interested in more, read .NET Core Framework Complete Review

Processes and threads in operating systems

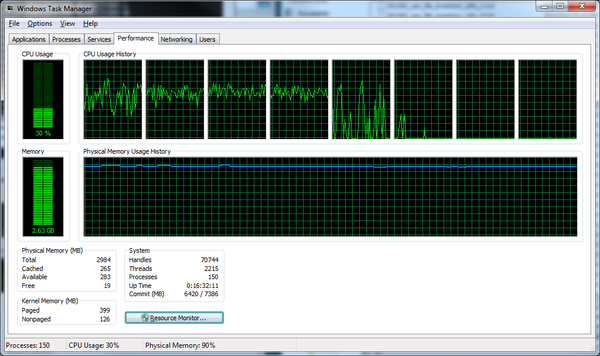
The operating system works with logical processor cores, not knowing about their physical implementation. It sees the physical processor cores and hyper-threading threads as the same. A clear example of this is a screenshot of Windows Task Manager for a quad-core (4 physical cores + 4 hyper-threading threads) of the Intel Core i7-4770K processor in Windows 7 (Fig. 1).

Fig. 1 – Screenshot of the Windows Task Manager for Core i7-4770K.

The main program object of an operating system is the process. A process is an executable instance of an application that owns system resources (for example, RAM resources or I/O threads).

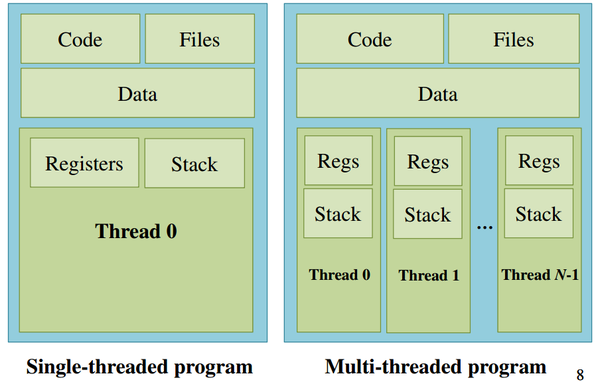
Each process can have one or more threads. Each thread executes part of the process code and has its own stack and registers. Threads can only access process resources and share them among themselves. The structure of a multithreaded program is shown in Fig. 2.

Fig. 2 – Structure of a single-threaded and multithreaded program.

At the same time, it is much faster to switch between threads than between processes during execution. Therefore, in terms of computing resources, it’s more profitable working with threads than working with processes. In addition, threads are supported by most operating systems and software platforms, for example:

  • WIN32 API Threads (Windows)
  • Cocoa Threads (iOS)
  • Multiprocessing Services (iOS)
  • Java Threads (Android)
  • POSIX Threads (GNU/Linux)
  • C Runtime Library (C)
  • OpenMP (C++, Fortran)
  • Intel Threading Building Blocks (C++, Fortran)

We will consider the technology for working with threads in .NET using C# as an example.

Thread class

The System.Threading namespace contains all the tools for low-level thread creation and management. First, we add this namespace to the project.

using System.Threading;

If threads have not yet been created, then at least one thread is already executing in the application. Let’s call it Main. To create another thread, we need to create a new Thread object.

Thread t1 = new Thread(GetThreadld);

In this case, the constructor of this object must pass the name of the function whose code will be executed in this thread. Here, it is the GetThreadId function. This function is passed as an object (in other words, a delegate) to the constructor’s argument. In this case, a function represented as a delegate has neither parameters nor return value. However, we can get out of this situation. For example, we can give a command to start a thread and simultaneously pass function parameters.

t1.Start("1");

Until the Start command is given, the thread will not start execution. In this case, the GetThreadId function can pass only an object as a parameter. The GetThreadId itself is declared as:

static void GetThreadld(object data)

A thread can be assigned a priority – both before its start and during execution.

t1.Priority = ThreadPriority.Lowest;
t2.Priority = ThreadPriority.BelowNormal;
t3.Priority = ThreadPriority.Normal;
t4.Priority = ThreadPriority.Highest;

ThreadPriority is a listed type here.

After all the threads have started, you need to call a function that is waiting for completion of their work. This is the Join function. Once the Join for all threads is executed, the threads will be terminated and destroyed. .NET automatically frees any resources that were occupied by these threads.

//waiting for all threads to finish executing
t1.Join();
t2.Join();
t3.Join();
t4.Join();

After the threads have finished executing, the main thread will again take over code execution completely.

Example of how the Thread class works

The following example displays 1000 messages from different threads with different priorities. Threads write their numbers to the console 1000 times each.

using System;
using System.Collections.Generic;
using System.Linq;
using System.Text;
using System.Threading;

namespace ConsoleApplication1
{
class Program
{
static void GetThreadld(object data)
{
// now the Main thread will display the received string (its number) one thousand times
for(int i = 0; i <= 1000; i++)
Console.Write(data);
}

static void Main(string[] args)
{
// we create 4 threads, we transfer as parameter the name of the function executed by the thread
Thread t1 = new Thread(GetThreadld);
Thread t2 = new Thread(GetThreadld);
Thread t3 = new Thread(GetThreadld);
Thread t4 = new Thread(GetThreadld);

// we assign priorities to threads
t1.Priority = ThreadPriority.Lowest; // lowest
t2.Priority = ThreadPriority.BelowNormal; // below normal
t3.Priority = ThreadPriority.Normal; // normal
t4.Priority = ThreadPriority.Highest; // highest

// we run each thread and pass the thread number as a parameter
t1.Start("1");
t2.Start("2");
t3.Start("3");
t4.Start("4");

Console.WriteLine("all threads have started");
// waiting for all threads to finish executing
t1.Join();
t2.Join();
t3.Join();
t4.Join();

Console.ReadKey(); // Until the user presses the key, the program will not end (so that you will have time to view the result)
}
}
}

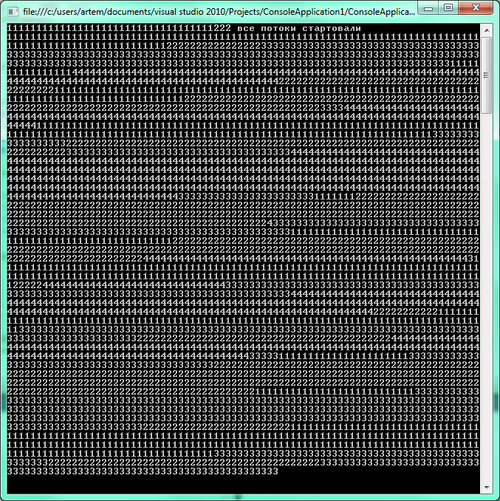
The program execution result is shown in Fig. 3.

Fig. 3 – Visual illustration of the work of threads with different priorities on a quad-core processor.

The example in Fig. 3 shows three facts:

  1. Creation of threads is a fairly time-consuming operation. First, thread 1 with the lowest priority was created and immediately launched for execution. Then the other threads were created and launched in turns.
  2. Threads are terminated according to their priority: the thread with the highest priority (4) ended earlier than the other threads.
  3. If a multithreaded program is running on a multi-core processor, the priority of threads becomes less significant here than on single-core processors, since threads will be allocated among all the processor cores.

Background and foreground threads

Threads can be foreground and background. The difference between foreground threads is that the program does not end until all the foreground threads have been executed. Background threads do not hinder the completion of a program and are terminated together with it, even if the process that the background threads were executing have not yet been run.

To find out whether a thread is a background or foreground thread, use the IsBackground property.

bool bg = Thread.CurrentThread.IsBackground;

where CurrentThread is a static method of the Thread class, which returns a link to the thread that is currently an active thread.

By default, all threads are created by foreground threads. But anywhere in the program code, you can make the thread to become background and vice versa.

t2.IsBackground = true;

Possible errors when working with the Thread class

Despite the simplicity of working with the Thread class, many novice developers make gross errors when creating multi-threaded applications.

Error 1

The most common mistake made by inexperienced developers is that they try to catch exceptions that occur in child threads, using the try { } catch block to wrap its call from the parent thread. The point is that in this case, all exceptions in the parent thread will be processed, while exceptions in child threads will remain unprocessed and lead to immediate termination of the application. The listing below shows how not to catch exceptions in multithreaded applications.

try
{ // This code is incorrect
t1.Start("1" );
t2.Start("2" );
t3.Start("3" );
t4.Start("4" );
t2.IsBackground = true;
t3.IsBackground = true;
t4.IsBackground = true;
Console.WriteLine(" all threads have started ");
//waiting for all threads to finish executing
t1.Join();
t2.Join();
t3.Join();
t4.Join();
} catch (Exception e)
{ // only exceptions in the parent thread will be processed here
Console.WriteLine(e.ToString());
} // exceptions in child threads will not be processed and they will stop the application

To catch all exceptions in child threads, the try {} catch block must be located inside the function that will be passed to the child thread for execution, as in the listing below:

static void threadID(object data)
{
try
{
// now the thread will display the received string (its number) one thousand times
for (int i = 0; i <= 1000; i++)
Console.Write(data);
}
catch (Exception e)
{
Console.WriteLine(e.ToString());
}
}

Error 2

The second error is the attempt to access the application interface from the child thread. When developing applications with a graphical user interface (for example, WinForms or WPF applications), there is always a main thread that monitors the state of the GUI elements. Only this thread can change the state of the interface elements. Any other thread, when accessing these elements, will immediately throw an exception.

In WinForms applications, the compiler will mark as erroneous the code that accessed the controls from another thread. In additional information, the following will be written about this error:

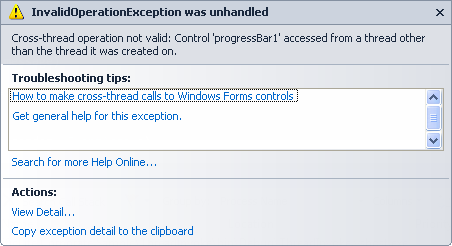
“Additional information: Cross-thread operation not valid: Control ‘textBox1’ accessed from a thread other than the thread it was created on”.

In WPF applications, the situation is even worse. This will throw up an InvalidOperationException exception during execution of the application with the description “The calling thread cannot access this object because its owner is another thread” (Fig. 4).

Fig. 4 – An example of an exception when accessing the elements of the WPF application interface from another thread.

If there is still a need to change the interface elements, there are fairly simple solutions in this case. If you need to access the interface in a WinForms application, you will need to first perform a check by calling the InvokeRequired method from the interface element. If the InvokeRequired condition is true, then execute the Invoke method (see the listing below). If Invoke has already worked, then the interface element can be accessed directly.

void ControlAccess()
{
if(textBox1.InvokeRequired)
textBox1.Invoke(ControlAccess);
else
textBox1.Text = "test";
}

Calling Invoke without InvokeRequired check will also throw an exception.

In WPF applications, special object Dispatcher is used to access interface objects from other threads. To organize a call, you need to connect the following System.Windows.Threading space.

using System.Windows.Threading;

Next, we need to wrap the application interface from another thread with the static Invoke method of the Dispatcher class.

this.Dispatcher.Invoke(DispatcherPriority.Normal, (ThreadStart)delegate() { Cons.Text = "Industrial";});

Here “this” is a pointer to the current window whose interface elements are accessed. DispatcherPriority is an enumerated type that is responsible for interface access priority. Type gradation is exactly the same as when creating threads.

With the delegate() function, we declare an anonymous function and pass code to it with direct access to the interface elements. After declaring the anonymous function, it must be cast to the ThreadStart type (casting to a type is indicated in parentheses before the variable or function). In this case, accessing the interface will not throw any exceptions in the WPF application.

Error 3

A fairly common mistake is the lack of control over the completion of threads. The point is that the .NET Common Language Runtime (CLR) environment does not know if the thread will continue to perform any actions after it has completed all the work. Therefore, all responsibilities for completing the work of threads and their destruction lie on the shoulders of the developer.

The developer is obliged to ensure correct completion of all application threads in case the application was closed (including abnormally). If this is not done, the application’s parent thread will be terminated, while the child threads will continue to execute (even when the application window is already closed). At the same time, they will consume system resources, and after closing the application window, you can stop them only through the task manager.

This can lead to amusing situations. For example, the author of this article used to study the multimedia capabilities of WPF and worked with the MediaPlayer class, which can open and play *.mp3 files. He did this in a separate thread. If you don’t take care of the ending of the thread that plays music, then even after closing the application window, the music will continue playing.

Conclusion

Modern multi-core processors are designed such as to execute a large number of processes and threads at the same time. Nevertheless, this operation is quite resource-intensive.

Despite all the simplicity and efficiency of working with the Thread class, multithreaded programming is fraught with a lot of dirty tricks, and the developer risks running into unexpected program behavior if he/she doesn’t know about the tricks.

In the following parts of this article, a thread pool that saves significantly on the computing cost of creating threads will be considered. Methods of thread synchronization, multi-sequencing of cycles and database queries will also be considered.

How To Design A Landing Page That CONVERTS

Simple steps to increase conversion rate

Technically speaking, a landing page is a HTML document that contains CSS, text, pictures, videos, and sometimes scripts. This page is not that much different from the normal websites. But from the business point of view, certain expectations are placed on a landing page – it must convert. An end user should be able to quickly get all the information he needs about a product and take an informed decision to buy or not to buy on the landing page.

Landing pages work most efficiently when you need to compel users to register on the site or leave their contact information. There is no better solution if your task is to compel users to download a software product.

When it comes to sales, landing pages fully justify any investments, when you need to sell a particular product or service in a particular situation – a promo offer, clearance sale, and entry into a new market.

Structure of a high converting landing page

The structure of a landing page is simple and linear. Let’s consider three parts: the first screen, the body of the page and the last screen. The classical first screen includes a background image, contact information, logo, headline and a button.
A product can be effectively used on the first screen as the main image. Background images on the first screen make a great impression on users. No wonder Apple uses such approach – see Fig. 1.

Fig. 1 – An iPhone used as a background image on the first screen. Source: www.apple.com

After you engage the user in studying your page, you need to provoke his trust and push him to buy. The following typical blocks are targeted at this.

Team. If you provide services, it is important for the customer to know exactly with whom to communicate if he decides to contact you, and who will handle his inquiries. The best way to gain the trust of a potential customer is to introduce yourself and tell him about your team.

Fig. 2 – Photos of team members with links leading to their portfolio. An excellent demonstration of professionalism. Source: http://islreview.com/

Text description of a product. You can use text blocks to describe the advantages your product have over competitors. An important rule here is that the blocks should be placed closer to the end of the page in order not to influence the first impression (a lot of text in the beginning may seem boring), but also not on the last screen.

Fig. 3 – Detailed description of what is included in the ticket price. Source: www.valiocon.com

Video. Placing video clips as the background of a landing page could be both useful and extremely harmful. Here’s what you need to understand: the video should not interfere with perception of other information, neither should it slow down the loading of the page. Besides, you should think in advance how you would compel the visitor to watch the video, because he would need good reasons to do so.

Fig. 4 – The atmosphere of the video ideally repeats the emotions that are evoked by the product. Source: www.getrest.co

Reviews. Positive reviews from satisfied customers – if the authenticity of such reviews is in no doubt – lead to stronger sales. The problem is that no one reads these reviews if presented in a mediocre and unattractive manner. Ensure that blocks featuring the opinions and reviews of satisfied customers or prominent people arouse interest and trust.

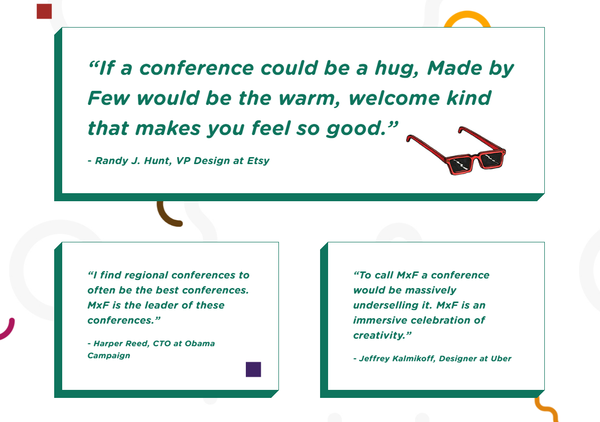
Fig. 5 – Stylish and brief quotes help to gain trust.

The final screen of the landing page is designed to summarize all your advantages and encourage the visitor to become a buyer – via a treasured button with a call to action.

Call to action

Each element of the landing page directs the user to the mouth of the conversion funnel, but only one call to action is needed. Several calls to action ruin the conversion rate ruthlessly. Suggest to users to make one unique and concrete action – is it not for this reason that the landing page was developed? Let’s examine this element in more detail.

A call to action should highlight the real benefit to the customer in a language that he understands. The client should be able to get the said benefit immediately after clicking on the button.

The action should be extremely simple: if the goal of the landing page is to collect phone numbers, then no other field should be included in the form. You only need to ask the user what his name is in addition to collecting his phone number. If the aim of the landing page is to distribute a software product, then the call-to-action button should initiate a download to the computer.

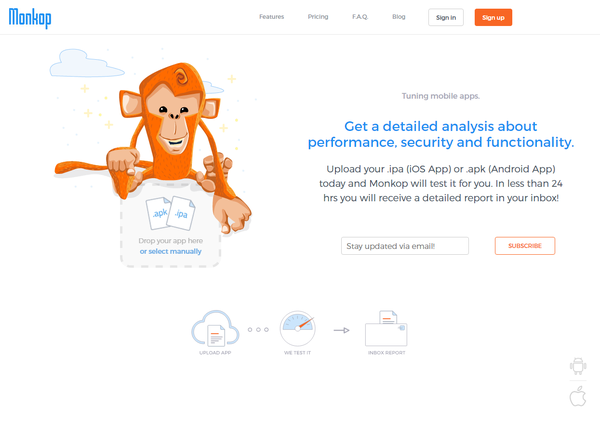
Fig. 6 – Having one field for email address and one button is a great example of how to avoid asking the user for unnecessary information. Source: www.monkop.com

There is one more rule – the more complex a product is, the simpler the action should be. It is ineffective to accompany complex products with calls for immediate purchase. If you are selling heating equipment, then simply ask the visitor to leave his phone number, and not try to sell an expensive device straight away through one web page.

Fig. 7 – You shouldn’t try to sell a camera worth $5,995 and its accessories in one page. It’s better to collect contacts from that user. Source: www.blackmagicdesign.com/products/blackmagicursaminipro

If you make your call to action different from those offered by competitors by adhering to the above simple rules, then the number of your leads would grow substantially.

Fig. 8 – A great call to action in the footnote. You can immediately see the price on the button.

AIDA and PMHS

AIDA is an acronym that stands for:

  • Attention
  • Interest
  • Desire
  • Action

It is a marketing model that describes a person’s decision to buy. This model works flawlessly. Implementing it into the structure of a landing page is very simple.

Blocks that capture attention are located on the first screen (headline, attractive background image). They are followed by those that arouse interest (display of the product and its advantages). You generate desire with discounts and time-limited actions, while buttons and forms lead to action.

PMHS stands for:

  • Pain
  • More pain
  • Hope
  • Solution

It is a design scheme for promotional materials, which helps to create a converting page structure. This scheme migrated to the Internet from infomercial (teleshopping).

First, the pain of a potential customer is described. If you sell toothpaste, then tooth problem is your customers’ pain. Then the pain intensifies, the consequences of these problems are described. In the end, there is a ray of hope in the form of your paste and a solution – mail delivery for $25. Remember, PMHS is a negative motivation that does not suit all companies and products.

You can use both tools to create a landing page structure and compose blocks on the page for maximum effect.

How to write high-converting headlines

Headline is a key element of a landing page. Before you sell your products, try to grab attention and spark interest. Only after reading a strong headline that a person would continue to study the page.

4 U’s – technique for writing high-converting headlines.

The technique highlights the four features of a strong headline. For an example, we shall use the phrase “Buy tires” and modify it with four elements: Useful, Urgent, Unique and Ultra-specific.

Usefulness
Demonstrate the benefits and point out the solution to the problem. Buying quality tires is beneficial in terms of safety on the road. The original headline “Buy tires” is therefore replaced with “Improve safety on the road”.

Urgency
Create a sense of urgency by adding a time parameter. People value their time. Show them that you can save their time. If it would take half an hour to replace the tires, then write: “Improve safety on the road in 30 minutes”.

Ultra-specificity

Speak clearly and use numbers. Be specific so that the buyer would know what he is paying for. Show the benefits using numbers: “Improve safety on the road by 25% in 30 minutes”.

Uniqueness
Tell why the product is unique. Let the reader understand how the benefits are achieved. The sentence should not look magical. “Improve safety on the road in 30 minutes with Japanese rubber”.

The main thing is to convey the value of the product to the reader. This technique serves as a farewell speech, and not a strict rule. It is not always necessary to use all the four U’s – sometimes you can do with three or even two. If the headline turns out to be cumbersome, you can put some of the information into a sub-headline.

Fig. 9 – An example of a strong headline with an informative sub-headline. Source: www.close.io
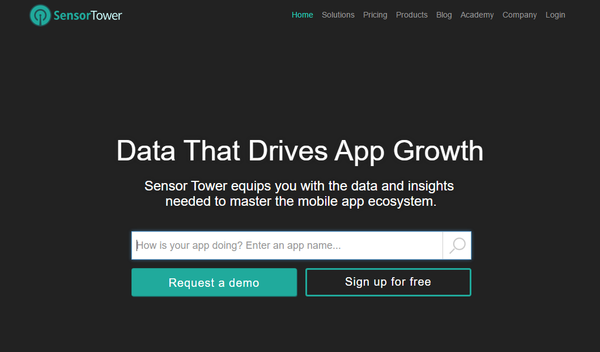
Fig. 10 – An example of a weak headline. The reader can understand the features of the product, but not the benefits from the beginning of its use right away. Source: www.sensortower.com

Some tips to increase conversion rate

1. Contextual advertising is the most common source of traffic for landing pages. The headline of a landing page, which welcomes visitors, should create the same impression as the advertising text that brought the user. This would make the user understand that he moved exactly where he wanted. Never allow the advertising text and the headline to create different impressions – this could lead to many visitors coming and leaving immediately.

2. Do not use stock images that can be found on many other sites. This is fraught with the fact that your landing page may get lost in a great lot of other headlines of potential customers. But even the uniqueness of the image is not enough – it should reflect or highlight the essence of your product.

Fig. 11 – Background image with people, though friendly, but uninteresting, boring, and does not reflect the essence of the page.

3. Even such a trifle as usual spelling errors can seriously damage the image of a company in the eyes of a potential client. Watch for both the grammar and the style of the text.

4. Landing page – a short and concise dialogue with a potential client. Using minimum number of blocks, you need to quickly make a person take the target action. If he gets distracted for even a moment, you can lose him. Therefore, all the elements of the page should serve a single purpose; there must be a reason for placing anything on the page.

5. If you don’t know why you need this or that block or element, safely remove it. Conduct tests to determine which elements of the page are not good enough and are negatively interfering with conversion rate.

6. Use social networking sites. Unobtrusively invite visitors to share your page and don’t hesitate to brag about the number of Likes you have on Facebook.

The main thing is to be honest with the visitor. If you undermine confidence, then your landing page won’t be able to restore your reputation. Do not lie or place unreliable or unverified information. Inconsistency between the real and declared price on the site is a common reason for refusal after a call.

Have a success in your sales!

Why QA Is So Important For Software Project

The Consequences Of Lack Of Testing

Far back in 1999, NASA lost its Mars Climate Orbiter, which came too close to Mars, entered the atmosphere and disintegrated because of atmospheric stresses. While investigating the causes of this accident, it was found that one of the company’s contractors – when developing one of the terrestrial modules of the software serving the satellite – used the English units of measurement as the output values ​​instead of the expected more conventional metric system used by the agency’s team. This mistake led to the failure of the $327.6 million mission. One of the reasons for this discrepancy was that the device systems were not tested enough.

There is a saying that It’s only those who do nothing who make no mistakes. Learning from your own mistakes gives you experience and wisdom. But in software, it is too expensive to learn from your own mistakes. The price of such errors is not only in the higher cost of developing the product or in the need to rework an already finished product. You will also lose your orders, your business reputation will be damaged and user confidence will decrease.

How costly is an error?

In 2002, a study commissioned by the US Department of Commerce’s National Institute of Standards and Technology showed that software errors cost the US economy an estimated $59.5 billion annually.

In 2004, NASA conducted a study to determine the relative cost of fixing errors discovered at different phases of a project life cycle. The results of this study, carried out via three different approaches, showed that the cost of fixing an error in the product escalates at the stage of mass use of the product compared to the initial stage of setting, collecting and validating the requirements.

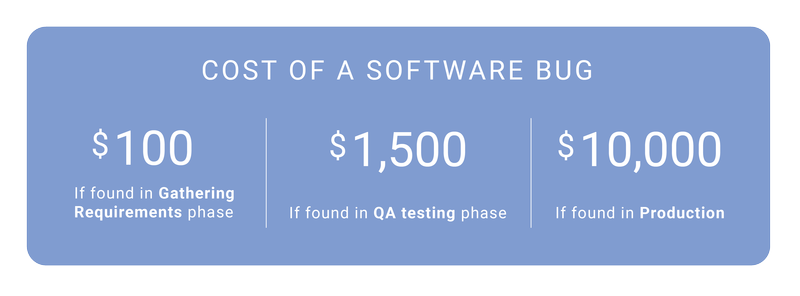
In one article posted on Celerity Blog, the following example is given: a software bug error detected in the gathering requirements phase can cost $100. A bug found at the testing stage can cost $1,500. An error detected after release can cost the customer $10,000.

All this suggests that to reduce the huge costs that come with software bugs in the finished product, it is necessary to make efforts to find such bugs at the earliest phases of the software development life cycle (SDLC). After all, these costs are borne by users in one way or the other – for example, in the form of increased cost of subscribing to a product. Ultimately, such factors can create customer dissatisfaction, weak competitiveness of the product, and, consequently, loss of target audience.

The job of a tester

When it comes to software development, nobody is immune to errors, no matter how well-weighed the project is, how detailed the technical task is and how competent the project manager is. There are just things that cannot be controlled. That’s why software companies test their products to reduce the number of errors and the financial losses that come with these errors.

The main tasks of a software tester are:

  • checking whether the product meets the customer’s requirements
  • detecting errors, thereby minimizing customers’ risks of using the product
  • providing maximum information about the current state of the product.

Thus, software testers enable managers to make timely decisions and release the product on time. After all, the purpose of development is precisely to provide the customer with a suitable and efficient product within a specific deadline.

If you’re interested in more, read Mobile application automated testing

What does a tester do?

A tester performs diverse functions, from planning the testing of separate product modules, to evaluating the finished product as a whole and detecting errors.

  • He checks the product for compliance with the requirements specifications.

It is really important that the product is exactly in the form in which it was conceived, so as to solve the customer’s problems.

  • He checks the product in rare or improbable conditions of use.

Testers find faults in a product which can be detected only in special cases or years of use. For example, it is important to check how the application will behave on February 29 – this day appears every four years in the calendar. Will the reports be properly generated? Can different calculations be carried out? Errors in such “bottlenecks” that were not detected during testing and which did not immediately reveal themselves, could subsequently lead to financial losses, and even to rejection of the product and reduction in the product audience.

  • He explores non-obvious ways of using the product.

A software tester finds areas of the product that need improvement. He does so by performing non-typical actions, that, under the industrial use of the product, can disrupt embedded business processes or the overall performance of the product.

  • He checks data security and product safety.

This is necessary in order to avoid outside interference or unauthorized access to confidential information.

  • He checks the product performance on different devices and platforms.

It is often a requirement that a product works efficiently on different devices and platforms: desktop, mobile apps, different browsers, and, moreover, different versions of browsers. This is typically a rather large task, and it is simply inefficient and unprofitable for developers to spend resources on such a task. A software tester performs this task.

  • He studies interactions with other products.

During testing, the tester checks the interaction between the product and the other products of the customer. Integration with popular social networks, payment aggregators, multimedia portals, etc. is checked, depending on the product requirements.

  • He prepares and submits a product status report to stakeholders.

By so doing, stakeholders receive information about the state of the product. This information enables them to take further decisions on product development and release.

Why can’t developers be good testers?

At first glance, it may seem that developers can test their own product, and this would be an opportunity to save costs on recruiting testers. But actually, this is not the case – developers alone cannot test a product sufficiently.

  • It’s very difficult to check yourself. Certainly, you wouldn’t be objective when you check your own work. In testing his own code, the developer often focuses on the positive aspects, not paying due attention to the negative and problematic side. After all, the task of a tester is to focus on product risks and to search for errors and discrepancies. The developer finds it more difficult to do this, for psychological reasons.
  • Testers have special expertise that developers do not have. Testers know and use various methods and testing techniques, and they prepare sets of typical test cases or checklists, which then help to detect errors or discrepancies with project documentation. Often it is the tester, as an independent party, who discovers bugs in a software product, arising from the fact that the developer initially misinterpreted the requirements.
  • A tester is cheaper than a developer. Therefore, the use of testers is also a cost-saving measure for the customer.

If you’re interested in more, read Automated Testing ROI

How to organize work efficiently?

Engaging a tester for your project after completion of development and before the release of the product may not be sufficient to ensure that the product is delivered exactly as the customer wants and within the agreed timeframe. For efficient testing of a complex and multifaceted process, there is a need for close interaction between the tester and developers, project managers, business analysts, technical writers and other specialists. Therefore, it is important to involve testers in the early stages of development, which will help to avoid discrepancies and ambiguity of requirements, and to introduce a critical view of the product at all its life stages.

Testers should also participate in trials at the end of testing. Problems can be identified based on customer feedback. Testers could take part in addressing such problems: they will reproduce situations and errors that the users encountered, test bug fixes to make sure that these fixes did not create new errors in other places, etc. These specialists have knowledge of the entire complex application and business process.

So, do we test or not?

Testing is a compulsory phase in a product’s life cycle. Both the designer and the builder of a new aircraft, who want to test their creation by themselves, risk their lives. Test pilots solve this problem. They do this before mass production starts and pilots start flying the aircraft.

Both in business and in everyday life, people achieve their goals by taking certain steps and assessing their progress. If your goal were to get an effective, high-quality product, then impeccable organization and testing would enable you to achieve this goal.

.NET Core Framework Complete Review

Developing Cross-Platform Apps Faster and on Any Platform

At the end of the last century, Microsoft, one of the most successful software development corporations, faced the problem of a huge number of incompatible languages, environments and programming technologies. At the same time, the development process was rigidly focused on a specific programming language. Also, across different languages, there was a different set of incompatible technologies. Above all, these technologies were gradually becoming obsolete.

There was a need to implement new programming tools that would fully support the object-oriented approach, exceptions handling and garbage collection. The growing popularity of the new Java software platform by Sun Microsystems surely added some fuel to the fire.

What was there before .NET Core?

In 1999, Microsoft began the development of a new unified platform, NWGS, later called the .NET Framework. This software platform, despite all the weaknesses and inoperability of the first versions, has become a unique product, combining many benefits. The main advantages of the platform:

  • Hardware-independent execution environment with the ability to compile just-in-time (JIT). This means that an application written in languages that support .NET can be run on processors of different architectures, in case there is a translator from the .NET MSIL language into the command codes of this processor.
  • Support for compatibility of program fragments written in different languages. For example, in C#, you can create your own class, inherited from a class written in Visual Basic, and call a method written in Managed C++. This all works without error.

As the .NET Framework evolved, it acquired new technologies and development capabilities. In version 2.0 there were WinForms and ASP.NET, in the 3.0 version there were WPF and WCF, the 3.5 version gave us LInQ, in version 4.0 TPL and PLInQ saw the light, and in version 4.5 API for Windows Store applications was added.

In 2002, the first version of the .NET Compact Framework was released. It was intended for mobile devices run by Windows Mobile. The .NET Compact Framework is formally a subset of the .NET Framework, but it actually contains its own application model, framework, and runtime environment, that is significantly different from the similar .NET Framework model.

Subsequently, all new “subsets” of the .NET Framework were born. They were architecturally and functionally different from the desktop .NET version. These subsets are familiar to all .NET developers. They are: Silverlight, Windows Phone, Windows Store, .NET Micro Framework, and ASP.NET. The situation is even stranger for the last one: ASP.NET of version 4 and ASP.NET of version 5 are two different platforms, each with its own application model, framework, and execution environment (Figure 1).

Figure 1. Example of the different .NET verticals

Of course, all the platforms mentioned have a number of common APIs because they all once were separated from the desktop version of the .NET Framework. But their evolution caused the growth of differences between them, and Microsoft had to come up with increasingly sophisticated “crutches” to ensure compatibility and uniformity of their APIs. The compatibility problem arises when you need a software product that can work on several platforms. This raises the question of the availability and compatibility of the API in each of these platforms.

In addition to the mentioned “subsets” of .NET that run exclusively on Windows, there are also implementations of the .NET Framework for Linux systems, the most famous of which are Mono and DotGNU. These are created by communities of enthusiasts; Microsoft did not participate in their development in any way. Each of these implementations also represents a “subset” of .NET, with its own application model, framework, and runtime. Porting applications from the Windows version of the .NET Framework to Mono or DotGNU is as difficult as the development of an ASP.NET application version based on its desktop implementation.

It turned out that Microsoft eventually gave birth to a whole “zoo” of similar, but at the same time different, platforms with different APIs, application models, and execution environments in order to create a single software platform with full language and technology compatibilities. The .NET Framework, which Microsoft considered a salvation from the “zoo” of incompatible languages and technologies, eventually itself became the “zoo” of APIs and implementations. Microsoft again faced the challenge of creating a single software platform for all development methods that exist in the .NET Framework. This platform is .NET Core.

What is .NET Core?

.NET Core is a modular cross-platform version of .NET Framework with the ability to port applications to other platforms and operating systems. In this case, the already created code is used to the maximum during the porting process, while the use of APIs specified for a particular platform is minimized. However, .NET Core does not replace the .NET Framework, but is just a version of it (a subset). Also, .NET Core does not replace Mono on Linux-like operating systems – both projects are developing in parallel.

This is achieved by using portable class libraries (PCL) with the most common form of API for all target platforms. At the same time, implementations of the application, including the framework itself and the execution environment, remain different, although they are subsets of .NET. Appeals to the API are particular for a specific platform (in the case of designing a cross-platform project) and are separated by special preprocessor directives:

#if WINDOWS_PHONE_APP
Windows.Phone.UI.Input.HardwareButtons.BackPressed
+= HardwareButtons_BackPressed;
#elif WINDOWS_APP
// Ignore. Windows Store doesn't have support for this.
#else
#error Unknown platform
#endif

where WINDOWS_PHONE_APP is the preprocessor symbol declared in the project. It can be found in the project properties (the Build section).

Beginning with 2013 Update 2 version in Visual Studio, it became possible to create universal applications for Windows that can be run on several platforms, due to PCL.

.NET Core is creating by the .NET Foundation community, which, in addition to Microsoft programmers, includes many independent developers, including the Mono Community developers.

Everyone can participate in the creation of .NET Core. The participation rules are published on GitHub. The project with open source is published on GitHub as well. .NET Core is a free software under the licenses of MIT, Apache 2.0 and Creative Attribution 4.0 (for some modules).

Portable Class Libraries (PCL)

In the .NET Framework, the core of the system is the extensive mscorlib library. It contains a lot of APIs and their implementations, some of which are not required in other target platforms (which differ from the desktop version) and others are not supported by these platforms. It turns out that on another target platform (for example, in Silverlight) there is a completely different mscorlib library. The situation is the same for other .NET libraries. Unlike the .NET Framework, the .NET Core has a flexible architecture of PCL, designed with significant code decomposition. At the same time, the dependencies between the libraries are clearly monitored by the .NET Core itself.

Each PCL is responsible for a specific .NET module and no more than that. Each PCL has its own independent assembly version, and new APIs are available only in new PCL versions.

This allows the target platform to choose the PCL modules independently. It is also important to note that the platform cannot support any PCL partially – it either supports it or it does not.

Also, the main principle of .NET Core is based on PCL, and there are uniform APIs for various .NET implementations. However the .NET implementations have not disappeared. They continue to exist and they are as different as before, but access to them can be done through APIs which are common to all of these implementations.

PCL allows you to implement the same code in several target .NET Core platforms.

If you’re interested in more, read How an IT Pro Makes His Life Easier Using TFS 2015

Unified BCL is the Cross-platform Kernel for .NET Core

BCL contains an API that is uniform for the entire .NET Core and for all its implementations. For example, most of the .NET Native API used to create applications for mobile devices and ASP.NET 5, on which the server side of web applications is written, contains BCL, and it is the same for both technologies.

BCL is an intermediate layer of assemblies on MSIL, common for all .NET implementations. Above BCL, there are APIs specific for each particular platform (so-called “application models”), for example, WinRT interop for .NET Native and MVC for ASP.NET 5.

Below BCL there is a layer of adaptation to various .NET implementations to the performing environments, for example, CLR (CoreCLR) or .NET Native. The CLR compiles the MSIL code into the target platform command system during the execution of the application (JIT compilation).

Unlike the CLR, .NET Native compiles the MSIL code, together with the .NET libraries, into the target platform command system, even before it reaches this platform, and launches on it. As you can see from the description above, CoreCLR and .NET Native are two completely different .NET execution environments, but the BCL is the same for both and interacts with them only through the adaptation layer.

Currently, .NET Core BCL is being developed under the name of .NET Standard.

Compatibility Issues in the .NET Framework

The traditional .NET Framework is distributed as a single, indivisible software product. It is installed on the device entirely and it is removed from the device entirely. The new version replaces the previous one, with all the ensuing consequences. However, the new version of the .NET Framework can disrupt the normal operation of the application written in an older version. For example:

  • If a new interface is added in the new version to the existing type of the .NET Framework, there may be problems with the serializing of this type;
  • If an additional overload has been added to the existing method in the new version of the .NET Framework, then there may be a problem with the reflection of this method;
  • In the case of renaming an internal type to the .NET Framework, the application’s performance may also be compromised if the type name is determined by the toString() method.

Since the release of the new version of the .NET Framework, Microsoft has been trying to make it compatible with the previous version. But even if the probability of failure is extremely low (less than 0.1%), then there may be millions of such failures, because the .NET Framework is currently used on billions of devices.

NuGet – Distribution Mechanism and Modularization Basis of .NET Core

Unlike .NET Framework, .NET Core is presented as small NuGet packages, and each of them, as a rule, is responsible for any library or namespace. For example, if in .NET Framework the System.Colections.Generic namespace was a part of a large mscorlib library, then in .NET Core it is a certain NuGet package.

  • Every NuGet package has its own name and version.
  • Every NuGet package can be updated to a new version without updating other .NET Core components.
  • NuGet packages can be downloaded and installed individually from the website nuget.org without installation of a new .NET Core version.

Currently the nuget.org web page contains more than 800,000 .NET Core libraries. But this doesn’t mean that you would have to download .NET Core components from the website and install them separately every time a new application on .NET Core needs to be developed. All the NuGet packages included in .NET Core are installed alongside the installation of .NET Core and have the same version as the current version of .NET Core. Additional packages or packages of a newer version are downloaded and installed separately from the installation of .NET Core.

Additional NuGet packages that are not included in the current .NET Core version are circulated with the application after downloading. There is no need for NuGet to download its packages from the Internet. There is an autonomous installer for NuGet that is included in Visual Studio. Any plug-in in .NET Core can be replaced by a newer one without the installation of a new version of the framework. If a .NET Core plug-in works insecurely, NuGet can roll it back to an older version without disrupting the work of other .NET Core components.

Thus, .NET Core is a framework adjusted for every application. Every .NET application uses only these .NET Core libraries, which are required. The libraries that are common for all .NET applications are presented as NuGet packages within .NET Core. Additional .NET Core libraries are circulated together with applications.

Integration with Other .NET Platforms

.NET Core is a subset of .NET Framework and must be compatible with its other subsettings. The .NET platform is fully compatible with .NET Framework 4.6 and fully realizes its function. In time, .NET Core will develop faster than .NET Framework, but both projects will develop simultaneously. All the new technologies will be tested on .NET Core, and only then will they be adapted to .NET Framework.

Mono is a subset of .NET Framework released in Linux and MacOS. The Mono community is building up support for .Net Core release on these operating systems, at most, integrated with Mono.

Windows Store and Windows Phone are subsets of .NET Core as well, and contain their own models of applications over BCL and their own runtime (.NET Native).

Other .NET platforms can be compatible with .NET Core as well. It is achieved either by the usage of PCL or by the creation of a common project and the adaptation of code with the help of #if directives.

.NET Compiler Roslyn as a .NET Core Part

Particularly in .NET Core, a new compiler, Roslyn, is used, written for usage in .NET Core. Roslyn allows the connecting of each stage of code compilation and .NET application building through API.

The possibilities of Roslyn are described in more detail in the article Microsoft Roslyn – using the compiler as a service.

Among the most interesting Roslyn possibilities we can point out are the building and reprogramming of a syntactic tree, the generation of source code by this tree and the possibility of using C# and Visual Basic as script languages (with the use of REPL).

.NET Core gave Roslyn its own namespace of Microsoft.Net.Compilers and its own NuGet package, which corresponds to this namespace. On the basis of Roslyn, a freely distributable cross-platform IDE with Visual Studio Code open source code was developed.

ASP.NET Core – a New Framework for Web Applications

Despite its crudity, the ASP.NET becomes a prospective platform for web service development. This is facilitated by more compact code, better scalability and the very high efficiency of a new platform. Along with that, Microsoft has refused many technologies in ASP.NET Core which were used in ASP.NET. These are System.Web namespace, Web Forms, Transaction Scope, WPF, and WinForms. Instead, .NET Framework provides a flexible web application model, with the use of MVC and WebAPI subsystems.

If the earlier ASP.NET, based on System.Web.dll, ran only on Windows and IIS, then at present, relying on benchmarks, it ranks among the top Linux web frameworks in terms of efficiency.

Microsoft’s aspiration to make ASP.NET Core cross-platform led to ASP.NET Core depending on neither the operating system nor the web server which it will run on. ASP .Net Core will run equally well on either Windows, Mac, or Linux, and its projects will be able to run both in Windows Azure Web App or in Docker on Linux, and everything will work correctly in both cases.

Further .NET Core (Roadmap) Development

Nowadays .NET Core is developing actively. .NET Core is adopting more and more common APIs from .NET Framework and Xamarin to make an application portable to all .NET platforms. Microsoft and .NET Foundation are pursuing the following aims in developing upgrades for the framework:

  1. To make .NET appropriate for most of the current development tasks;
  2. To develop high-quality .NET Core versions for Windows, Linux, and MacOS operating systems;
  3. To create high-quality .NET Core versions for processor architectures: x86, x64 arm32, and arm64;
  4. To perform releases of new .NET Core versions at least several times per year;
  5. To allow developers to develop applications as quickly as possible, using intuitive .NET Core tools;
  6. To improve application building productivity in .NET Core to make the development cycle (making changes in code and subsequent code execution on a compiler) as quick as possible;
  7. To improve the work of .NET applications in the cloud – to improve logging algorithms, tracings, and error diagnosis;
  8. To allow the user to assemble .NET Core from source code files independently, including those modified by the user.

The release of the 2.0 version of .NET Core is expected in 3Q 2017. The next version of cross-platform framework by Microsoft is expected to have many improvements. The utility of the second .NET Core version has been proclaimed for the following operating systems:

  • Windows (starting from 7 SP1);
  • Windows Server (starting from 2008 R2 SP1);
  • Red Hat Enterprise Linux (from version 7.3);
  • Fedora (from version 25);
  • Debian (from version 8.7);
  • Ubuntu (from version 14.04);
  • OpenSuse (starting from version 42.2);
  • Tizen (from version 4);
  • MacOs X (from version 10.12).

Microsoft continues to develop other .NET tools, together with .NET Core. These are: ASP.NET, .NET Framework, programming languages for .NET, and others. The project .NET Standard, developed from Unified BCL, is developing actively. .NET Standard is a set of common specifications for all .NET platforms: .NET Core, .NET Framework, Mono, Xamarin, and others. .NET Standard guarantees the usage of its libraries in all .NET runtime environments.

Summary

The contribution of Microsoft to the progress of development tools is, of course, wonderful, but at the same time, the progress of these tools was ambiguous. The tendency to use a huge number of different technologies and approaches to software development resulted in many incompatible languages and development tools. This led to the problem of unification and compatibility of all languages, development tools and technologies ever developed by Microsoft.

Microsoft, having resolved this issue once and having created .NET Framework, faced the problem again. Now this issue presents as different verticals of .NET subsettings, which have originated from one framework but are different, and have become more and more distant from each other as they developed. The colossal effort of developers was needed to create a single software platform. The result of such work was .NET Core – one framework for all .NET verticals.

.NET Core is not just another .NET Framework. As opposed to .NET Framework, it is an absolutely new .NET platform with technologies and work principles entirely different from .NET. Absolutely everything has changed in .NET Core: the framework and its core building principles, the distribution and upgrade scheme (NuGet), development frameworks (Visual Studio 2015/2017 and Visual Studio Code), web development platforms (Asp.NET Core), and even the compiler *(Roslyn). However, Microsoft and .NET Foundation have not hurried to switch fully to .NET Core; they are developing it along with other .NET platforms.

Advantages of Lean Software Development

How to boost team productivity

The term “lean software development” was created in 1992. Since then, it has become overloaded with interpretations and refinements, but has remained the same – the rational use of resources. Principles of lean development help to debug the software development process so as to prevent losses at any stage.

Lean use of resources is very important in software development: after all, even a perfect product that is not released on time becomes irrelevant. The same goes for people – developers should not be subjected to constant tension and stress caused by overworking.

Lean production

The principles of lean resources distribution were first developed in the factories of Toyota, the Japanese car manufacturer. Through such an approach to their work, Toyota has become the leader in the production of cars worldwide. In 1989, the company employed slightly more than 90,000 workers and produced 3.3 million vehicles, while American General Motors had 775,000 employees and produced 5.5 million vehicles. The results are obvious.

Toyota did not keep the reason for their extraordinary success a secret. Indeed, the company openly promoted their principles, the main purpose being to avoid losses at all stages of production.

According to Toyota, there are seven kinds of such losses:

  1. Transport losses – unnecessary replacement of the product during production.
  2. Loss of assets – when not all of the components or capabilities are used in the production process.
  3. Movements – people or equipment are making many unnecessary movements during the production process.
  4. Expectations – in the case of delays or interruptions during the production process.
  5. Overproduction – when production volume is more than end user need.
  6. Excessive processing – when low-quality production tools are used.
  7. Defects – when there is a need to involve additional resources for checking the absence of defects in the final product.

Sometimes they single out an eighth kind of loss – when the final product does not meet the expectations or specifications of the end user.

Further on, lean production principles were modified for other types of production activity, including software development.

Why lean development is beneficial for software

15 years ago, lean development was implemented into the field of software. At that time, the software industry began to develop and to attract multimillion-dollar investments very fast.

Here are the basic reasons why lean development is beneficial for software:

  • Rationalizes and simplifies the development process. Lean development helps to get rid of unnecessary stages in the process of designing software. It makes the process of development cheaper and faster, saving the most important resources – time and money.
  • Prevents any losses. It is very important to prevent losses related to overproduction. With regard to software, overproduction means excessive functionality.
  • Increases the team involvement rate. People are one of the key values of lean development methodology. It is their participation that helps to prevent losses and optimize the workflow.

Principles of lean software development

Mary and Tom Poppendieck are the evangelists of the concept of lean software development. They have outlined seven basic principles that ensure success in lean development.

  1. Loss removal. If the product has functionality that the user does not need, this is a loss. If the development is transferred from one team to another, this is a loss (as it takes time to bring a new team up to speed).
  2. Training. Often you have to act in conditions of uncertainty. Therefore, the team needs knowledge and experience to be able to properly respond to the circumstances. For example, they might need another technology stack or other methods of implementing for the development of the product.
  3. Make decisions as late as possible. Due to uncertainty, making decisions may be very difficult. Therefore, if the important decisions are postponed “for later,” when the results of the
    beta testing of MVP are received and you have more information about the market situation, there is more chance you will make the right decision.
  4. Show the results as soon as possible. This principle is related to the previous one. Fast development, even with imperfect code, is much more valuable than slow, thorough, error-free development. Even with a small set of functions, the product will help to collect feedback from users. Then, using these results, you can decide what to do next.
  5. Transfer power to the team. A team of developers knows the technical capabilities of the product and the possibilities for improving it. Team members can also optimize the process
    of change implementation to the product. All of this will help to output new versions of the product quickly.
  6. Integration. The product should give the impression of an integral system that does not lose its worth and utility over time, but is one that is constantly developing and improving. It should have installation convenience and usability, and be geared for the purpose of use – that’s what makes it integrated.
  7. Know it all. In the development field, you need to possess knowledge that goes far beyond this subject area. In good software, the code must provide speed, and the design must be easy to use. If something is wrong with one of those things, the software product is unlikely to be successful.

Areas of lean development

Lean software development is used in IT companies of any size. It goes well with the Scrum and Kanban methodologies, so it can easily be implemented in companies that already work with these methodologies. But it is advisable that lean development is implemented especially in teams that work in uncertainty conditions.

– The team is part of a large company. Financial issues are not a priority for such team. Time is their main value. It is important for the team to release the product before some similar product appears on the market. Principles of lean development help them to release the product quickly and with the functions that are required. Even a “rough” version will help them to collect feedback from users. This will show the direction to be taken.

– The close-knit team of developers. Lean development helps such teams to organize the development process better: to reduce the time between releases and design a product that meets customers’ expectations.

– Startups. Such teams are limited in everything: in finance, in time, in human resources. Lean development helps them to prevent unnecessary losses for an MVP (Minimum Viable Product) that can be quickly developed and shown to investors and even users in closed beta mode. Then, relying on user feedback, they will be able to understand how good their product is and what functionality is mostly in demand.

A few words about startups

Many problems and ways to resolve them with the help of lean software development are considered by American entrepreneur Eric Ries in his book “Lean StartUp.” He wrote this book relying on his work experience in startups, with reference to his own mistakes.

The author considers putting hard effort into planning in conditions of full uncertainty as the main mistake of many startups.

That’s why he confirms that lean software development is especially good in projects for creating a whole new product. Here, the principles of lean software development help to test the MVP and refine it on the basis of customer feedback. After the feedback analysis, developers have to bring in necessary changes to the product and release a new version as fast as possible. Such a cycle of continuous improvements and changes will help startups to produce a compatible product which customers would be ready to pay for.

Lean software development and Kanban

The principles of lean software development are being increasingly used by teams that work with Kanban methodology, for development process improvement and the reduction of time loss. Visualization of the work process, which is common practice for Kanban, helps to improve the development process, to make it faster.

Other peculiarities of Kanban methodology, such as restriction of the number of tasks in workflow and the principle “you must not take on a new task before you finish the previous one,” also blend quite well with the principles of lean software development.

The most important thing is that the Kanban methodology is also focused on rational resource usage and reduction of losses. That is why a team that works with Kanban doesn’t need to change its work process to follow the principles of lean software development.

Lean software development and other Agile practices

Lean software development is linked with other Agile practices. Agile software development methodologies espouse the same values:

  • Continuous development and integration;
  • Leading part of a team in development process;
  • The possibility of making changes to a product when it is still under development.

In such a way, Scrum practice foresees a release at the end of every sprint. Of course, it could be a release on the test server, but in any case, it would be a functional product that you can test and receive feedback about.

One more peculiarity of a Scrum team’s workflow which corresponds to the philosophy of lean software development is daily standups. This is the everyday meeting of the team where each teammate talks briefly about his / her successes of yesterday and today’s plans. These meetings help a team stick together, to find out more about what the others do, and to improve work processes.

Conclusion

Both in the Japanese Toyota plant and in the sphere of software, lean software development leads to outstanding results. Its basic principles help to develop software in conditions of full uncertainty, where every product version depends on customer reaction to the previous one. Nowadays, when the situation in the market changes rapidly and there is no full certainty, the lean software development philosophy helps to achieve success.

Microsoft Roslyn – using the compiler as a service

.NET Compiler Platform from A to Z

One could encounter different situations where it becomes necessary to write one’s own code compiler, interpreter or analyzer for a programming language. Creation of compilers and interpreters is believed to be an “aerobatics” in programming, whilst the creation process itself is seen as very complicated and time consuming. However, the .NET platform has had tools existing quite for a long time, which greatly simplify this task.

What we had before Roslyn came

The .NET Framework can compile a source code without Visual Studio installed on the machine. The .NET Framework (starting with version 2.0) includes command line compilers csc.exe and vbc.exe. These compilers can be used to build .NET applications from any text file containing C# or Visual Basic source code. The compilers are run from the command line. The command line compiler parameters enable you to:

  • Set the name of the compiled file (/out);
  • Collect console applications (/target:exe);
  • Collect applications with graphical interface without using a console (/target:winexe);
  • Collect dynamically linked libraries (/target:library);
  • Add references to external assemblies (/r);
  • Write command-line arguments for the *.rsp file and specify the name of the rsp file as the command-line argument (@file.rsp).

The csc and vbc parameters perfectly handle the task of compiling a source code contained in one file. But MSBuild is used for the more complex tasks of compiling and assembling projects. Moreover, Visual Studio files *.csproj, *.vbproj and *.vcxproj serve as XML codes for MSBuild. Visual Studio uses MSBuild to build projects. In addition, MSBuild can be called from the command line or from a .NET application code via APIs.

It is also possible to generate a low-level MSIL code using System.Reflection.Emit. You can also go for dynamic code generation for .NET programming languages using CodeDOM, and then compile the generated code with the help of code providers (for example, CSharpCodeProvider, which is an add-in over the csc compiler).

All the approaches listed above were being used for code generation before the emergence of the .NET Compiler Platform, better known as Roslyn.

Roslyn is a collection of open-source compilers, code analysis and refactoring tools which work with C# and Visual Basic source codes. This set of compilers and tools can be used to create full-fledged compilers, including, first and foremost, source code analysis tools.

The History of Roslyn

The name “Roslyn”, the new platform for compiling a source code, was first written by Eric Lippert, a former Microsoft employee, when he started to recruit developers for a new project. Lippert named the compiler in honor of Roslyn, a suburb in Washington.

The first version of Roslyn was released in October 2011 as a part of Community Technology Preview (CTP) – an extension for Visual Studio 2010 SP1. The update of CTP in September 2012, despite the large scale, was not very successful. It had the so-called “breaking changes” – changes in Roslyn components, which could potentially crash other components. Besides, not all the features of the CTP APIs were implemented for C# and Visual Basic languages.

At its Build conference in April 2014, Microsoft announced Roslyn as an open source project, and also implemented a way to integrate Roslyn in Visual Studio 2013. Since then, Roslyn has been distributed under the Apache 2.0 license. However, even by then, not all Roslyn features were implemented – there were plans for deployment in C# 6.0 and Visual Basic 14.0.

Starting with 2015 version, Visual Studio uses Roslyn to compile and build its own projects. However, to date, Roslyn only supports two languages – C# and Visual Basic.

In January 2015, Microsoft moved Roslyn source code to GitHub.

Installing Roslyn

To date, Roslyn has remained a part of Visual Studio 2015 and is installed together with it. Roslyn is a part of Visual Studio 2017 as well. It has been released in March 2017.

However, Roslyn is not included in the .NET Framework. Even in the .NET Framework 4.6 version, the traditional csc.exe and vbc.exe compilers are included. This is done for it to be compatible with previous .NET Framework versions.

To install Roslyn compilers without installing Visual Studio, you need to download and install Microsoft Build Tools. Roslyn can also be downloaded from Github, then you can compile and get binary files csc.exe and vbc.exe, which can be accessed from the command line.

APIs for Roslyn compilers

Most of the existing traditional compilers come as “black boxes”, which “magically” convert the source code into an executable file or library. Unlike them, Roslyn allows you to access each stage of the code compilation and application creation process via its own APIs.

Together with compilers, other “black boxes” are often supplied – integrated development environments (IDEs) that can enable you to increase the development speed with convenient tools, such as code highlighting, Intellisense, refactoring tools, performance analysis tools (profilers) and other complex tools. Roslyn takes over these features and also provides an API to them. Moreover, with Roslyn, the developer can work with the compiler from his own application, using the compiler as a service to:

  • Generate code in C# and Visual Basic (like CodeDOM);
  • Analyze code;
  • Refactor code;
  • Use C# and Visual Basic as script languages, interpreting instead of compiling the code. Roslyn APIs are represented by three sets (Figure 1).
Fig. 1 – Roslyn APIs

The compiler APIs allow you to get an object model of processes that occur at each stage of the compilation process, regardless of the Visual Studio components installed (Figure 2).

Fig. 2. Compiler APIs

The Roslyn compiler pipeline is represented by four phases, each of which has its own object representation:

  1. The parser displays information in the form of a syntax tree;
  2. The symbol declaration phase displays a hierarchical symbol table;
  3. The binding phase returns information in the form of semantic analysis results;
  4. The emitting phase provides APIs for generating low-level code in MSIL language (similar to what System.Reflection.Emit does).

Language services use these APIs to perform their own functions. For example, code highlighting uses a syntax tree, while an object browser uses a hierarchical symbol table.

Roslyn diagnostic APIs allow you to handle errors and warnings that occur at all the compilation stages. Roslyn also allows you to process errors through analysis tools written by the user.

Scripting APIs allow executing C# or Visual Basic code without compilation – something similar to the REPL interactive environment in Perl, Python, Haskell, Erlang, and others.

Workspace APIs gives direct access to the application’s object model in the compiler without parsing the source code files for the second time. The APIs also allow for projects tuning, management of project dependencies, source code generation without using Visual Studio components.

Syntax trees

The syntax tree is the basic structure used by Roslyn for compilation, code analysis, binding, refactoring, code generation and other operations. Roslyn syntax trees have three key properties:

  1. They contain all the source information, such as grammatical constructs, tokens, directives, comments and even whitespaces – all this information is contained in the syntax tree;
  2. The syntax tree or its part can be converted back to the source code – you can build syntax trees and generate code from them, you can edit the syntax tree and it will generate a corrected code;
  3. They are thread-safe and protected from changes. This means that you will not be able to directly change the data in the syntax tree. The tree completely reflects the state of the source code at the time of construction.

These three important attributes of the trees allow you to work with the syntactic structure of the source code, including in custom projects, accessing it through APIs. These properties have also greatly simplified complex refactoring operations, and this happens naturally without direct code editing but only by editing the syntax tree. Each syntax tree consists of the following elements:

  • Syntax Nodes – they represent complex syntactic constructs, such as declarations or expressions;
  • Syntax Tokens – they represent the simplest constructs for constructing syntax nodes. Syntax tokens consist of, for example, an identifier or operator;
  • Syntax Trivia – it represents parts of the source text that are mainly insignificant for the compiler, such as comments, directives or whitespace;
  • Spans display positions within the source text of each node, token or trivia, and its length;
  • Kinds identify the syntax unit in the tree;
  • Errors are processed in the syntax tree in two ways: either by inserting the expected token, or by adding a token that is unknown to the compiler as a trivia.

Semantic model and Workspace APIs

Unlike syntax trees that represent the structure of source code, semantics is the logic in the source code and all its constructs. It includes declarations of variables, classes, objects, fields, methods, function calls and passing parameters to them, types of operands and operation results, and operator priorities. Semantic analysis of source code checks the code (or syntax tree in Roslyn) for compliance with the rules of the language. Semantic model provides the following information about the source code:

  • Semantic symbols: source elements or elements imported from libraries (types, methods, properties, fields, events, etc.);
  • Resulting type of expression;
  • Diagnostic data: errors, warnings, exceptions, etc.

Workspace APIs represent the object model of solutions, projects in solutions and documents in projects. All the objects and methods listed above can be called from any .NET application working with Roslyn as a service and using Roslyn APIs.

Working with Roslyn: samples

There are so many examples of working with Roslyn. Here are some of them:

Future development of Roslyn

Roslyn will be developed further in two important areas: creation of new features and improving existing algorithms. The following are expected among the qualitative improvements of algorithms:

  • Increasing the performance and speed of algorithms in the compiler platform;
  • Creating a new implementation of PDB Writer with big parallelism when writing text to a PDB file;
  • Increasing the test coverage with the help of new testing tools;
  • Eliminating Roslyn’s dependence on the full version of .NET Framework so that Roslyn could be deployed, for example, on WinRT.

Some of the features of Roslyn compilers are still considered experimental and are being tested publicly. Others that have already been implemented can be improved – performance, speed and quality of work can be enhanced. Still others associated with the new functionality require a decision by Microsoft and the .NET Foundation community to be taken first before intensive development and implementation could start. Here are some of the ways to improve the following versions of Roslyn compilers:

  1. New features for programming languages ​​C# 6.0 and Visual Basic 14.0 (more);
  2. APIs for creating XML documentation from code comments;
  3. Improvement of diagnostic APIs for synchronous code analysis in the process of writing it. For example – identifying and indicating errors and warnings while writing code without running it for compilation;
  4. Increasing the performance of code analyzers via Roslyn APIs;
  5. Increasing the number of rules for static code analysis tool FxCop;
  6. Creating APIs for writing custom static code analyzers;
  7. Modifying the semantics of some expressions for scripting languages ​​(C# Script and VB Script);
  8. Improving REPL interface – interactive environment windows for programming within command line interface tools;
  9. Improving APIs for working with scripting languages ​​(C# Script and VB Script);
  10. Increasing the performance of FindAllReferences operation;
  11. Improving the algorithms for finding conflicts when renaming.

Some more piece about Roslyn

Despite the large number of flaws, the Microsoft’s new compiler platform Roslyn is gaining popularity, and it’s no accident. Roslyn is one of the few compilers that give you the opportunity to observe all the compilation and assembly stages, access any intermediate results and internal compiler constructs, as well as use various language services of the compiler, refactoring and diagnostics tools. Due to the wide interpretation options inherent in Roslyn, the C# and Visual Basic have become scripting languages. Despite its relatively small history, Roslyn is already being used in large projects, such as IDE Visual Studio 2015, static code analyzer PVS-Studio, and cross-platform framework .NET Core. It is also used as an alternative to script system Windows PowerShell. In the future, the number of such projects will only increase.

Some life hacks on the use of Roslyn

Roslyn provides a huge set of tools for building your own compilers, code analyzers, interpreters and scripting languages. A significant shortcoming of Roslyn is that it only works with two programming languages: C# and Visual Basic. However, Roslyn makes it easier to create your own language on the .NET platform. In this case, you only need to translate the code into C# or Visual Basic, or create a syntax tree, and then use Roslyn compiler APIs to build a full-fledged application on the .NET platform. Another option is to run the generated code for execution (interpretation) as a script. If you need to generate and compile a source code using C# as a scripting language, then the best solution is to use Roslyn compiler APIs. If you do not like the source code analyzers built into Visual Studio, then Roslyn APIs could enable you to create your own. You can even create your own IDE, using the features of this compiler platform and connecting it as a service to your project.

Roslyn is not just another Microsoft compiler – it is an off-the-shelf framework, which you can use to create your own source code tools. Roslyn gives .NET developers many new features. It is a great tool that helps you to write your own compiler, interpreter or analyzer for a programming language. We advise you to study how the compiler works for it would simplify your tasks. We are interested in Roslyn because it can be used to create your own programming language on the .NET platform.

5 Stages of Building a Smart Website

From Strategy to Design

Today, almost every start-up has its own website or landing page. When building a website, we always expect it to please both the users and us, and, most importantly, build customer loyalty and generate income. But is that often the case? No! Most such sites don’t solve business problems; neither do they meet customer needs.

The truth is that to create a smart website, you need to pass through five important stages. And the design is the last of them (how often do companies start with it!). We are going to discuss these five key stages in this article. We’ll ask you some important questions. Try to answer them for yourself.

Why divide the process into stages?

In his book “The Elements of User Experience,” Jesse Garrett describes five stages of user interface design:

  1. Strategy
  2. Scope
  3. Structure
  4. Skeleton
  5. Surface.

The design process starts with the most abstract expressions about the project strategy and ends with very concrete models of the site.

Figure 1. Jesse Garrett’s view of the web development process. Work starts at the lowest stage (strategy) and ends at the surface.

The first thing to do is to categorize your project into one of two groups:

  • Software interface (online stores and service sites);
  • Information space (blogs and news portals).

The questions that we’ll ask at each stage will depend on this categorization.

The development process needs to be divided into stages to clearly distinguish between the responsibilities of different specialists. A UX designer is engaged in the project at the second or third stage, while the company’s head formulates the strategy at the first stage – before the team starts developing the site features.

You can’t start working on a set of features (feedback forms, calculators, shopping cart, comments section, etc.) without first defining the need for them in the strategic planning stage. It’s not possible to develop navigational items, implement module layout on a page, or develop contextual navigation without ready information architecture and an understanding of what content will be posted on the website.

If you’re interested in more, read Don’t Make Me Think. Rules of a User-Friendly Interface

Maslow’s hierarchy and Garrett’s scheme

In his 2012 book “Designing for Emotion,” which was warmly received by professionals, Aarron Walter uses the famous Maslow’s hierarchy to show how to properly set priorities when creating a website design. Maslow’s hierarchy is a simplified visualization of the hierarchy of needs, developed by American psychologist Abraham Maslow in 1943.

Figure 2. Maslow’s classical hierarchy.
Figure 3. How Aarron Walter sees the use of Maslow’s hierarchy of needs for web design.

Despite the fact that Garrett deals with the entire development process, while Walter is solely focused on design, we can see similarities between both approaches in their quest to segment user needs and website objectives.

If you test Garrett’s scheme (Figure 1) on Walter’s hierarchy (Figure 3), it turns out that strategy is the cornerstone of the whole development process – without strategy you can’t start. Here, design is the apex of the hierarchy, which is a logical extension and embodiment of the goals to be achieved by the team in previous stages. Besides, one can’t deny that a well-grounded strategy and the right content requirements are much more important than choosing button colours and font styles.

As you can see, design is just the tip of the iceberg, visible and very important, but it can’t exist without dozens of tons of ice, hidden under a layer of water. Work on the surface level is the very last thing to do because it is subject to results achieved in the previous stages.

If you’re interested in more, read Icons in Design: Nonsense, Necessity, or Decoration?

Stage 1: Strategy

In the first development stage, we need to answer two key questions:

  • What do we want to get out of our site?
  • What do users want to get out of the site?

It is essential here to pay due attention to the formulation of strategies because Garrett’s entire methodology assumes a ripple effect if there is a need for change. This means that wrong decisions at this stage will automatically make all the decisions taken at subsequent stages wrong or disputable.

Figure 4. Ripple effect of making a wrong decision.

Always REMEMBER that the approved objectives of the website should reflect the essence of the company’s business processes. User needs are easier to identify using user persona methodology and target audience segmentation.

What do you want to get out of your site? What do users want to get out of your site? When answers to these two questions are formulated accurately and clearly, then we can move to the next development stage – scope (features and functions of the site).

Stage 2: Scope

If you consider your site as a software interface, then at this stage, you’ll formulate and describe the features and functions, and prepare terms of reference for programmers. If your site is an information portal, then content requirements move to the forefront.

In determining the content requirements, it is necessary to find out the following:

  • What will be the site content: text, video, audio or image?
  • Why does the user need this content?
  • How often will the content be updated?
  • Who will be responsible for hosting, creation and editing?

Here is a good example of poor work on the scoping stage: thousands of business card websites that have a “news” section, but don’t have any useful information to publish or the news section isn’t updated.

This is because the customer just said, “We need a news page,” but didn’t think about what would be posted there, how often, and who would be in charge of it. So that’s why you end up getting sites with empty and useless news pages.

Figure 5. The website of a construction company has on its news page only 4 news items for 3 years.

In describing the functional specifications of a website, the following needs to be clarified:

  • Why should a particular feature be on the site?
  • How will users interact with it?

It’s all so simple: if in the first stage, you’ve found out that users will be visiting your site to watch videos, then it’s time to talk about what kind of videos those will be and who will create them.

If you’re interested in more, read
Part 1. Responsive Web Design Using Breakpoints
Part 2. Responsive Web Design. Mobile Devices
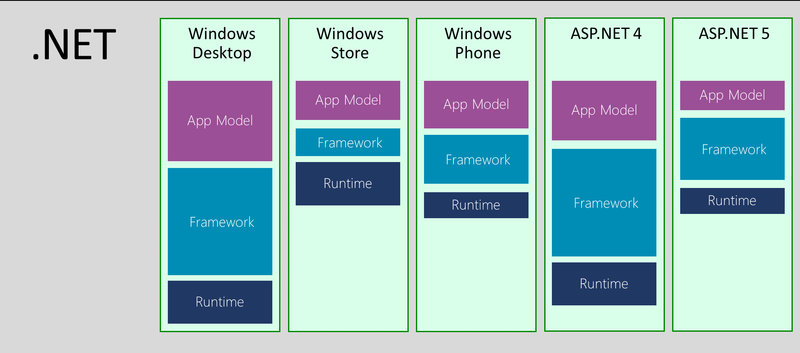
Stage 3: Structure

At the previous stage, we determined what content will be posted on the site, and which features will be offered to users. At the structure development stage, we’ll determine which particular pages will host the content and features.

SEO experts, marketers and editors are fully involved in the structure development stage. Before developing the navigation system, which is the most important part of the site, the number of pages, their type and relative location all need to be defined.

Experts classify information architecture arrangement into four types:

1. Hierarchical structure. Most online stores serve as a classic example. For example, when selecting specific men’s winter boots from a product catalogue, we normally navigate the following pages/categories: “men,” then “shoes,” “winter,” and then we choose a specific model.

Figure 6. Hierarchical structure.

2. Matrix structure. This lets you navigate through multiple axes. A good example is a blog where each post can belong to more than one category at once. For example, a post entitled “Cheap vacation in Bruges” can be posted in such sections as “Belgium,” “Cost saving,” and “New.” Thus, such a post will be seen by several target groups: people who want to know more about Belgium, people who are looking for cheap vacation packages, and people who regularly follow new posts.
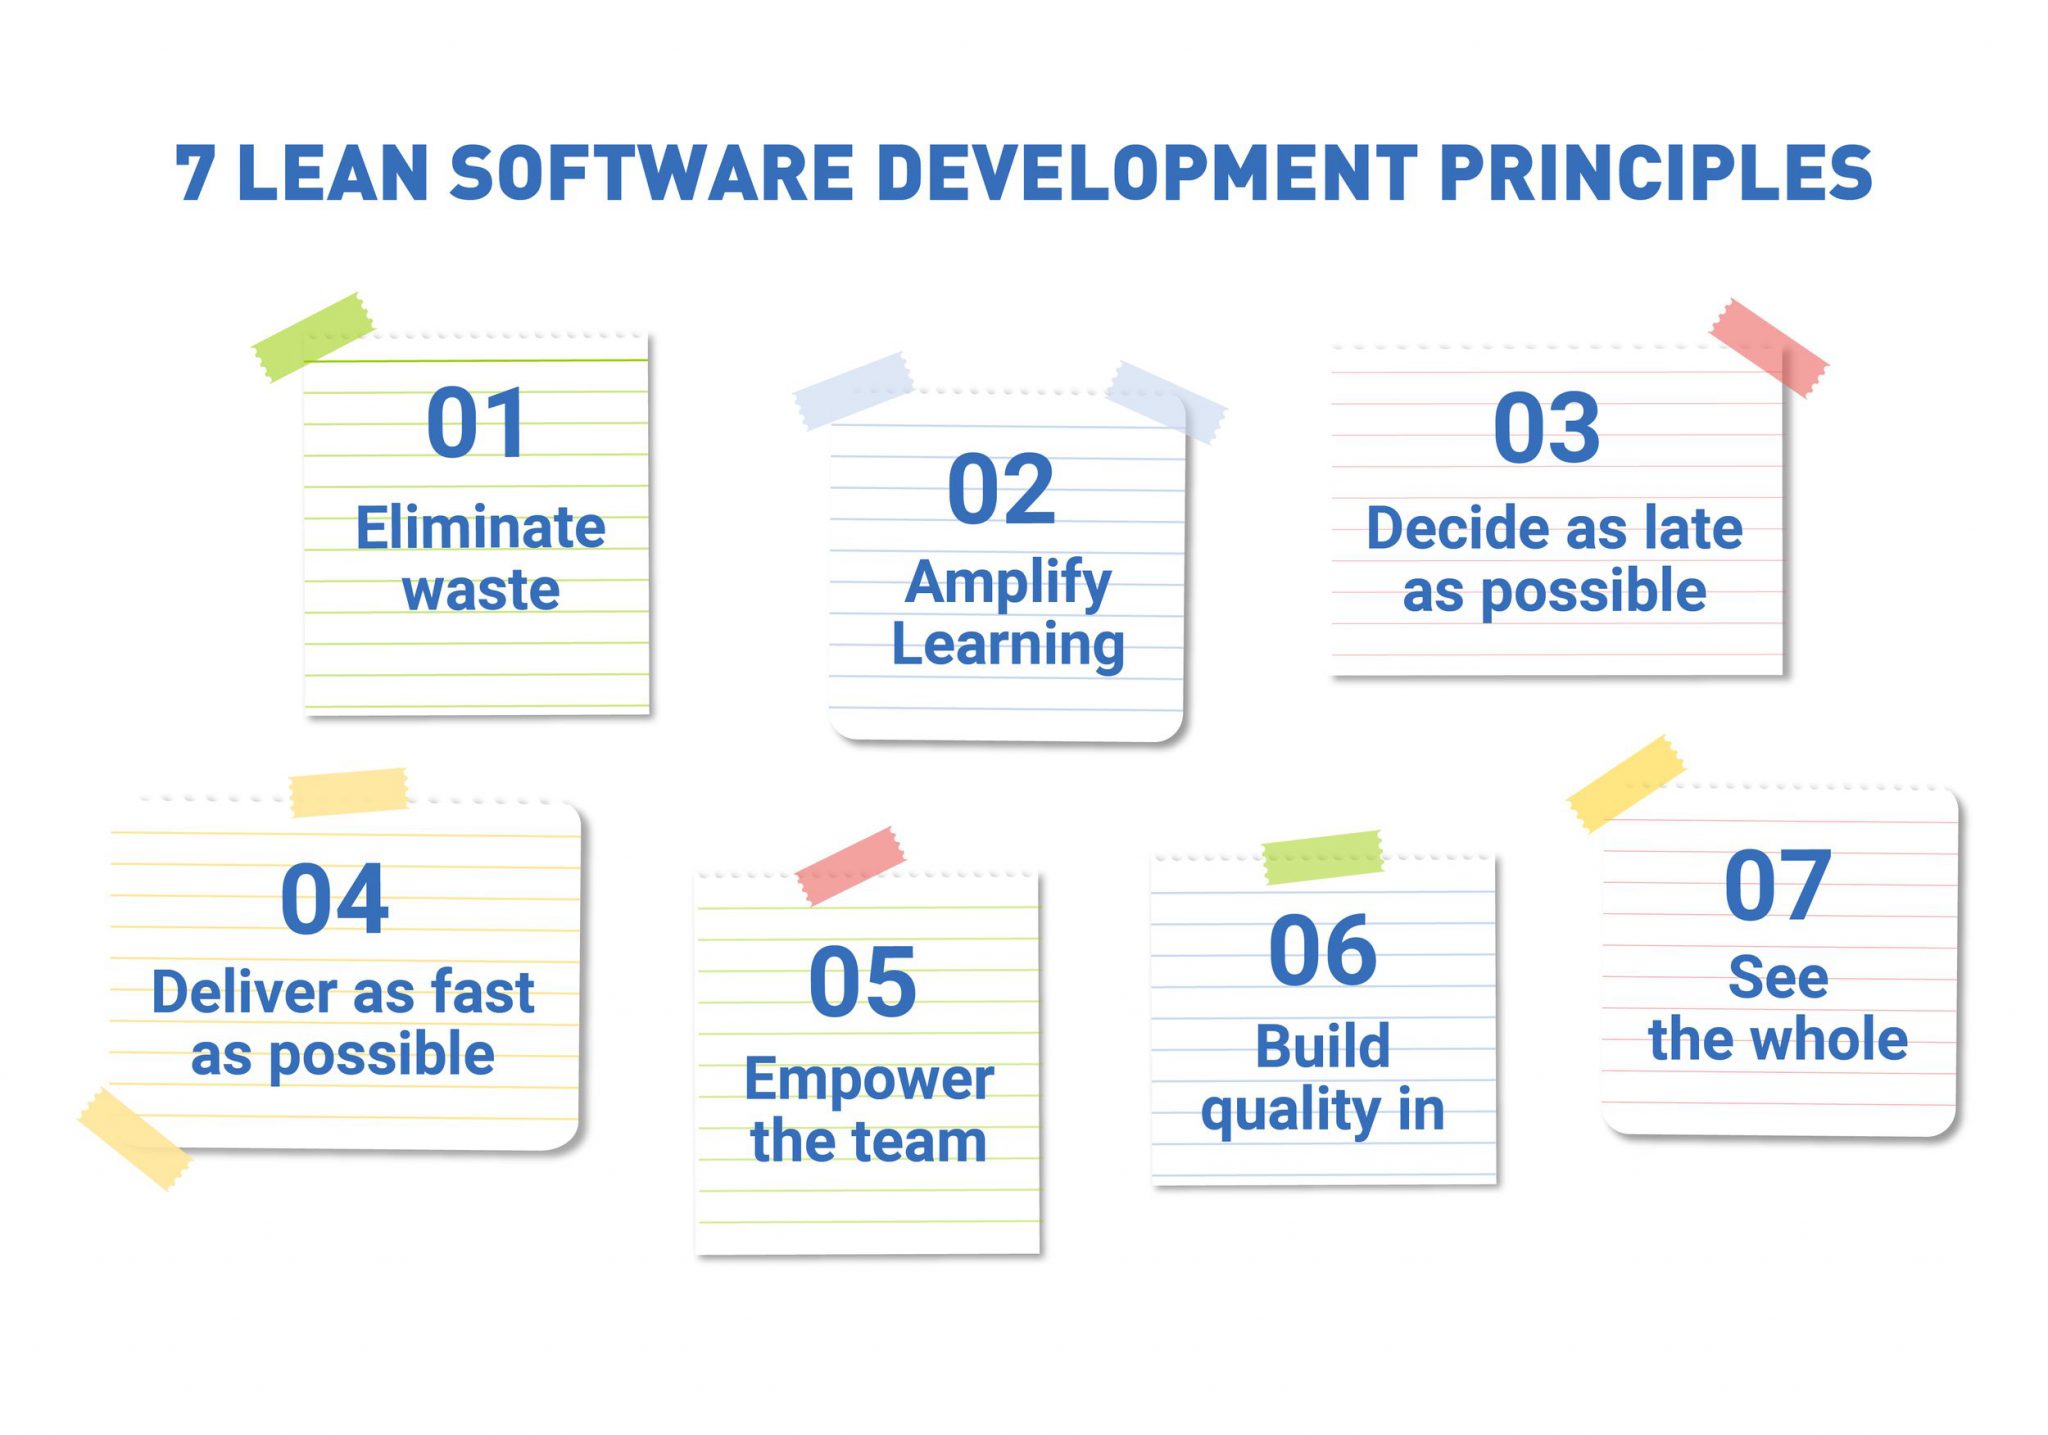
Figure 7. Matrix structure.

3. Organic structure, This type has a very narrow range of application. This architecture can be used in entertainment sites or sites where the user is given the freedom to study materials just like when you visit a museum. This structure is suitable when there is no need to guide the visitor through the web pages, and the visitor doesn’t really care what section he is currently in.

Figure 8. Organic structure.

4. Linear structure. This is characteristic for landing pages. Landing pages are created with the involvement of marketing specialists and schemes such as PMHS (Pain, More pain, Hope, Solution) and AIDA (Attention, Interest, Desire, Action), gradually leading the customer to make a purchase or to another target action.

Figure 9. Linear structure.

An example of poor work at the structure stage is the eventual appearance of additional sections on a site, which was originally designed to be a landing site. This means that developers envisaged user behaviour incorrectly, or they don’t know how and what information needs to be placed on the site.

The structure can be designed via two possible approaches:

  • Top-down;
  • Bottom-up.

The top-down approach implies that the objectives of the site and user needs form the basis for selection of a structure, for example, starting from general categories of the online store and ending with pages of specific goods.

The bottom-up approach is based on content analysis and its requirements. First, we look at what kind of content we have available and what we can create in the near future, then we group it and get categories and sections of the site.

Stage 4: Skeleton

The skeleton stage is very similar to the previous stage, where the structure was considered. Here, it’s also all about placement of features and content – not on the site generally, but within a particular page. Once we have compiled a list of elements and text blocks for each page, it’s time to think about how these blocks will be placed.

It is not enough to tell the designer to make the homepage of your site contain a logo, global and local navigation, breadcrumbs, search, banner ads, and text. We also need to inform the designer how these elements should be arranged relative to each other.

Figure 10. Working on the skeleton stage – page prototype.

Navigation is the main aspect of work at this stage. When arranging elements, it is important to pay attention to how the user will navigate the page.

The main rule: the navigation system must allow the user to easily navigate the site, and it must reflect the interrelationship between pages and interrelationship between a page and the navigation system itself. Simply put, navigation should answer the following user questions:

  • Where am I now?
  • How do I get to where I want?

Prototypes can have different levels of detail, depending on the complexity of the project. A page prototype gathers all layout solutions into a single document, which serves as a bridge between the earlier stages and the visual design of the site.

If you’re interested in more, read How To Create Masonry And CSS Hybrid Grid Layout

Stage 5: Surface (Design)

Now it’s time to figure out what is design and how it depends on the other previous web development stages. All the work carried out at the previous stages (strategy, scope, structure, and skeleton) consists of a formulation of constraints that will be transferred to the designer in the form of input data, requirements and wishes.

These constraints are precisely what allows the designer to do his job efficiently. It enables your website design to meet its objectives. Experienced designers, with one voice, say: “A good design is born only from constraints.”

Experts say that the best design samples emerge from stringent requirements and constraints. A designer who is given a specific field for creativity will create a really nice design, while a designer who is asked to do “something very nice” without constraints will end up doing something that is not effective, even for a huge fee.

You can create the best design for the website of an online store (e.g. selling woollen socks) featuring a shopping cart, blog, material and colour filters, and weekly updated foot-care articles, made in corporate colours. The design can show your company’s logo as effectively as possible. But you can’t create or even imagine the best website design without stringent requirements. After all, these constraints will at the same time serve as evaluation criteria.

It is for the sake of gathering requirements and constraints before rendering the layout that the web development process should be divided into five stages.

Let’s summarize

If you decide to use this web development technique, you must remember that you can’t move on to the next stage until the previous one has been completed. Each development stage – from strategy to skeleton – formulates constraints and input data for a web designer at the surface stage.

Such an approach allows a team leader to narrow down and articulate tasks for each specialist involved in the development process, and secure a result that brings the company closer to having a well-functioning site. If a single web designer is developing the site, this approach would enable him to create a fully-fledged site on his own, giving adequate consideration not only to the layout but also to customer needs.

So, design is simply a visualization of solutions within the framework of elements of user experience (adopted during the development process) in the first four stages. If the strategic objective of your site is to generate profit, if the user needs to buy woollen socks, then a good design should help you sell a lot of socks at a price favorable to you and reasonable for customers.

How to plan a sprint

Both developers and board members of companies like agile methodology thanks to the easy implementation of new features in a project and update of the product backlog. Agile helps teams to create a competitive and modern final product, adapting it to all the challenges of the modern market. When a new code is deployed every week or every two weeks, the software development process becomes more flexible and competitive.

Agile team collaborating during sprint planning

The process of estimating user stories from the product backlog or sprint backlog is one of the most contradictory issues in Agile practices. The product owner would certainly prefer backlog estimation in hours since he holds the answer to shareholders who prefer to deal with accurate and clear timeframes of a product or a particular stage.

Scrum helps us to use an iterative approach to software development, which allows adjusting the estimation time after each sprint and changing the order of tasks in the backlog to ensure product release within the deadline.

Break it down: decomposing user stories

After the Scrum team has received the user stories, they are often broken down into smaller tasks. If even after decomposition, the team finds a task too difficult to estimate or too large, another round of decomposition may be needed until the task becomes estimable. Each user story from the product backlog should be estimated prior to development.

Many Agile teams use the INVEST principle for decomposition of user stories. INVEST is an acronym that describes the characteristics of good user stories.

A user story should be:
Independent
Negotiable
Valuable
Estimable
Small
Testable

Sprint retrospective discussion

Independent means that the user story can be developed, tested and delivered even by itself.

Negotiable. A user story is not an explicit contract, but an area encompassing a variety of requirements that need to be discussed.

Valuable. Value is one of the most important elements of the INVEST principle. Each user story must deliver value to the user.

Estimable. A good user story should be estimable.

Small. User stories should be small because they need to be fitted comfortably within iterations.

Testable. In Agile, the entire code is testable, and therefore the story should be testable. If one cannot test a user story, it means that the story is too complicated.

If you’re interested in more, read Why Agile Is Not Only SCRUM

Estimating user stories: challenges

Each task needs to be estimated. The cornerstone of all the problems lies in the estimation methods. After all, the product owner and shareholders prefer estimates in hours. This helps them to better understand:

  • When the working prototype of the product will be ready.
  • When the new characteristics of the product will be made available to users.
  • When the new product will be ready for commercial release.

But developers estimating user stories may encounter problems when estimating in hours. For example, every developer works at his/her own speed, and estimates in hours may differ very much. After all, it is clear that a middle developer spends more time on a task than a senior developer. However, if a middle developer has performed such a task before, then, provided that the senior developer has not encountered such a task before, the middle developer will likely spend lesser time than his senior colleague.

Sprint backlog items on sticky notes

Whenever we talk about estimates, we refer to their accuracy. If an estimate is accurate, it very much helps in further development. But when the estimate is not accurate, the entire development process may be disrupted, which can then lead to failure to meet deadlines.

If your team practices Scrum, you must have seen from your own experience that estimates may differ significantly among different people. In estimation, people tend to rely on their own experience or colleagues’ experience. People also often try to either build a safety net by setting a deadline a little more than needed to make sure that the task is 100% delivered on time or, the other way round, name a shorter deadline in order to draw attention (e.g., the manager’s attention).

Scrum teams that are newly created or that have more than one new member may also experience difficulties during estimation. Sometimes, newcomers try so hard to make a good impression before all their team members to the extent that they underestimate a task. This may subsequently lead to disruption in sprint deadlines.

Till now, even Scrum evangelists still have no consensus on how best to estimate user stories – in story points or in hours. Some Scrum Alliance authors even claim that hours and story points reflect and measure different aspects of the development process. There is also the opinion that new members of a Scrum team may initially have difficulty with estimating user stories in story points since their very conception can be unclear. On the other hand, if the Scrum team is already well established, estimates in story points will help create a well-thought-out sprint backlog and deliver all the tasks in it within deadlines.

Most importantly, the Scrum master and product owner should have an excellent knowledge about the capabilities of their team members to convert estimates into story points to hours so as to present a report to the board of directors.

Determining the worth of a story point

The original purpose of any estimate is to determine the unit of measure, which will subsequently be used to compare all other user stories. While an hour is a more or less a clear unit, story points may seem complicated especially for those who have not handled them before.

The most common approach to determining the essence of story points is that all the Scrum team members agree on which task will be estimated in 1 story point (or 0 story points). This should be a one-piece small task that can no longer be decomposed into smaller tasks. Of course, it may take developers in the team different amounts of time to perform such task, but in general, the task should be recognized as the smallest task in the product backlog.

Also, some teams use 0 story points to determine a task that takes negligible time (for example, fixing a small bug in the layout). In this case, the Scrum team decides on how many microscopic tasks will make up 1 story point.

The next step will be to determine the scale for more complex tasks that take more time. Any number from 1 to 10, or a logarithmic scale or the Fibonacci sequence can be used. The last two are even better because values in them grow exponentially, thereby stimulating the division of large tasks or user stories into smaller ones. Also, for any scale, you need to determine which of its value would be the boundary – a task with such a number of story points must be divided into smaller tasks (it’s typically 16 story points for a logarithmic scale and 13 or 20 story points for the Fibonacci sequence).

The Fibonacci sequence is named after the scientist and mathematician who studied its laws. It is a sequence of numbers 1, 1, 2, 3, 5, 8, 13, 21, 34, 55…, where every number after the first two is the sum of the two preceding ones. The Fibonacci sequence is used to estimate user stories because it demonstrates exponential growth and all the numbers in this sequence differ relatively from each other. Thus, Fibonacci sequence is easy to use for comparison and difficult for counting.

Team planning sprint on whiteboard

With regards to the principles of estimating tasks in story points, Scrum teams usually take into account the following factors:

– Effort – how many hours are required to complete the task;

– Uncertainty – how clear, how will the task be performed, does any member of the Scrum team have a similar experience before;

– Complexity – whether this task is connected with other tasks in a user story if the task needs some kind of comprehensive solution.

Story points are used to measure the sprint scope by finding the average statistical sum of the estimated story points. For example, a user story that has been estimated at 3 story points is not equal to a simple sum of user stories that were estimated at 2 story points and 1 story point.

Steve Bockman’s estimation method

This is one of the easiest methods of estimating user stories, requirements, or tasks. You only need to create cards with a brief description of all the user stories (or tasks, if the user stories are too extensive) from the product backlog and sprint backlog. The description should be sufficient to ensure that each Scrum team member could understand exactly what kind of a user story is involved.

Then all the cards are collected in a pile. Each team member picks the top card off the pile and places it somewhere on the playing surface:

– If a card is placed on the left of a card that has already been estimated, it means that the user story on this card is relatively less complex than the user story on the already estimated card;

– If a card is placed on the right of a card that has already been estimated, it means that the user story on this card is relatively more complex than the user story on the already estimated card;

– If a card is placed underneath a card that has already been estimated, it means that the user story on this card is of equal complexity to the user story on the already estimated card.

Each member of the Scrum team then explains why he/she placed his/her card exactly on that spot. A member can also skip a move. If all the cards from the pile have been laid out, they can be moved, explaining why this is necessary.

When all have skipped their turn, the game ends.

At the end of the game, the cards can be estimated from the smallest to the highest. Estimates are then assigned in story points.

The main aim of this game is to explain the course of one’s thoughts to other team members and hear the views of others.

Planning poker

The Planning poker (also called Scrum poker) represents a more advanced version of estimating tasks or user stories.

Before you start playing, it is recommended to first decide on a set of values that will be used. Scrum teams usually use the Fibonacci sequence because it allows to clearly see the moment when a user story or task is too large and needs to be decomposed. After agreeing on a set of values, numbers from this set are printed out in the form of a card for each member of the Scrum team. Typically, the largest number in the set of cards is 13 or 20. This number serves as a signal that the user story cannot be estimated in the form in which it is, but needs to be decomposed.

Agile sprint planning session in progress

During Planning poker session, each member receives a set of cards. The product owner describes the user story and answers questions from other members of the team. Each member estimates this user story, chooses the appropriate card, and places it face down. At the command of the product owner, all the members show their cards simultaneously. If the values in the cards differ significantly, then the team discusses the user story in more detail and then conducts another round of estimation.

Planning poker is a simple and easy way to obtain estimates of user stories from the sprint backlog or product backlog.

Fruit poker

This is a new upgraded version of planning poker. This game has exactly the same rules as in planning poker. The only difference is that fruits are used instead of numbers. Cherry is used as the smallest task, strawberries as a small task, kiwifruit as a medium task, orange as an above-average task, grapefruit as a big task and watermelon as a large and complex task that requires decomposition. Some Scrum teams also use a card called a “fruit salad” to refer to tasks that are too complex to estimate and require decomposition.

Sprint review meeting with team

Why do we need Fruit poker?

  1. This simple technique helps a Scrum team to fully concentrate on task comparison, rather than common estimation by counting.
  2. This technique is very helpful to newly-created Scrum teams.
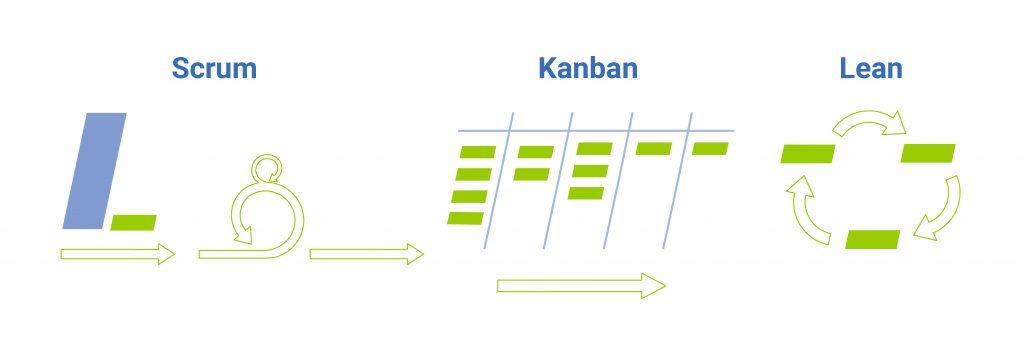

  3. Helps those teams composed of new members who have never worked with Scrum before.

Since planning poker involves the use of numeric values, developers with no Scrum experience may encounter problems when estimating user stories. For example, they may attempt to somehow calculate the “correct” estimate based on the values of the cards of other members of the team or based on previous estimates.

Fruit poker, on the other hand, offers a quick and informal way of comparing tasks. Yes, the developer team may within themselves agree that a “Cherry” task requires from one to three hours approximately and a “Grapefruit” task requires from forty to one hundred hours of work, and thus establish some kind of value for comparisons. And that’s it.

Conclusions

Clear and accurate estimates of time and effort in most cases are not the main purpose of implementing Scrum methodology. They are often a pleasant by-product of such implementation. When estimation of user stories is simple and engaging, the Scrum team has all the chances of obtaining accurate estimates, which the product owner can then translate into hours and working days.

Scrum team members usually determine by themselves how they will estimate user stories. Since engagement is one of the core values of Scrum, the team in most cases will work out the most convenient way of estimating user tasks in practice – whether in story points or in hours, whether they will be obtained via Planning poker or Fruit poker. There is no perfect or universally recommended method of estimating user stories. Each Scrum team may find a method that suits it most.

Anna Vasilevskaya
AI modified real photo
Anna Vasilevskaya
Account Executive

Get in touch

Drop us a line about your project at
[email protected] or via the contact
form below, and we will contact you soon.